Iduino Yun Cloud
Introduction
OverView
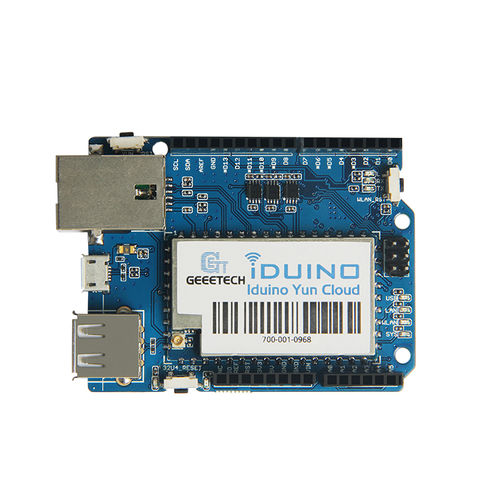
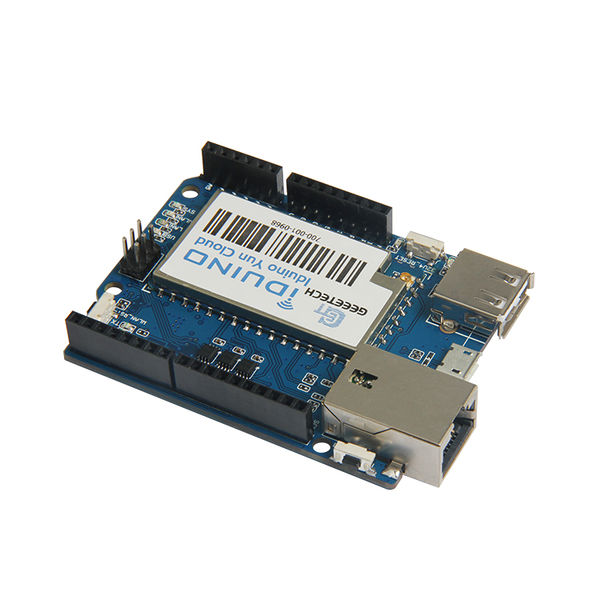
Iduino Yun is a ideal IoT device for Internet of Things projetcs. It is a compatible / replacement product for Arduino Yun. It works with Arduino IDE with version higher than 1.5.4.
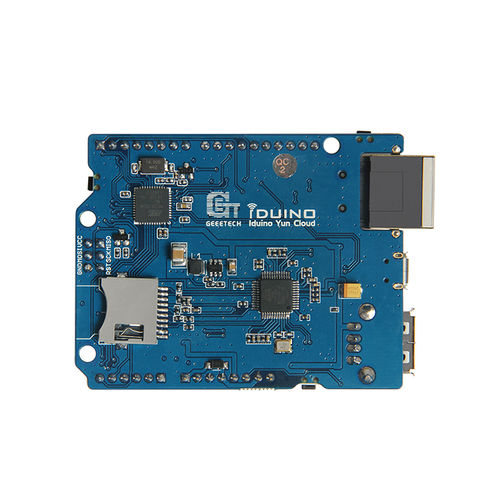
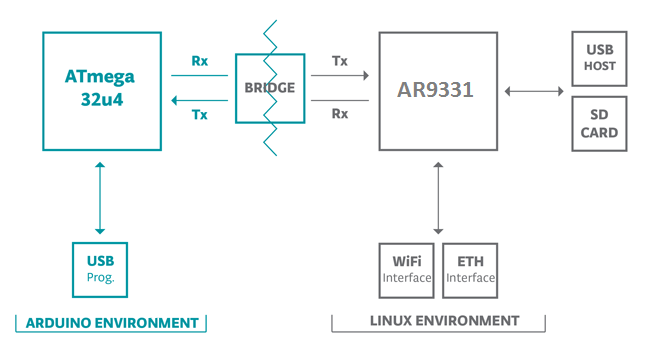
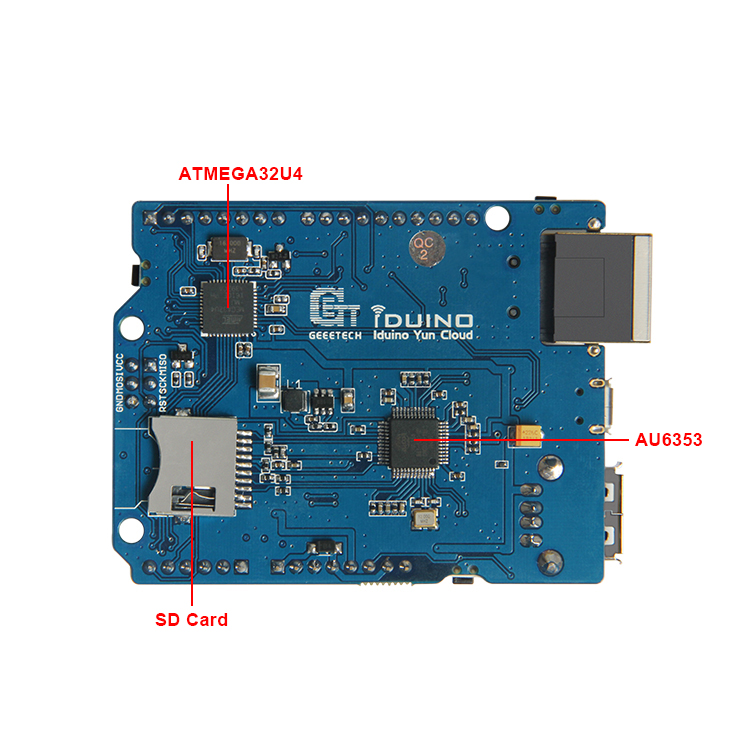
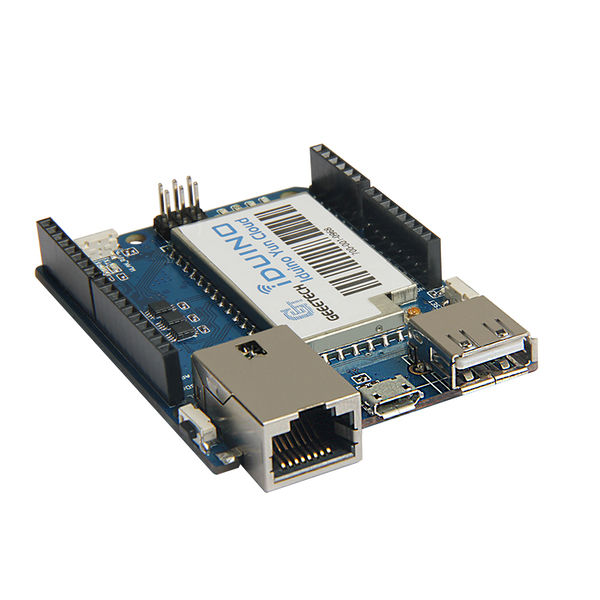
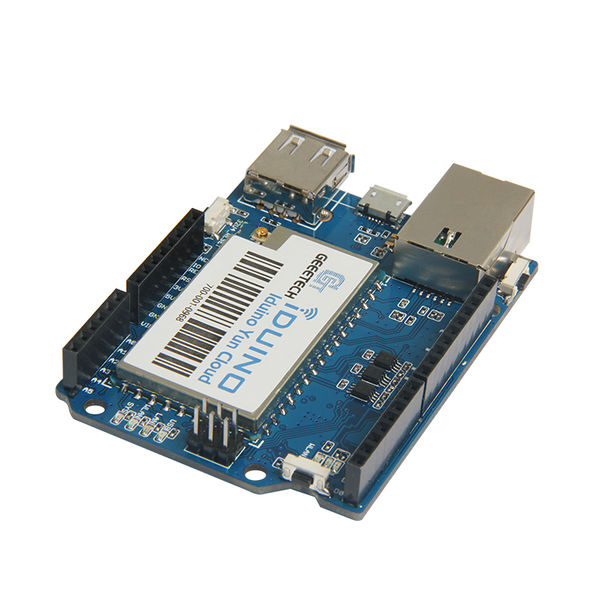
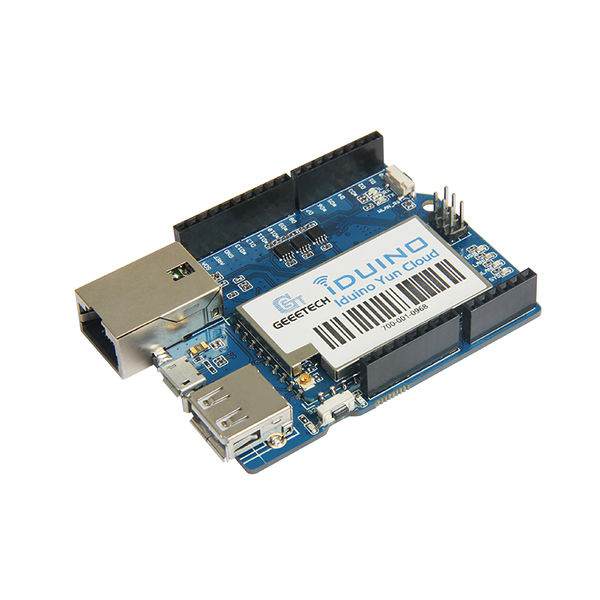
The Iduino Yun is a microcontroller board based on the ATmega32u4 and the Atheros AR9331. The Atheros processor supports a Linux distribution based on OpenWrt named OpenWrt-Yun. The board has built-in Ethernet and WiFi support, a USB-A port, micro-SD card slot, 20 digital input/output pins (of which 7 can be used as PWM outputs and 12 as analog inputs), a 16 MHz crystal oscillator, a micro USB connection, an ICSP header, and a 3 reset buttons.
The Iduino Yun is similar to the Arduino Leonardo in that the ATmega32u4 has built-in USB communication, eliminating the need for a secondary processor. This allows the Yun to appear to a connected computer as a mouse and keyboard, in addition to a virtual (CDC) serial / COM port.
The Bridge library facilitates communication between the two processors, giving Arduino sketches the ability to run shell scripts, communicate with network interfaces, and receive information from the AR9331 processor. The USB host, network interfaces and SD card are not connected to the 32U4, but the AR9331, and the Bridge library also enables the Arduino to interface with those peripherals.
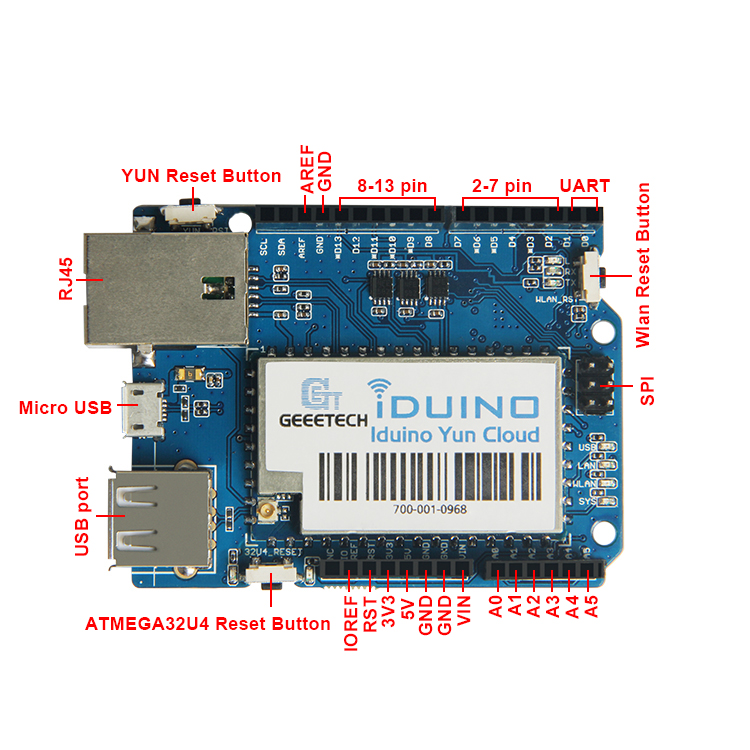
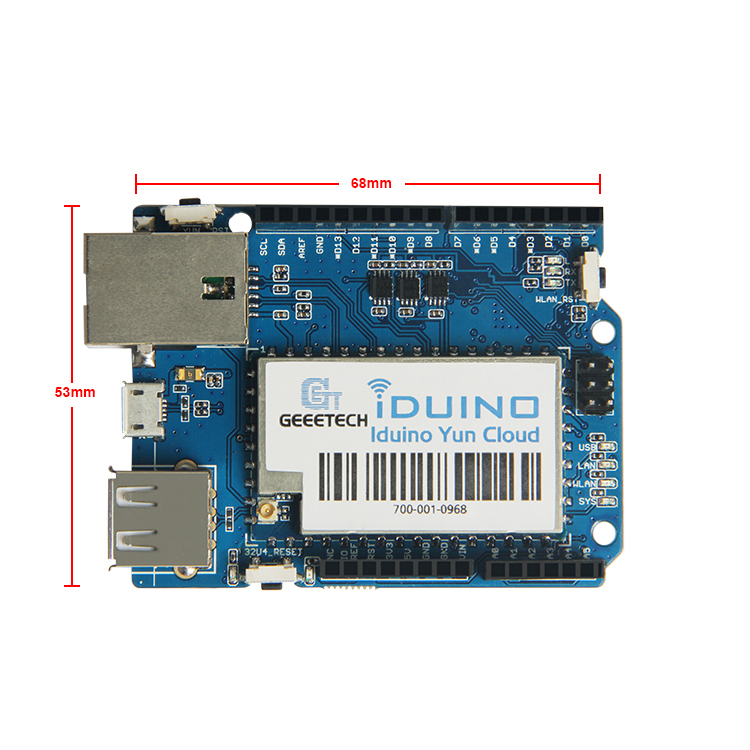
Interface explanation
Features
- Open source Linux (OpenWrt) onboard
- Compatible with Arduino IDE 1.5.4 or later, user can program, debug or upload sketches to the Arduino board via the Arduino IDE.
- Managed by Web GUI, SSH via LAN or WiFi
- Software upgradable via network
- Built-in web server
- Supports internet connection via LAN port, WiFi or 3G dongle.
- Supports USB flash to provide storage for Arduino projects.
- Failsafe design provides robust system.
Specifications
AVR Arduino microcontroller
- Microcontroller ATmega32U4
- Operating Voltage 5V
- Input Voltage 5
- Digital I/O Pins 20
- PWM Channels 7
- Analog Input Pins 12
- DC Current per I/O Pin 40 mA
- DC Current for 3.3V Pin 50 mA
- Flash Memory 32 KB (of which 4 KB used by bootloader)
- SRAM 2.5 KB
- EEPROM 1 KB
- Clock Speed 16 MHz
Linux Microprocessor
- Processor Atheros AR9331
- Architecture MIPS @400MHz
- Operating Voltage 3.3V
- Ethernet IEEE 802.3 10/100Mbit/s
- WiFi IEEE 802.11b/g/n
- USB Type-A 2.0 Host
- Card Reader Micro-SD only
- RAM 64 MB DDR2
- Flash Memory 16 MB
WiFi Specification
- WiFi: Support 150M 2.4Ghz WiFi, 802.11 b/g/n
- Frequency range: 2.4~2.4835GHz
- Modulation: BPSK, QPSK, CCK and OFDM (BPSK/QPSK/16-QAM/ 64-QAM)
- Sensitivity @PER: 135M : -65dBm@10%PER; 65M : -65dBm@10%PER; 54M : -68dBm@10%PER;
11M : -84dBm@8% PER; 6M : -88dBm@10% PER; 1M : -90dBm@8% PER
- Typical Distance: Indoor: 60m (max); Outdoor 150m (max) (with 2 dBi antenna)
- RF Power: 11n: 13dBm; 11g: 13-15dBm, 11b: 16-18dBm,
- Connector: I-PEX connector.
USB Ports
The Iduino Yun Cloud has two USB connectors for different purpose:
- USB Type A Female: Connect to the Linux part. it is a USB host port. User can use it to connect to USB flash, 3G dongle etc.
- USB micro A Female: Connect to Atmega32u4, use can use it to upload sketch to Atmega32u4 or get debug info from 32u4.
Buttons:
- WLAN_RESET: Reset Linux part.see here
- 32u4_RSET: Reboot Atmega32u4
- YUN_RST: Reboot Linux part
Dimentions and weight
Net weight: 110g
Quick Start of Iduino Yun
This chapter shows how to run the first sketch of Iduino Yun.
Connect to Iduino Yun
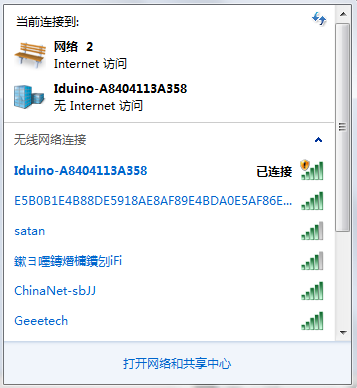
Power on Iduino Yun, after the system runs, it will generate a WiFi network with SSID : I duino-A84041XXXXXX.
Use your PC to connect to this unsecure WiFi netowrk. Your PC will get DHCP from Yun. Your PC will get an IP 192.168.240.x and the Iduino Yun will have the IP 192.168.240.1
Open Arduino IDE and configure right Profile
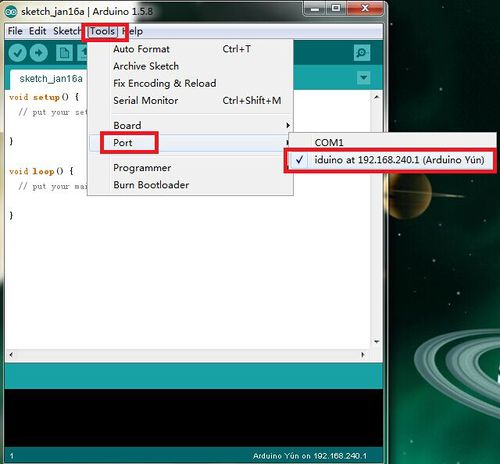
Open Arduino IDE and choose the profile Tools --> Boards --> Arduino Yun. Choose the ports to "Iduino at 192.168.240.1"
Upload Bridge example
This example for the Arduino Yun shows how to use the Bridge library to access the digital and analog pins on the board through REST calls. It demonstrates how you can create your own API when using REST style calls through the browser.
Possible commands created in this shetch:
 "YUNs_IP/arduino/digital/13"     -> digitalRead(13)
 "YUNs_IP/arduino/digital/13/1"   -> digitalWrite(13, HIGH)
 "YUNs_IP/arduino/analog/2/123"   -> analogWrite(2, 123)
 "YUNs_IP/arduino/analog/2"       -> analogRead(2)
 "YUNs_IP/arduino/mode/13/input"  -> pinMode(13, INPUT)
 "YUNs_IP/arduino/mode/13/output" -> pinMode(13, OUTPUT)
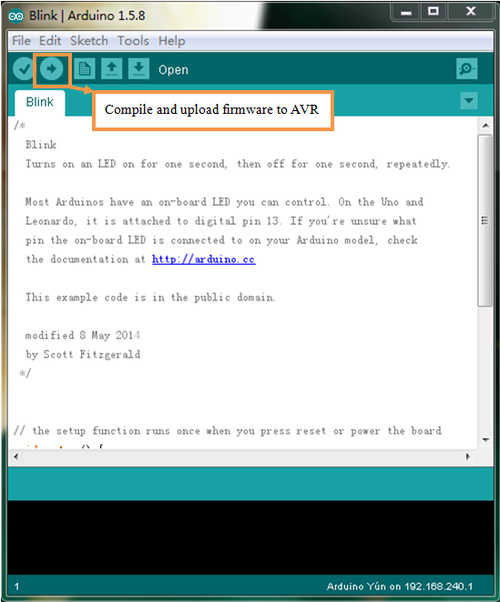
In Arduino IDE, Select example File-->Examples-->Bridge-->Bridge . Click Upload , Arduino IDE will compile this example and upload to Yun. During the upload, Arduino IDE will pop up a window for asking the password. type password iduino here. and continue upload.
Test the sketch
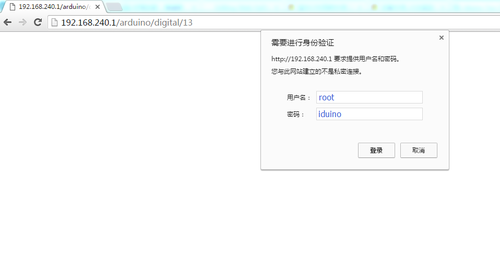
After upload, user can open the web broswer and use it to Read/Write the I/Os of Yun.
Notice: Yun will ask for password at the first connect via Web. The user name is root and password is iduino.
more info about this sketch please refer this link: Explain of Bridge Example
User Manual
This chapter introduce more detail for the use of Iduino Yun. Iduino Yun is compatible/replacement of Arduino Yun, user can also see the Arduino Yun manual for reference.
Getting IP address
There is a Wifi interface a LAN port on the Iduino Yun. And they both have an IP address for network connecting and device management.
Factory IP of Wifi port
At the first boot of Iduino Yun, an unsecure Wifi network called Iduino-xxxxxx will automatically generate. Users can use their laptop to connect to this Wifi network and the laptop will get an IP 192.168.240.xxx. The default IP of Iduino_Yun_Shield is 192.168.240.1.
FallBack IP
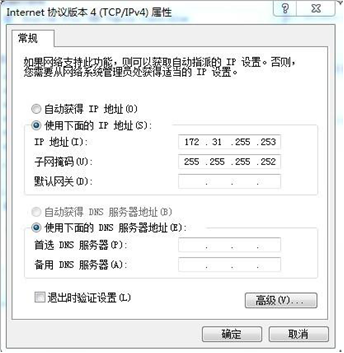
The LAN port of Iduino_Yun_Shield distributes a Fall Back IP
- 172.31.255.254/255.255.255.252
If the user’s laptop IP is
- 172.31.255.253/255.255.255.252
Then you can access Yun Shield by Fall Back IP.
Detect IP from Arduino IDE
If the Ethernet port of Iduino Yun is connected to Uplink Router or Wifi Router, the PC in the same network can use Arduino IDE to detect the IP of Iduino Yun.
Access Method
The Iduino Yun Shield runs Open Source Linux System. If you have a PC which is in the same network with Iduino Yun, you can access its system by Web or Secure Shell (SSH).
Webpage access
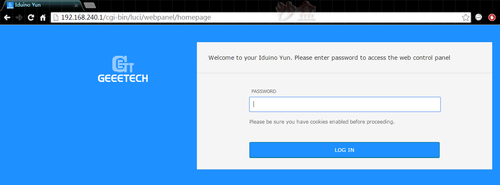
Use browser (recommend Firefox or Chrome) to set Iduino Yun, and you will see login page after entering 192.168.240.1.
Default password for Iduino Yun is ‘iduino’.
SSH Access
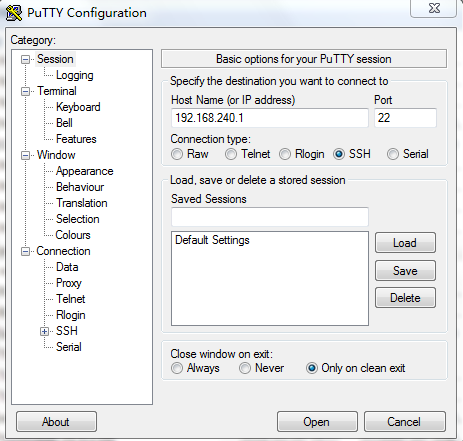
By SSH Access, users can enter Linux system directory and customize more functions as well as applications.
SSH Access:
- IP address: IP address of Iduino_Yun_Shield
- Port: 22
- User Name: root
- Password: iduino (default)
Webpage Setting
General setting
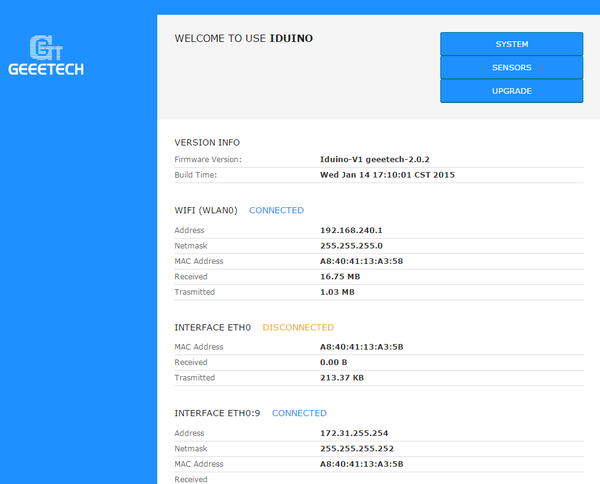
After login, the GUI will show the WIFI/ETH status.
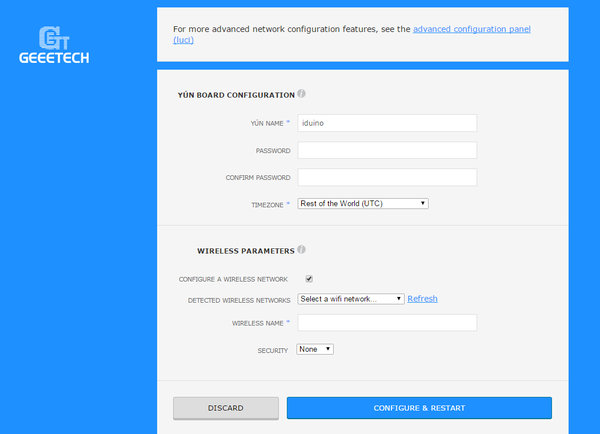
Click the SYSTEM button, and you can set the device password and parameter.
Upgrade
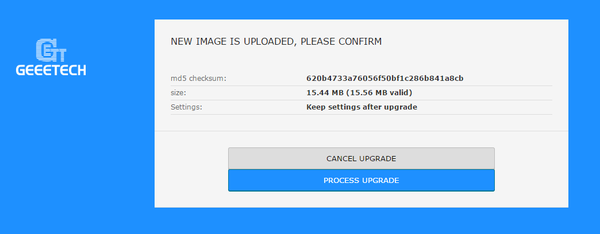
You can repair bug, upgrade system, and add new function by upgrading Iduino Yun firmware through GUI. Turn to page of GUI→Upgrade and choose correct firmware. The firmware used for webpage upgrade should be Sysupgrade Type, and you can decide to save setting or not after upgrade.
Usually, it takes 2 minutes to upgrade firmware. The Iduino Yun will restart automatically and all the LEDs will blink together.
FAQ
1 How to set up /www/sd and mnt/sd?
The way to use /www/sd and /mnt/sd is as the same as Arduino Yun. User can prepare a USB flash and create directory /arduino and /arduino/www at the root of USB flash. Then input the USB flash into the Iduino_Yun_Shield and it will automatically create directory /www/sd and /mnt/sd, which link to /arduino and /arduino/www.
2 What if Arduino IDE doesn’t detect Iduino Yun Shield?
You can check the below issues:
- Whether the Arduino version is 1.5.4 or later;
- Whether you PC is in the same network with the Iduino_Yun_Shield;
- If the Iduino Yun boots in advance than Arduino IDE, this situation may happen. So try to reboot the Iduino Yun and check again.
3 Where can you find the source code of the Iduino Yun?
The source code can be found at https://github.com/dragino/openwrt-yun
4 How to upload, download or edit the files in Iduino Yun?
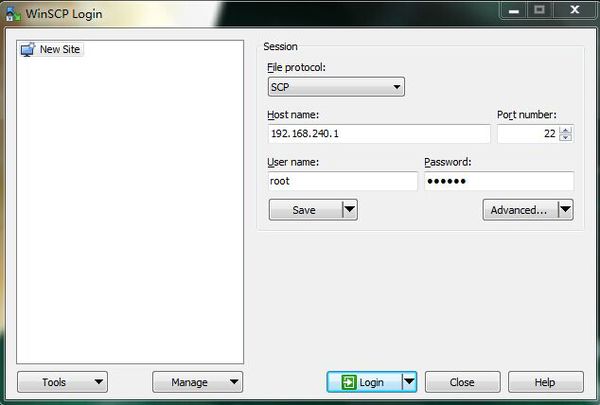
Iduino Yun has a built-in Linux system and supports SCP protocol. You can download or edit the Linux files using SCP tools. In Windows OS, the SCP tool is winscp. Install it and log into SCP as below:
- Host name: The IP address of Iduino_Yun_Shield
- User name: root
- Password: iduino (default)
- Protocol: SCP
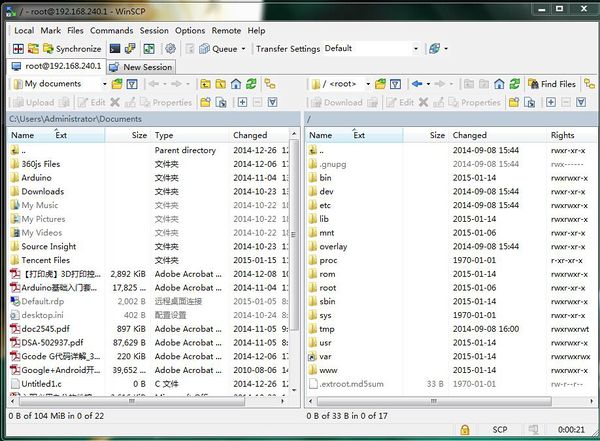
There will be 2 warnings during login and just ignore it. After login, a management panel will appear.
The left part of this panel is your PC’s directories and the right part is the directories of Iduino Yun. You can upload/download files by dragging, or double click the file to edit its content.
5 How to reset Iduino Yun?
Iduino Yun has a WLAN_RESET which can be used for reset. You can press the WLAN_RESET to reset the running Iduino Yun.
- If pressing the WLAN_RESET and release after 5 seconds, it will reset the Wifi setting and other settings will be kept.
- If pressing the WLAN_RESET and release after 30 seconds, it will reset all the settings to factory default.
6 How to recover the Iduino Yun in case firmware crash?
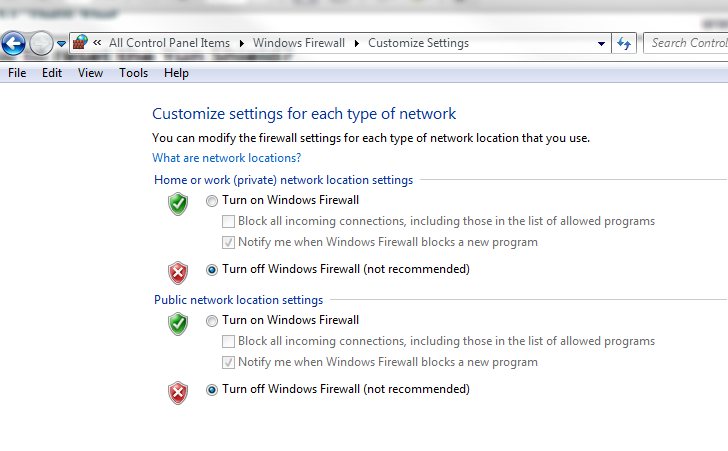
There are some cases that the Iduino Yun fails to boot. For example, upgrade an improper firmware or lost power during upgrade. But you are still able to recover the Iduino Yun by using the U-boot of IduinoYun. An instruction in Windows is shown as below:
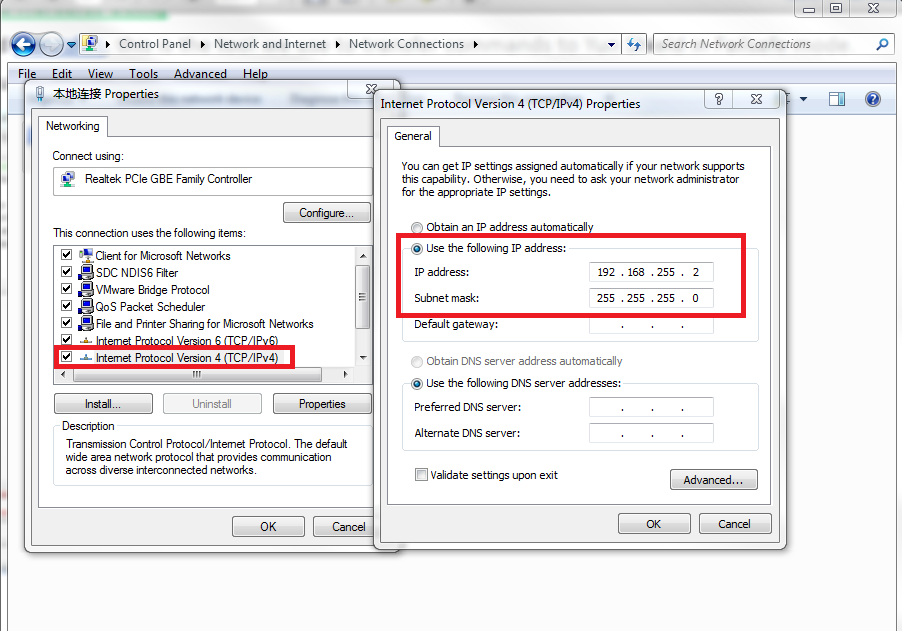
2.Set IP address as "192.168.255.2", Subnet mask: 255.255.255.0
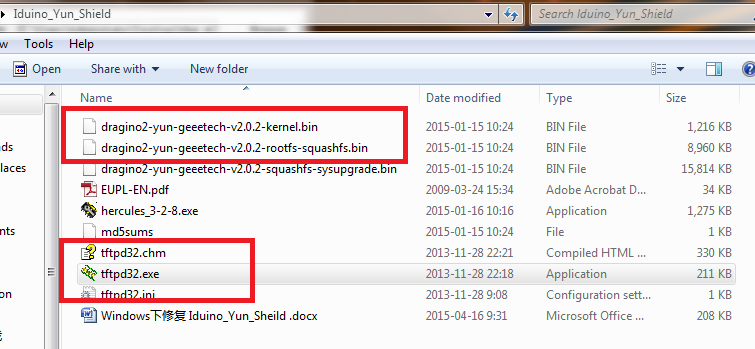
3. You need firmwares called "kernel" and "root-squash", put the firmwares and "tftpd32.exe" in same folder.
4.Connect Iduino Yun Shield to computer via cable. Power Iduino Yun Shield with 9V of DC.
5.Set TPFP service:
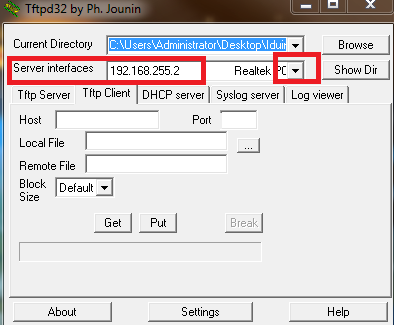
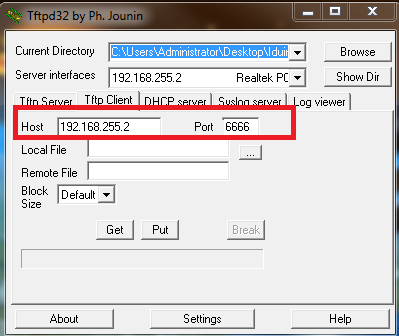
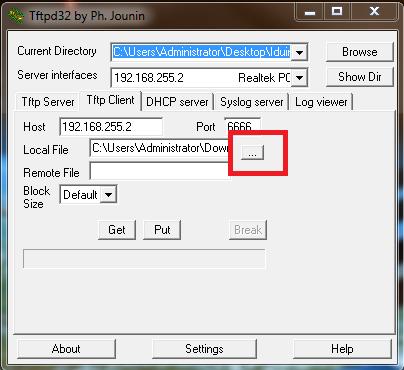
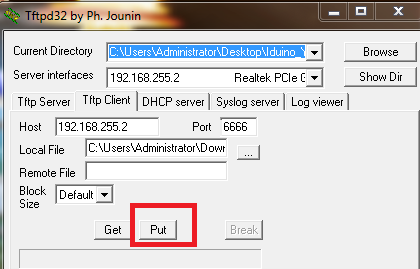
- (1)Open "tftpd32.exe", Choose "192.168.255.2" in "Service interfaces".
- (2)Host: 192.168.255.2
- Port:6666
- Port:6666
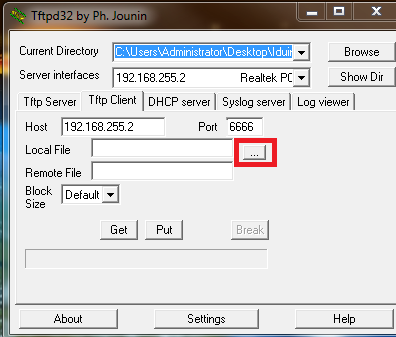
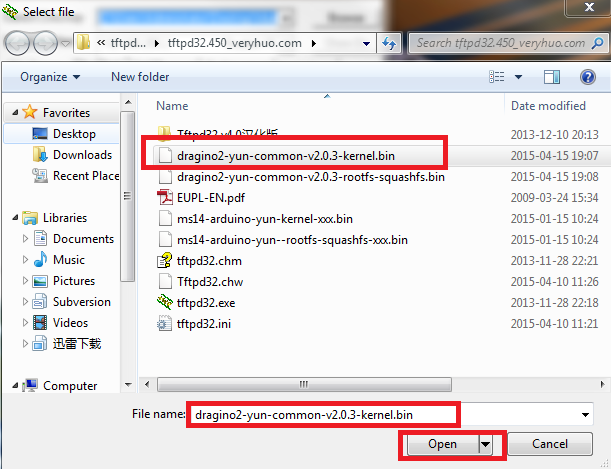
- (3)Choose file "kernel" in "Local File".
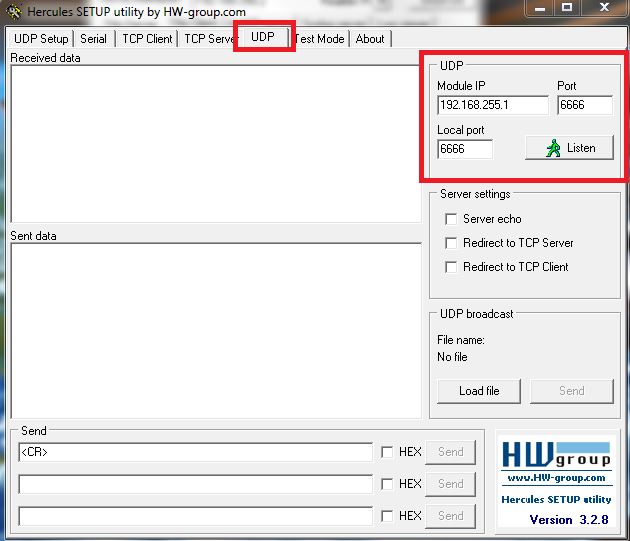
6.Open "hercules_3-2-8.exe", set the following parameters in UDP board:
- Module IP: 192.168.255.1
- Port: 6666
- Local Port: 6666
7.Back to tftpd32, click "Put":
8.After clicking "Put", you can see "kernel" displayed in "Received data" on Hercule.
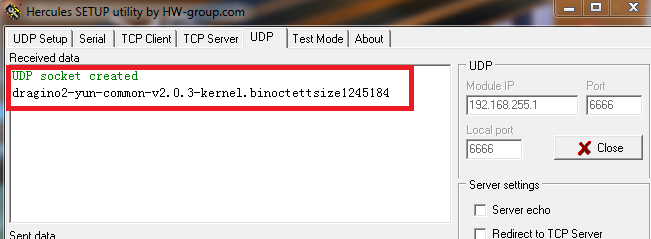
9.Access "Failsafe" mode: Disconnect the power supply for Iduino Yun Shield, keep pressing button "Failsafe". Then power Iduino Yun Shield again, you will see the LEDs of LAN,WLAN and SYS blinking at the same time. When these LEDs stop blinking, release "Failsafe".
10.Send printenv<CR> command on Hercules. "Received data" will display some information from Iduino Yun Shield as follow, if not, re-send printenv<CR>
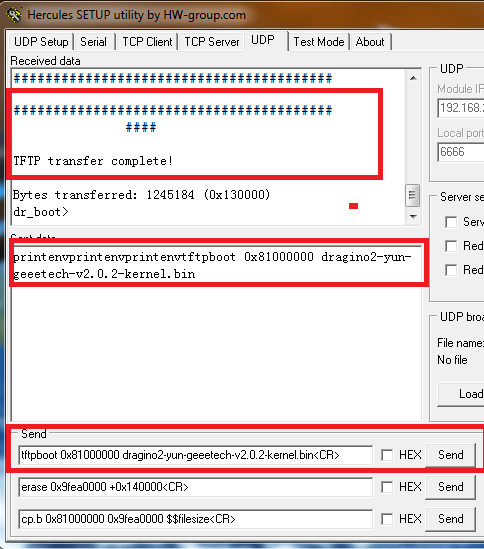
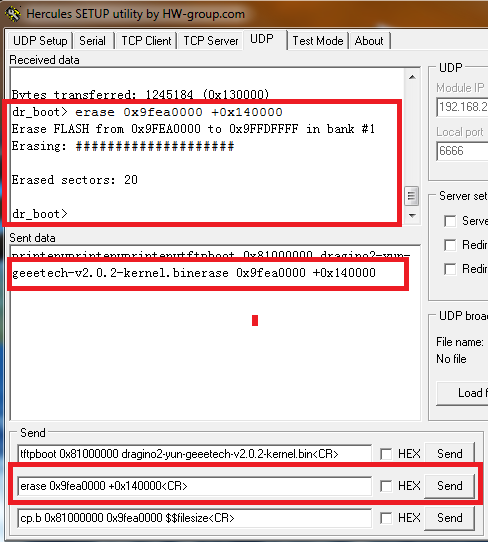
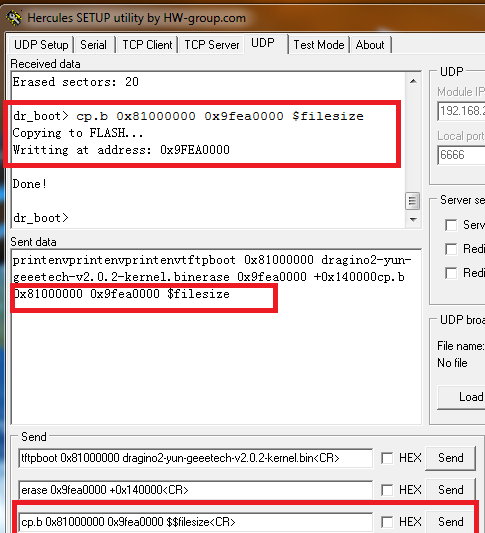
11.Send the following commands in order, to upgrade kernel:
tftpboot 0x81000000 dragino2-yun-geeetech-v2.0.2-kernel.bin<CR>
erase 0x9fea0000 +0x140000<CR>
cp.b 0x81000000 0x9fea0000 $$filesize<CR>
12.Disconnect the power supply for Iduino Yun Shield, and back to tftpd32, click "Break":
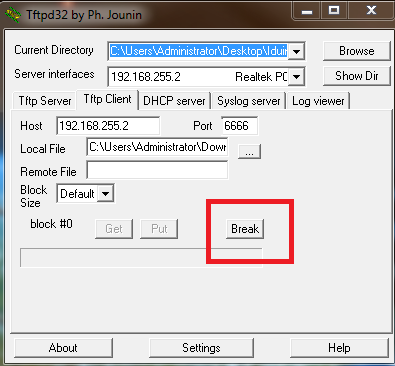
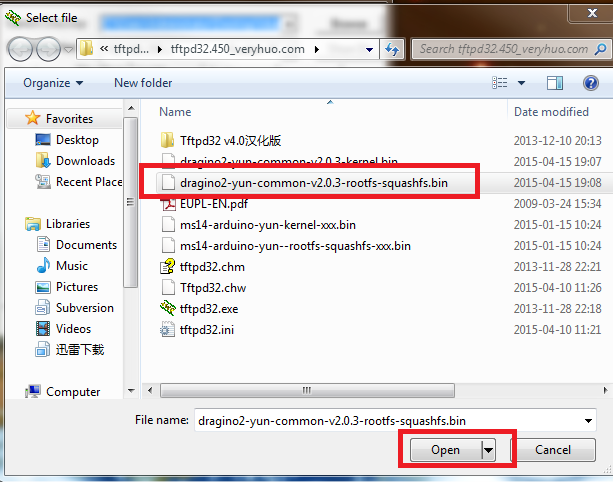
15.Click "Put" to send file to Hercules.
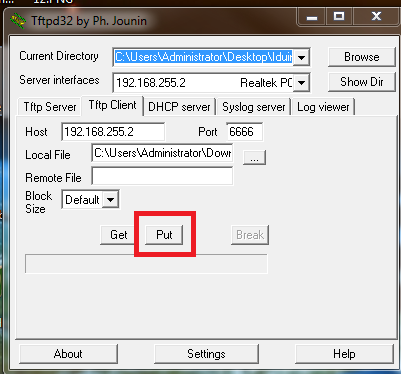
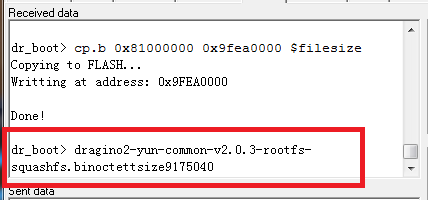
16. Keep pressing "Failsafe" button on Iduino Yun Shield, power Iduino Yun Shield again, you will see LEDs of LAN,WLAN and SYS blinking at the same time. When they stop blinking, release "Failsafe" button. Iduino Yun Shield is in Failsafe mode now.
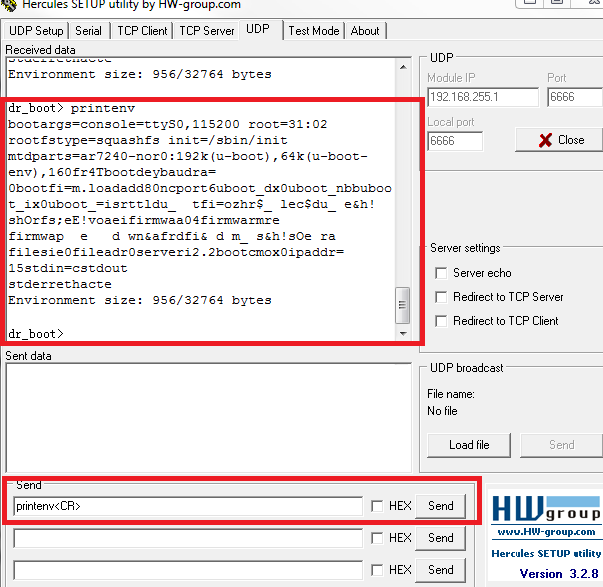
17.Send printenv<CR> command on Hercules. "Received data" will display some information from Iduino Yun Shield as follow, if not, re-send printenv<CR>
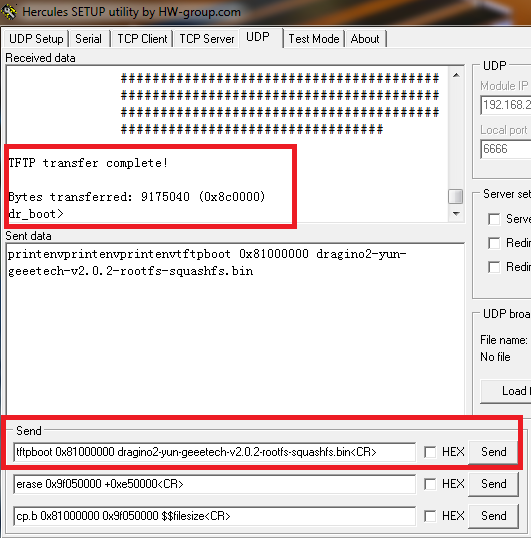
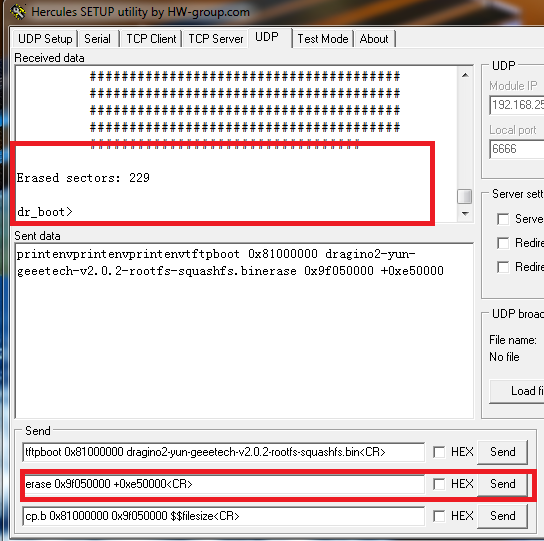
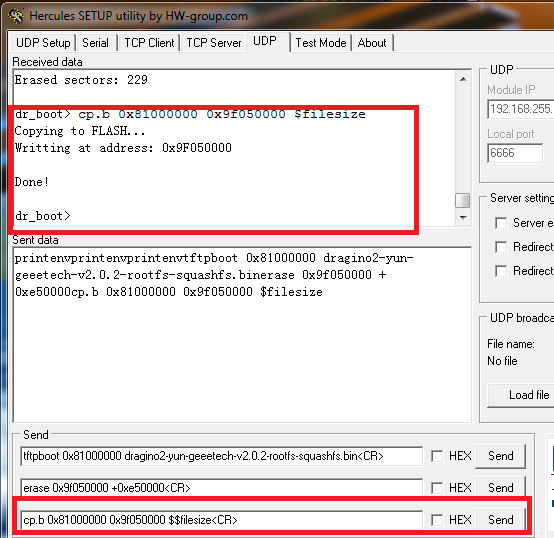
18.Send the following commands to upgrade rootfs:
tftpboot 0x81000000 dragino2-yun-geeetech-v2.0.2-rootfs-squashfs.bin<CR>
erase 0x9f050000 +0xe50000<CR>
cp.b 0x81000000 0x9f050000 $$filesize<CR>
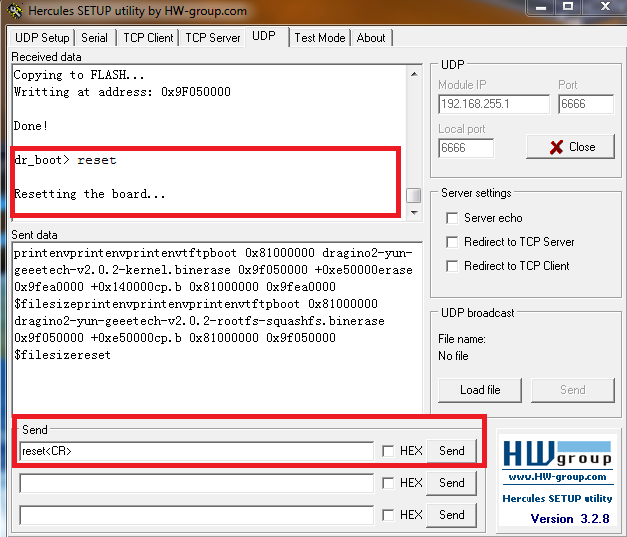
19.Send the following command to reset Iduino Yun Shield.
reset<CR>
Relevant file:
http://www.geeetech.com/wiki/images/4/41/How_to_recover_Iduino_Yun_Shield.rar
- Warning:
1. User should use correct address in the erase and cp.b. Wrong address may destroy the boot-loader of Iduino Yun and the device won’t boot anymore, or destroy the radio data leading to a poor Wifi performance or incorrect MAC address.
2. Recover in Linux is similar with Windows. The different is that the tool used in Linux is nc, namely nc-kul6666. The figure below shows that the Iduino_Yun_Shield has been in Failsafe mode and detected by nc.
[[File:Reset firmware.png|reset firmware]
