Iduino Yun Shield
Introduction
Iduino_Yun_Shield, an extremely powerful development for Arduino board, is designed to solve the problems of connection and storage which exist in the Arduino board. Iduino_Yun_Shield runs Open Source OpenWrt System (Same system as runs in Arduino Yun) and it is fully compatible with Arduino IDE V1.5.4 or later versions. Yun Shield is an ideal choice for Arduino Projects which require various internet connections and more storage.
Actually, Iduino_Yun_Shield is equal to the official Arduino Yun, but Iduino_Yun_Shield is more flexible because it can work with other Arduino board such as Uno, Duemilanove, and Mega etc. Iduino_Yun_Shield uses external antenna which provides stable connection under various environments.
The Iduino Yun is the core module of Iduino_Yun_Shield. And it requires 200mA current when in full load, so it is powered by the Arduino VIN pins to avoid overheated in the Arduino onboard 5V LD0.
Features
- Open source Linux system (OpenWrt) inside
- Low power consumption
- Compatible with Arduino IDE 1.5.4 or later versions. Users can program, debug or upload Sketch to Arduino board
- Managed by Web GUI, SSH via LAN or Wifi
- Software upgradable via network
- Support internet connection via LAN port, Wifi or 3G dongle
- Support USB flash to provide storage for Arduino projects
- Reliable design provides robust system
- Compatible with Arduino Leonardo, Uno, Duemilanove, Diecimila and Mega
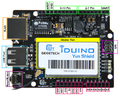
Overview and Hard ware Resources

front side 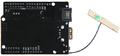
back side


1. Processor: 400MHz, 24 MIPS
2. Flash: 16MB
3. RAM: 64MB
4. Power input: 4.75V~23V via Arduino Vin pin
5. 1×10M/100M RJ45
6. Connector 150M Wifi 802.11 b/g/n
7. External antenna via I-Pex
8. 1×USB port for USB storage or 3G connection
9. 1×Reset button
10. Compatible with 3.3V or 5V I/O Arduino
Size: 70mm * 53mm*24mm
Weight: 33.2g
Software Resource
Compiling environment: Arduino IDE 1.5.4 or later version
Source
The Open Source hardware of Iduino_Yun_Shield: https://github.com/dragino/modules/tree/master/hardware/YunShield
The Open Source code of Iduino_Yun_Shield: https://github.com/dragino/linino
The official webpage of Arduino Yun Bridge: http://arduino.cc/en/Reference/YunBridgeLibrary
The official forum of Arduino Yun http://forum.arduino.cc/index.php?board=93.0
Interface
Interface layout
Interface layout 
wireframe


Interface specifications
- RJ45, Wifi, USB port and Failsafe are connected to the Iduino Yun module directly, and the Iduino Yun module uses SPI and UART to communicate with Arduino board
- The SPI interface is used to upload the sketch coming from the Arduino IDE. SPI interface connects to Iduino Yun only in the upload time, so the Arduino SPI can still be used to connect to the other slave devices.
- The pins of two sides are respectively connected to the corresponding pins of Arduino
How to set up Iduino_Yun_Shield
Getting IP address
There is a Wifi interface a LAN port on the Iduino_Yun_Shield. And they both have an IP address for network connecting and device management.
Factory IP of Wifi port

At the first boot of Iduino_Yun_Shield, an unsecure Wifi network called Iduino-xxxxxx will automatically generate. Users can use their laptop to connect to this Wifi network and the laptop will get an IP 192.168.240.xxx. The default IP of Iduino_Yun_Shield is 192.168.240.1.
FallBack IP

Allocation pattern
The Iduino_Yun_Shield runs Open Source Linux System. If you have a PC which is in the same network with Iduino_Yun_Shield, you can access its system by Web or Secure Shell (SSH).
Webpage access
Use browser (recommend Firefox or Chrome) to set Iduino_Yun_Shield, and you will see login page after entering 192.168.240.1.

Default password for Iduino_Yun_Shield is ‘iduino’.
SSH Access
By SSH Access, users can enter Linux system directory and customize more functions as well as applications.

SSH Access:
- IP address: IP address of Iduino_Yun_Shield
- Port: 22
- User Name: root
- Password: iduino (default)
Webpage Setting
General setting
After login, the GUI will show the WIFI/ETH status.

Click the SYSTEM button, and you can set the device password and parameter.

Settings of Iduino
Click SENSORS button and enter the settings relate to Iduino

Arduino board Type: Define the setting of bootloader/mcu type/fuse during Sketch uploading Operation Mode: Make sure the mode is Arduino Bridge mode so that the Bridge class can work
Upgrade
You can repair bug, upgrade system, and add new function by upgrading Iduino_Yun_Shield firmware through GUI. Turn to page of GUI→Upgrade and choose correct firmware. The firmware used for webpage upgrade should be Sysupgrade Type, and you can decide to save setting or not after upgrade.


Usually, it takes 2 minutes to upgrade firmware. The Iduino_Yun_Shield will restart automatically and all the LEDs will blink together.
Use with Arduino Board
The Iduino_Yun_Shield uses SPI for uploading sketch and uses UART port for Bridge class to talk to the AVR. While connecting Iduino_Yun_Shield to Arduino board, below points should be checked:
1.Whether the Arduino board is powered by DC jack;
2.If the board type setting is correct in the Iduino_Yun_Shield;
3.If the board type setting is correct in the Arduino IDE;
4.Whether the Arduino SPI and UART is not influenced by other hardware
5.Make sure the UART mode is in Arduino Bridge.
Connect to Arduino Board
Connect to Leonardo
As is shown in the follow figure, simply plug the Iduino_Yun_Shield on the top of Leonardo, and power the Leonardo via DC jack

In Arduino IDE, the board type selected should be Arduino Yun.
Connect to Arduino Uno
1) In Uno, the UART connection between mega328P and mega16u2 will influence the Bridge feature with Iduino_Yun_Shield. So we have to disconnect it by setting the mege16u2 into reset mode, as below:

Note: USB upgrade/debug won’t work after this change. User must upgrade/debug via Arduino IDE via Wifi.
2) Add board type in the file: Arduino\hardware\arduino\avr\board.txt, as below, and reopen the Arduino IDE:
unoyun.name=Arduino Uno --Iduino Yún
unoyun.upload.via_ssh=true
unoyun.vid.0=0x2341
unoyun.pid.0=0x0043
unoyun.vid.1=0x2341
unoyun.pid.1=0x0001
unoyun.upload.tool=avrdude
unoyun.upload.protocol=arduino
unoyun.upload.maximum_size=32256
unoyun.upload.maximum_data_size=2048
unoyun.upload.speed=57600
unoyun.upload.disable_flushing=true
unoyun.upload.use_1200bps_touch=true
unoyun.upload.wait_for_upload_port=true
unoyun.bootloader.tool=avrdude
unoyun.bootloader.low_fuses=0xff
unoyun.bootloader.high_fuses=0xde
unoyun.bootloader.extended_fuses=0x05
unoyun.bootloader.file=optiboot/optiboot_atmega328.hex
unoyun.bootloader.unlock_bits=0x3F
unoyun.bootloader.lock_bits=0x0F
unoyun.build.mcu=atmega328p
unoyun.build.f_cpu=16000000L
unoyun.build.board=AVR_YUN
unoyun.build.core=arduino
unoyun.build.variant=standard