Raspberry Pi Camera Module
Introduction
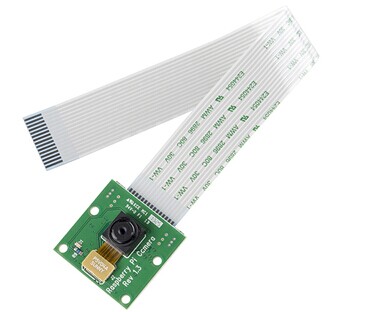
This camera module is capable of 1080p video and still images, the size as around 25 x 20 x 9 (mm). It can be directly connected to your Raspberry Pi by CSI. The CSI is designed especially for the camera. The lens of the module is replaceable so that it is convenient to replace to make sure getting highest quality image for the user. The sensor has a native resolution of 5 megapixel and a fixed focus lens onboard. In terms of still images, the camera is capable of 2592 x 1944 pixels, and supports 1080p30, 720p60 and 640x480p60/90.
Features
- 5MP sensor
- Wider image, capable of 2592x1944 stills, 1080p30 video
- 1080p video supported
- CSI
- Size: 25 x 20 x 9 mm
Connect to the camera
- The flex cable inserts into the connector situated between the Ethernet and HDMI ports, with the silver connectors facing the HDMI port. The flex cable connector should be opened by pulling the tabs on the top of the connector upwards then towards the Ethernet port. The flex cable should be inserted firmly into the connector, with care taken not to bend the flex at too acute an angle. The top part of the connector should then be pushed towards the HDMI connector and down, while the flex cable is held in place.
- Update the SD card
In order to use the camera you must be using a recent operating system that knows that the camera exists. The easiest way to do this is to grab the latest Raspbian image from the RaspberryPi.org site and create a fresh SD card.
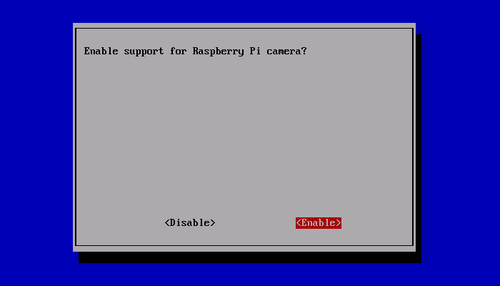
- Enable camera in raspi-config settings
Reboot. If you are using a fresh image the raspi-config utility should load. If it doesn’t then you can run it manually using : sudo raspi-config Sekect the “Camera” option and press “Enter”.
Select “Enable” and press “Enter”.
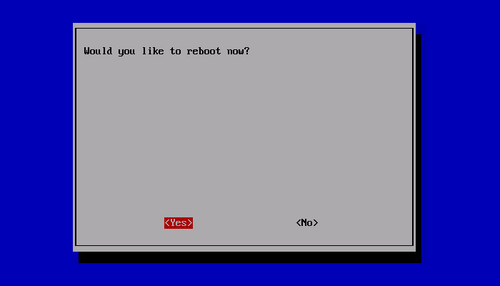
Select “Yes” and press “Enter”. Your Pi will reboot.
Updating your operating and enabling the camera using raspi-config did two things. It told your Pi that there is a camera attached and it added two command line utilities. raspistill raspivid These allow you to capture still photos and HD video respectively.
You are now ready to start having fun!
Application case
Stream Video from the Raspberry Pi Camera to Web Browsers
- Motion JPEG to the rescue
What is Motion JPEG? Pretty simple, it's just a stream of individual JPEG pictures, one after another. I was surprised to find that most modern browsers can play MJPEG streams natively.
The down side of MJPEG streams is that they are not as efficient as H.264, which greatly improves quality and reduces size by encoding only the differences from one frame to the next. With MJPEG each frame is encoded as an entire JPEG picture. For my needs this isn't a concern, though.
Continuing with my research I stumbled upon MJPG-streamer, a small open source MJPEG streaming server written in C that I was easily able to compile for the Raspberry Pi.
The following sections describe how I've used this tool to create a very flexible, play anywhere, streaming server for my Raspberry Pi camera.
- Installing MJPEG-streame
UPDATE: This section is outdated. Please use the instructions on my updated guide to build and install MJPG-Streamer.
Unfortunately there isn't a package for MJPEG-streamer that can be installed with apt-get, so it needs to be compiled from source.
MJPEG-streamer is hosted at sourceforge.net, so head over to the project's download page to get the source tarball.
To compile this application I used the following commands:
$ sudo apt-get install libjpeg8-dev
$ sudo apt-get install imagemagick
$ tar xvzf mjpg-streamer-r63.tar.gz
$ cd mjpg-streamer-r63
$ make
This tool requires libjpeg and the convert tool from ImageMagick, so I had to install those as well.
The makefile does not include an installer, if you want to have this utility properly installed you will need to copy the mjpg_streamer and its plugins input_*.so and output_*.so to a directory that is in the path, like /usr/local/bin. It is also possible to run this tool directly from the build directory.
- Setting up the JPEG source stream
The streaming server needs a sequence of JPEG files to stream, and for this we are going to use the raspistill utility that is part of Raspbian. For those that are concerned about performance, keep in mind that the JPEG encoder used by raspistill runs in the GPU, the load required to generate JPEGs is pretty small.
To setup a constant stream of JPEG images the command is as follows:
$ mkdir /tmp/stream
$ raspistill -w 640 -h 480 -q 5 -o /tmp/stream/pic.jpg -tl 100 -t 9999999 -th 0:0:0 &
Let's go over the arguments to raspistill one by one:
- -w sets the image width. For an HD stream use 1920 here.
- -h sets the image height. For an HD stream use 1080 here.
- -q sets the JPEG quality level, from 0 to 100. I use a pretty low quality, better quality generates bigger pictures, which reduces the frame rate.
- -o sets the output filename for the JPEG pictures. I'm sending them to a temp directory. The same file will be rewritten with updated pictures.
- -tl sets the timelapse interval, in milliseconds. With a value of 100 you get 10 frames per second.
- -t sets the time the program will run. I put a large number here, that amounts to about two hours of run time.
- -th sets the thumbnail picture options. Since I want the pictures to be as small as possible I disabled the thumbnails by setting everything to zero.
- & puts the application to run in the background.
- Starting the streaming server
Okay, so now we have a background task that is writing JPEGs from the camera at a rate of ten per second. All that is left is to start the streaming server. Assuming you are running it from the build directory the command is as follows:
$ LD_LIBRARY_PATH=./ ./mjpg_streamer -i "input_file.so -f /tmp/stream" -o "output_http.so -w ./www"
Let's break this command down to understand it:
- LD_LIBRARY_PATH sets the path for dynamic link libraries to the current directory. This is so that the application can find the plugins, which are in the same directory.
- -i sets the input plugin. We are using a plugin called input_file.so. This plugin watches a directory and any time it detects a JPEG file was written to it it streams that file. The folder to watch is given as the -f argument.
- -o sets the output plugin. We are using the HTTP streaming plugin, which starts a web server that we can connect to to watch the video. The root directory of the web server is given as the -w argument. We will use the default web pages that come with the application for now, these can be changed and customized as necessary.
- Watching the stream
Now everything is ready. Go to any device that has a web browser and connect to the following website:
http://<IP-address>:8080
Where IP-address is the IP address or hostname of your Raspberry Pi.
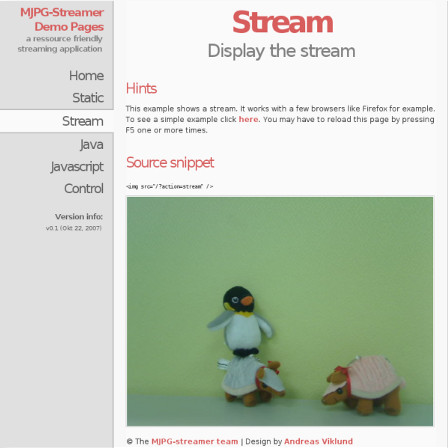
The default website served by the streaming server provides access to several players to watch the stream. I've found that the "Stream" option worked on most devices I tried. For a few that "Stream" didn't show video I went to "Javascript" and I was able to play the video just fine.
Documents
Datasheet(OV5647) Media:Ov5647full.pdf
Information(OV5647) http://www.ovt.com/products/sensor.php?id=66
Quick Start Guide http://www.raspberrypi.org/help/camera-module-setup/


