How to install system in Mini6410
Contents
Instuction
In order to install system using SD card, Superboot must be burned into SD card using SD-Flasher.exe first and copy the system images needed in images directory of SD card. Actually you just need to copy the imges folder in CD-ROM to SD card, it includes all of the system images. If you want to burn the generated files of your own, you can modify the related file name in configuration file or replace the file name.
Superboot support normal SD card and SDHC card booting the system. Now we take the file in the CD-ROM for example to introduce how to install system expressively.
Note: First please copy the images folder in the CD B to the SD card whch has been burn into the Superboot. The installation below proceeds needn’t serial cable and USB cable, a SD card and the power supply is enough.
Install Linux(yaffs2 format)
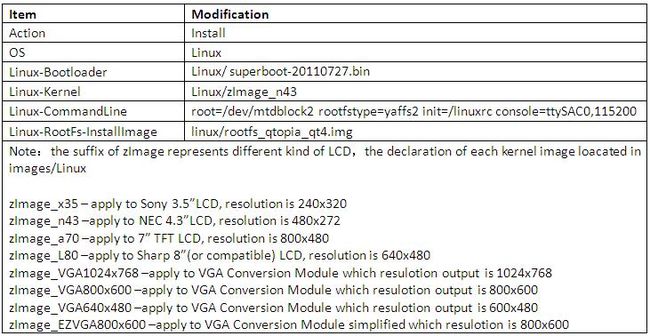
Step1: open the config file FriendlyARM.ini in images folder of SD card, modify the related definition item of Linux installation.
Step2:Set the switch S2 to “SDBOOT” side and insert the SD card and power on the development board.
Step3: After the installation is completed, set the switch S2 to “Nand” side and reboot.
Install Linux(UBIFS format)
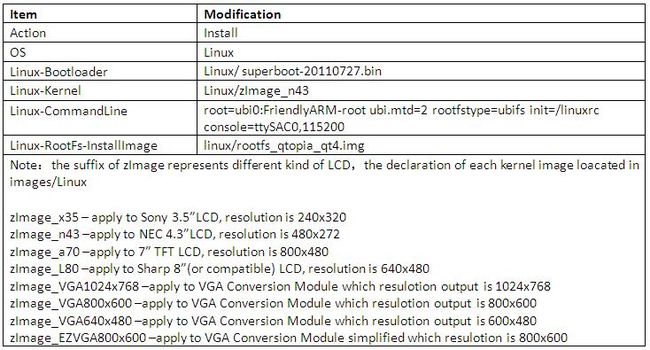
Step1: open the config file FriendlyARM.ini in images folder of SD card, modify the related definition item of Linux installation.
Step2:Set the switch S2 to “SDBOOT” side and insert the SD card and power on the development board.
Step3: After the installation is completed, set the switch S2 to “Nand” side and reboot.
Install WindowsCE6
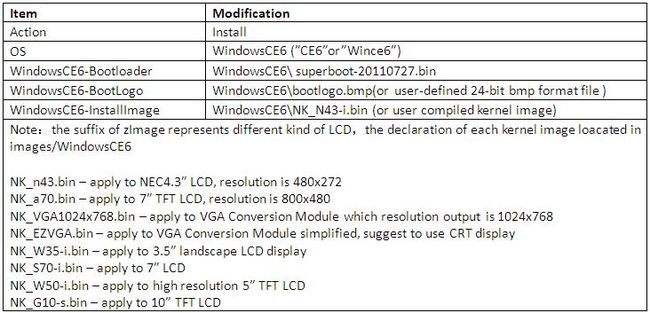
Step1: open the config file FriendlyARM.ini in images folder of SD card, modify the related definition item of WindowsCE6 installation.
Step2:Set the switch S2 to “SDBOOT” side and insert the SD card and power on the development board.
Step3: After the installation is completed, set the switch S2 to “Nand” side and reboot.
Install Android(yaffs format)
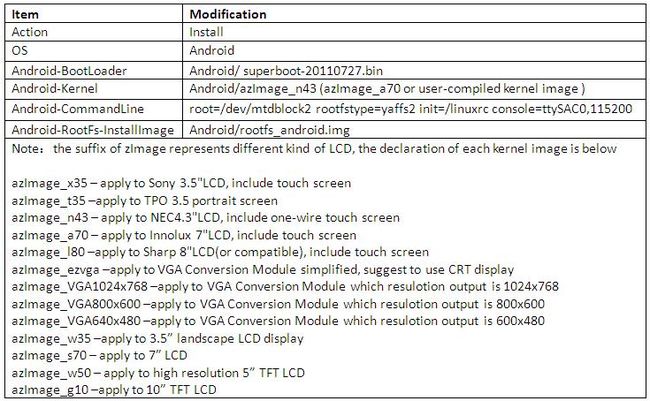
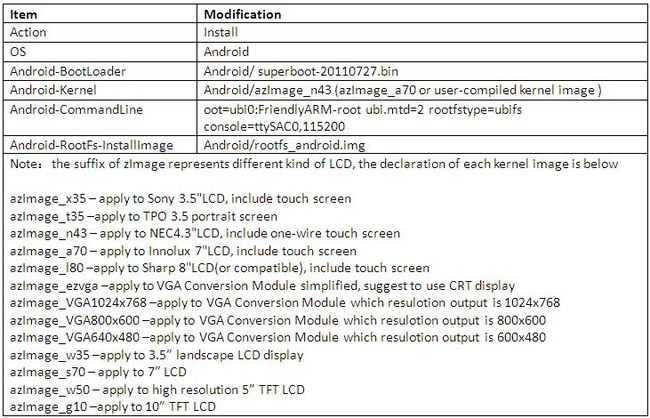
Step1: open the config file FriendlyARM.ini in images folder of SD card, modify the related definition item of Android installation.
Step2:Set the switch S2 to “SDBOOT” side and insert the SD card and power on the development board.
Step3: After the installation is completed, set the switch S2 to “Nand” side and reboot.
Install Android (UBIFS format)
Step1: open the config file FriendlyARM.ini in images folder of SD card, modify the related definition item of Android installation.
Step2:Set the switch S2 to “SDBOOT” side and insert the SD card and power on the development board.
Step3: After the installation is completed, set the switch S2 to “Nand” side and reboot.
Install Ubuntu(UBIFS format)
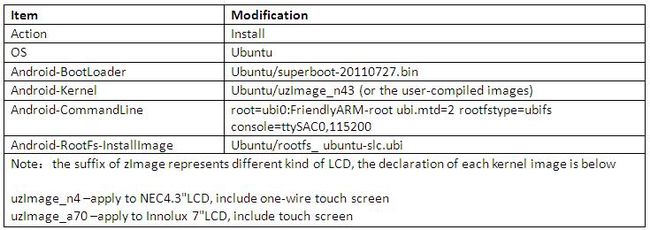
Step1: open the config file FriendlyARM.ini in images folder of SD card, modify the related definition item of Ubuntu installation.
Step2:Set the switch S2 to “SDBOOT” side and insert the SD card and power on the development board.
Step3: After the installation is completed, set the switch S2 to “Nand” side and reboot.
