Motherboard 1.2
Contents
Overview
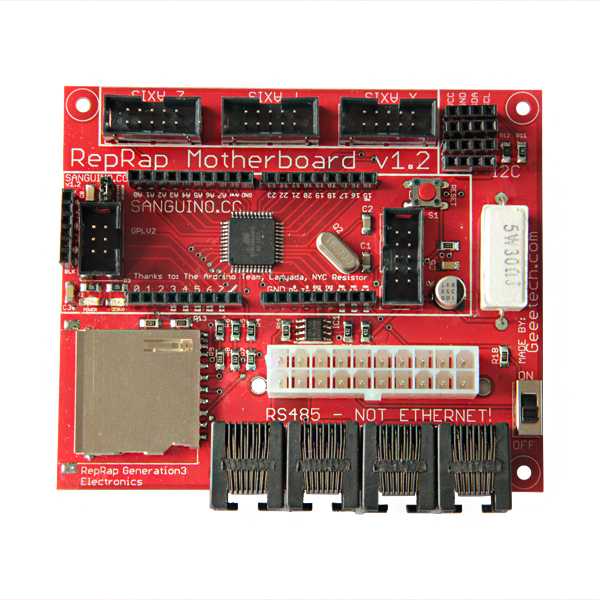
The top picture shows the board configured forfor use in a Cupcake[1]. The few differences are described in the appropriate sections below.
This board is the brains behind the Generation 3 Electronics. The heart is a Sanguino which is an Arduino-compatible board that is powered by an ATMEGA1284P chip. It has connectors to hook up all the various peripherals that you'll need to drive a RepRap machine. It has headers for three stepper drivers, as well as 4 RJ45 connectors for Extruder Controller Boards. Not only that, but it has an SD card and a connector to hook it up to an ATX power supply
Some highlights:
- Onboard ATMEGA1284P - 64K flash space, 4k ram, 32 I/O pins, Arduino compatible.
- 3 x Stepper driver connectors with min/max inputs.
- Built-in SD card socket for printing from file and buffering large print jobs.
- RS485 connection for noise-free communications with extruder / toolhead controllers.
- ATX power connector for power. It can also turn the power supply on and off.
- Headers to allow existing Sanguinos to plug straight in.
- I2C headers for simple hookup of external peripherals.
- On/Off switch for instant-kill and simple control of the entire system.
Interface
Pinout Here is a handy reference that tells you what pins are hooked up to what features of the board.
Stepper Motor Headers
| Pin | Name | Function |
| 1 | N/C | Not Connected to anything |
| 2 | GND | Connect this to your uC to share a common ground. |
| 3 | Step | A pulse on this line will make the stepper motor advance one step in the desired direction. |
| 4 | Dir | If this pin is high, the motor will rotate forward, low it will rotate backwards. |
| 5 | Enable | This pin allows you to turn the motor on and off. The definitions of high/low are determined by your stepper driver. |
| 6 | Min | This is the signal from the 'min' sensor. The definitions of high/low are determined by your opto endstop. |
| 7 | Max | This is the signal from the 'max' sensor. The definitions of high/low are determined by your opto endstop. |
| 8 | GND | Connect this to uC to share a common ground. |
| 9 | GND | Connect this to uC to share a common ground. |
| 10 | GND | Connect this to uC to share a common ground. |
RS485 Comms + Power THIS IS NOT ETHERNET!
| Name | Function |
| 1 | RS485 A |
| 2 | RS485 B |
| 3 | +12V |
| 4 | +12V |
| 5 | +12V |
| 6 | GND |
| 7 | GND |
| 8 | GND |
This is one of the major new features of the Generation 3 electronics. RS485 is a robust serial communications channel. It uses differential signaling to provide very noise tolerant communications over relatively long distances, such as in a RepRap machine. RS485 is how the RepRap motherboard communicates with all the tool controllers. It is a very mature technology and is also pretty cheap. Definitely rad. RS485 is a half-duplex channel, which means data can either be transmitted OR received at one time. This makes things a little bit tricky, but don't worry... we have it under control. What you need to know is that there are two wires that need to be hooked up: A and B. These are arbitrary names for the wires due to the differential signaling. Basically, you just have to make sure that all the A's are wired together, and all the B's are wired together. To give a bit more insight into the way RS485 is implemented on the Extruder controller, we have given full control over the RS485 chip to the controller. It can independently enable or disable transmitting and receiving. One of the cool things about RS485 is that you can listen in to your own transmissions. This is a critical feature we exploit to ensure that we keep the transmit functionality enabled until all of our data has had a chance to be sent out. Both RepRap and MakerBot use the RS485 communications channels to control their extruders. But RepRap doesn't need the four black RJ45 connectors and doesn't distribute power from the motherboard. For RepRap leave those connectors off (this is described below when we come to soldering). Since RS485 only takes up 1 of the 4 pairs of wires in a Cat5e cable, for MakerBot we decided to use the rest of the pairs as power. This allows us to send something like 10 amps over the wire which is more than enough for most extruder needs. The extruder controller has an onboard voltage regulator to produce the 5v required for powering all the logic chips, as well as the optional servo motors. The H-bridges and MOSFETs are powered directly from this input voltage. The maximum allowable voltage is 18v to avoid overheating the 5v regulator.
Serial Header
| Name | Color | Function |
| 1 | Black | GND |
| 2 | Brown | CTS# |
| 3 | Red | VCC |
| 4 | Orange | TXD |
| 5 | Yellow | RXD |
| 6 | Green | RTS# |
This is the serial communications header for programming and communicating with the board. It uses the same USB<->TTL header format as the Sanguino, Boarduino, or any of the other minimal Arduino clones. You can find out more information about the cable and where to get it on the Sanguino website. Its very easy to use.
I2C Headers
| PIN | FUNCTION |
| 1 | VCC (5v) |
| 2 | GND (0v) |
| 3 | SDA |
| 4 | SCL |
The extruder controller has left the I2C pins open for use as an I2C bus. This means you can use any number of really cool peripherals very easily! One idea is to use an I2C based LCD screen to print out information about the extruder for example.
The SDA and SCL pins even have built-in 4.7K pullup resistors to make configuration of the I2C bus hassle-free and automatic. The table below lists the pin-out of the header. The labeling in the v2.0 board is not too good, so pin 1 is towards the top of the board and in to the top and the right in the picture.
SD Card Slot
The RepRap motherboard can support SD cards up to 2GB. This means we'll be able to implement all sorts of awesome functionality like printing from card, full print job queueing, and many other awesome things that one can do with a 2GB non-volatile memory buffer
ATX Power Supply Header
For RepRap you replace this header with a couple of power supply components. In RepRap the motherboard is powered by its USB connection and doesn't need the ATX Power Supply Header.
For MakerBot, the RepRap motherboard uses this ATX power supply header. This allow us to power the Motherboard directly and it gives us a little bit of control over the power supply itself. The ATX power supply provides a digital on/off switch that we have interfaced to the Motherboard. This allows us to turn the power supply itself on or off digitally. That gives the motherboard the power to simply and easily turn the entire system on or off in one fell swoop: extruders, stepper motors, everything. The power supply provides a standby 5V supply, so the Motherboard itself will still be powered even if the supply has been turned off.
Burn the Bootloader
The ATMEGA1284P chips come totally blank, so you'll need to upload the special program called a bootloader to the chip so that you can then easily program it with the Arduino software. In order to do this, you'll need an AVR programmer. I highly recommend the USBtinyISP from LadyAda. Its cheap, simple, and easy to assemble. It is also rock-solid. I've used it to program almost a thousand chips and it works great.
Before you start, make sure your motherboard is not hooked up to anything. In order to program the chip:
- Plug the USBtinyISP into your computer's USB port
- Plug the USBtinyISP into the RepRap Motherboard. The Green power LED should light at this time. If not then check to make sure that the jumper on the USBtinyISP is connected.
- Open the Arduino software, make sure the 'Sanguino' option is selected in 'Boards', and then choose the menu option of "Tools -> Burn Bootloader -> w/ USBTinyISP".
Once you do that, you should get a red light on the USBtinyISP, indicating that the USBtinyISP is 'busy' programming, this should take about a minute. The red light on the motherboard will flash a few times indicating that the burn is complete. If everything is successful, then the Arduino software should tell you "Done burning bootloader".
Program It!
There really isn't much to test on the board that it can do itself, so the easiest way to test it is to program the production firmware and to try using it.
Sanguino Master Firmware
There are two alternatives here. One is standard for RepRap, and the other for MakerBot. However, both ought to work in either machine - they are so similar. But for the moment it's probably best to stick with the one intended for each.
- For MakerBot follow the instructions on the RepRap 3rd Generation Firmware [2]. Alternatively, you can now use ReplicatorG to upload the current 2.x firmware onto the board described here.
files
how to buy
http://www.geeetech.com/reprap-motherboard-v12-p-676.html?zenid=klqflbftgg99ppu4hlgvj3u0i2

