Difference between revisions of "Mizar M"
(→Unpacking and proper handling) |
(→Printer maintenance) |
||
| Line 466: | Line 466: | ||
=Printer maintenance= | =Printer maintenance= | ||
| + | |||
| + | === '''Turn the printer on but the screen does not work'''=== | ||
| + | |||
| + | |||
| + | === '''Hotend clogging'''=== | ||
| + | |||
| + | |||
| + | === '''Mintemp error'''=== | ||
| + | |||
| + | |||
| + | === '''The extruder keeps making a noise'''=== | ||
| + | |||
| + | |||
| + | === '''Nothing is printing'''=== | ||
| + | |||
| + | |||
| + | === '''Automatic leveling failed'''=== | ||
| + | |||
| + | |||
| + | === '''Spring steel sheet problem'''=== | ||
| + | |||
| + | |||
| + | === '''Filament sensor'''=== | ||
| + | |||
| + | |||
| + | === '''Firmware'''=== | ||
Revision as of 09:10, 9 May 2023
Contents
Introduction
Separate Mode VS Gradient Mode
Traditional monochrome printing has been difficult to meet the creative needs of 3D printing enthusiasts, and mixed-color printing has become the future trend. Mizar M has two print head modules, “Separated Color Module” and “Gradient Color Module”, and is designed for quick replacement in structure. After replacing the print head module and inserting the hot end connector, the system will intelligently identify the print head module and enter the corresponding print mode.
Unique Separated Color Module
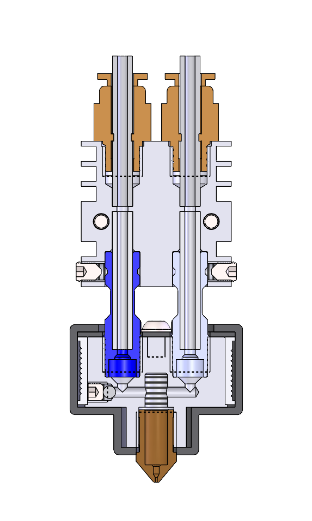
Compared with Gradient Color Module, the Separated Color Module of Mizar M can realize printing a single color without mixing another color when printing models with two color filaments. Besides, it gains a faster printing speed, which can better meet the needs of two-color printing.
Patented gradient color technology
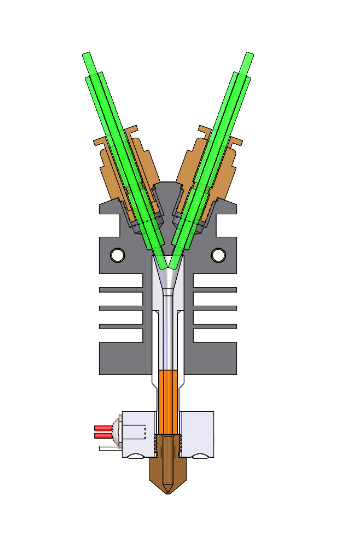
The Geeetech R&D team has optimized and upgraded Gradient Color Module of Mizar M. Compared with Geeetech’s first-generation multi-color 3D printer, the Mizar M Gradient Color Module has redesigned the color mixing flow channel and a structure to prevent the reverse flow of melting filament. The filament is more uniformly mixed in the hot end. This special design effectively solves the problem of uneven color mixing, and the hot end blocked due to the reverse flow of the melting filament. At present, the gradient color structure has applied for a patent.
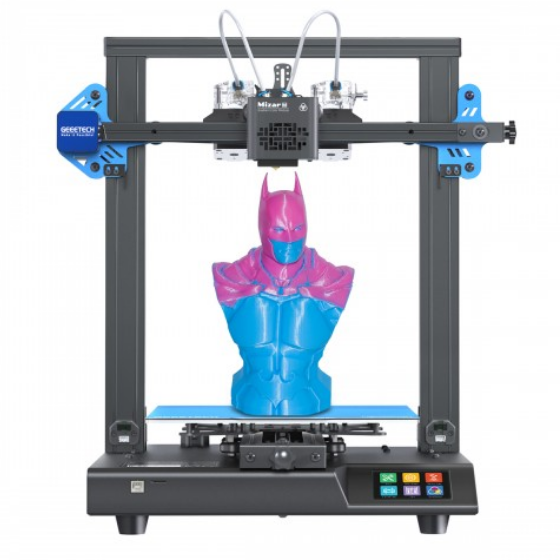
Mizar M with a printing size of 255 x 255 x 260mm, supporting auto-leveling and manual leveling, is equipped with fixesd hotbed and 32-bit silent motherboard. Responding to two printing modes, it comes with double UI interaction systems. The machine comes with dual-drive gear extruder and double Z-axis ensuring high printing quality. At the same time, Mizar M are designed with belt adjustment kit, nozzle LED light, filament detector and break resuming capability, etc.
Product details
Main specification
Technology: FDM
Printing Thickness: 0.1-0.2mm
Printing Materials: PLA,ABS, PETG
Printing Volume: 255*255*260mm
Auto-leveling: 3D Touch Leveling Sensor
Hotbed Heating Time(110℃): 11min
Nozzle Diameter: 0.4mm
Positional Accuracy: X axis: 0.011mm Y axis: 0.011mm Z axis: 0.0025mm
Printing Accuracy: ±0.1mm
Printing Speed: 20~150mm/S
Display: 3.5-inch Color Touch Screen
Hotbed Max Temperature: 110℃
Nozzle Max Temperature: 250℃
Working temperature: 10-40℃
Electric Parameter
Power Input: 115/230V AC, 50/60Hz
Power Supply: DC24V-15A Max, 350W
Mechanical Parameter
Hotbed Size: 260*260mm
Net Weight: 10.2kg
Gross Weight: 13kg
Machine Size: 400(W)*465(L)*484(H)mm
Package Size: 522(L)*482(W)*285(H)mm
Unpacking and proper handling
Watch the unboxing video and user manual before assembling the printer.
Slicing
Cura
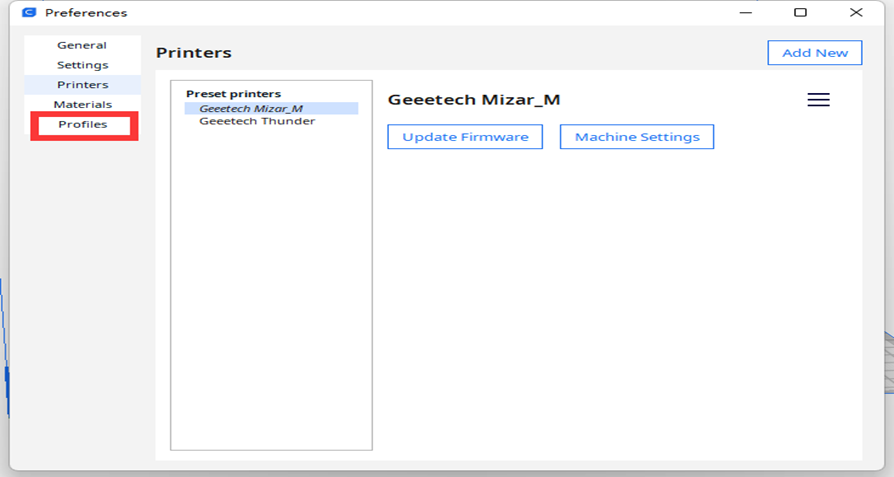
Mizar M Cura Configuration
File Path
Cura 5.X
Copy “geeetech_Mizar_M.def.json” to Ultimaker Cura 5.X\share\cura\resources\definitions
Copy “geeetech_Mizar_M_extruder0.def.json” and “geeetech_Mizar_M_extruder1.def.json”to Ultimaker Cura 5.X\share\cura\resources\extruders
Cura 4.X
Copy “geeetech_Mizar_M.def.json” to Ultimaker Cura 4.X\resources\definitions
Copy “geeetech_Mizar_M_extruder0.def.json” and “geeetech_Mizar_M_extruder1.def.json” to Ultimaker Cura 4.X\resources\extruders
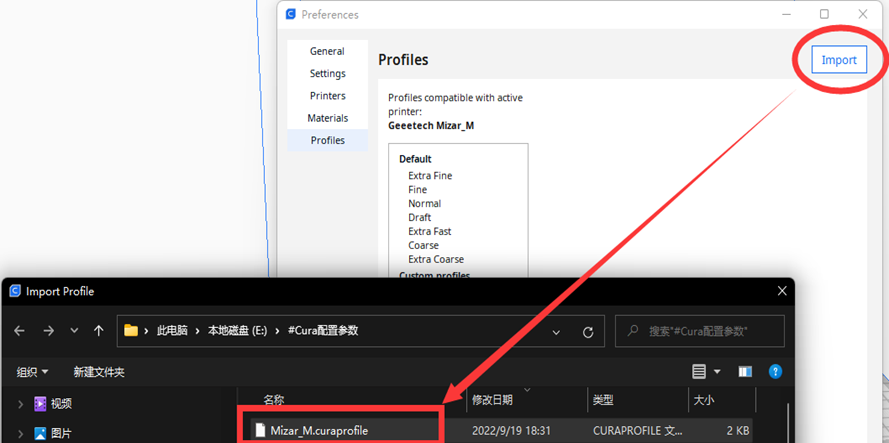
Cura Profile
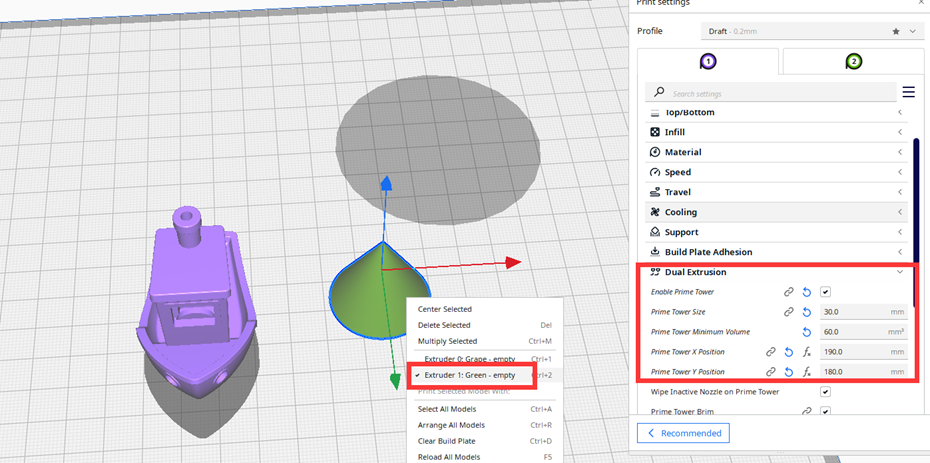
Separate Color Printing
Applied to both Gradient Color module and Separate Color module.
Import 2 or more models, respectively set the extrusion head used by each model, set the size and position of the Prime Tower.
Gradient Color printing
Make sure to install the Gradient Color module in advance.
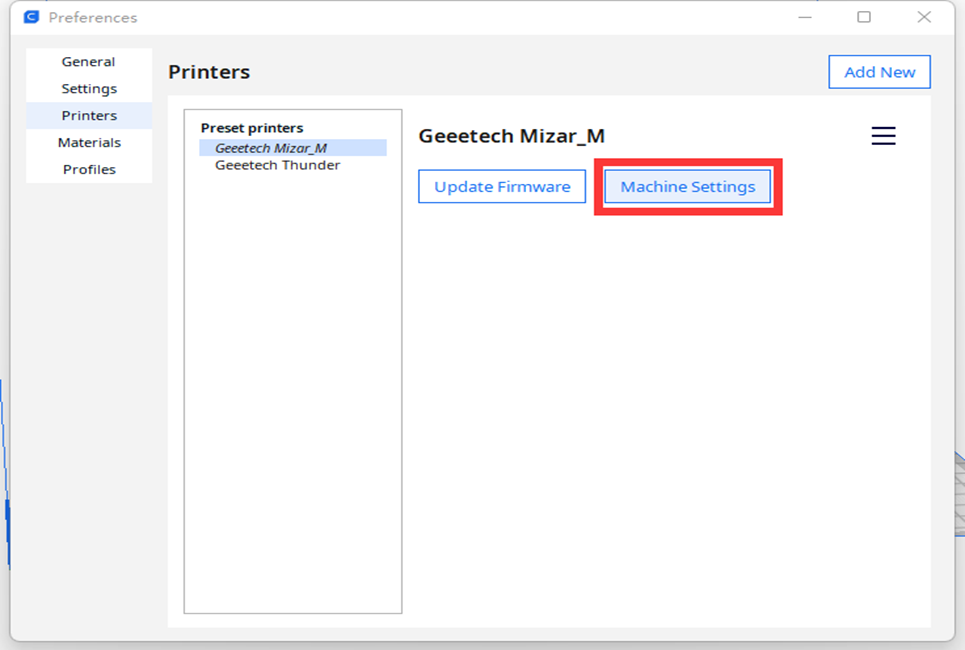
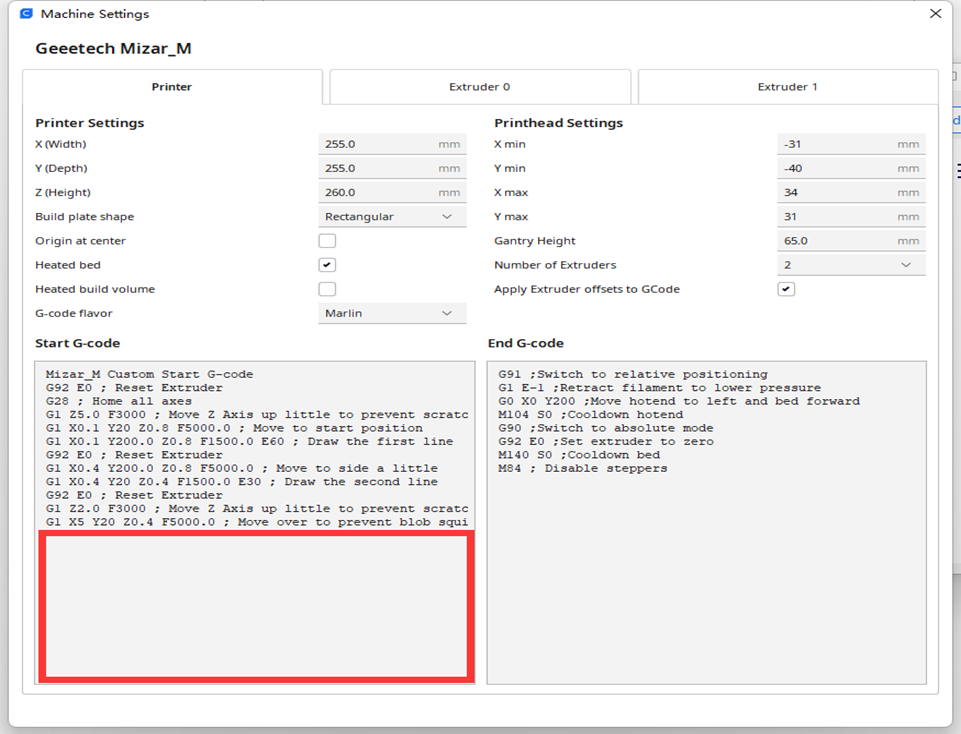
According to the different effect of the model you want, enter Mizar M printer management settings and edit different contents under the content of Start G-code. The details
are as follows. By the way, gradient color printing can disable the Prime Tower setting option.
- G-code Instructions
M163 Set a mix factor
M164 Save mix factor
M166 Gradient for Marlin 2.0
A= Start z height
Z= End z height
I= Start Virtual Tool
J= End Virtual Tool
S= Enable / disable the gradient in manual mode
T=A tool index to reassign to the gradient. If no index is given, cancel the tool assignment.
Detailed G-code instructions, please refer to the Marlin's official website https://marlinfw.org/meta/gcode/
Note: Do not use separate-color module to print mix-color gcode, clogging and damaging Teflon tube.
- Gradient color printing in a fixed proportion
M163 ;Set a mix factor M164 ;Save mix factor
For example, E0/E1 extruded 100%, 0 or 0, 100%, respectively
M163 S0 P1
M163 S1 P0
M164 S0 ;T0=100/0
Then we create the first Tools T0, which will be red.
M163 S0 P1; 100% Red
M163 S1 P0; 0% Green
Now save this color scheme in our Tools T0 we use the command:
M164 S (index), where index is our Tools, and then click:
M164 S0; Store color mixing in tools T0=100/0/0
Now we create the Tools Green, And keep it on the Tools T1:
M163 S0 P0; 0% Red
M163 S1 P1; 100% Green
M164 S1; Store color Mixing in Tools T1
- Gradient color printing in gradient proportions
Gradient for a tall vase:In this example no tool index is assigned to the Gradient. So the Gradient is enabled using M166 S1 and disabled with M166 S0.
M166 A0 Z250 I0 J1 S1
Gradient as a Virtual Tool:In this example the Gradient has been given a tool alias of 3. So the Gradient is selected with T3, and all other Tn commands will select a static
mix.
M166 A0 Z250 I0 J1 T3
T3
To use the static mix stored in T0…
M166 T
T0
M163 S0 P1
M163 S1 P0
M164 S0 ;T0=100/0
M163 S0 P0
M163 S1 P1
M164 S1 ;T1=0/100
M163 S0 P0.5
M163 S1 P0.5
M164 S2 ;T2=50/50
M166 A0 Z100 I0 J1 S1 ;Gradient Usage Instructions 1
In this example no tool index is assigned to the Gradient. So the Gradient is enabled using M166 S1 and disabled with M166 S0
M163 S0 P1
M163 S1 P0
M164 S0 ;T0=100/0
M163 S0 P0
M163 S1 P1
M164 S1 ;T1=0/100
M163 S0 P0.5
M163 S1 P0.5
M164 S2 ;T2=50/50
M166 A0 Z100 I0 J2 T3 ;Gradient Usage Instructions 2
In this example the Gradient has been given a tool alias of 3. So the Gradient is selected with , and all other commands will select a static mix.
Easy Print
Mizar M Easy Print Configuration
Mizar M Easy Print Configuration
Separate Color Printing
Applied to both Gradient Color module and Separate Color module.
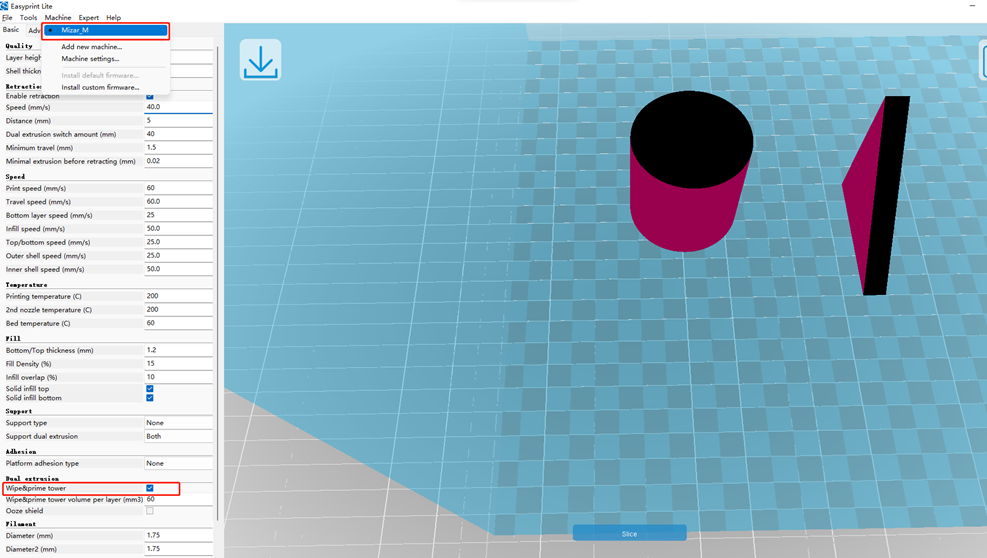
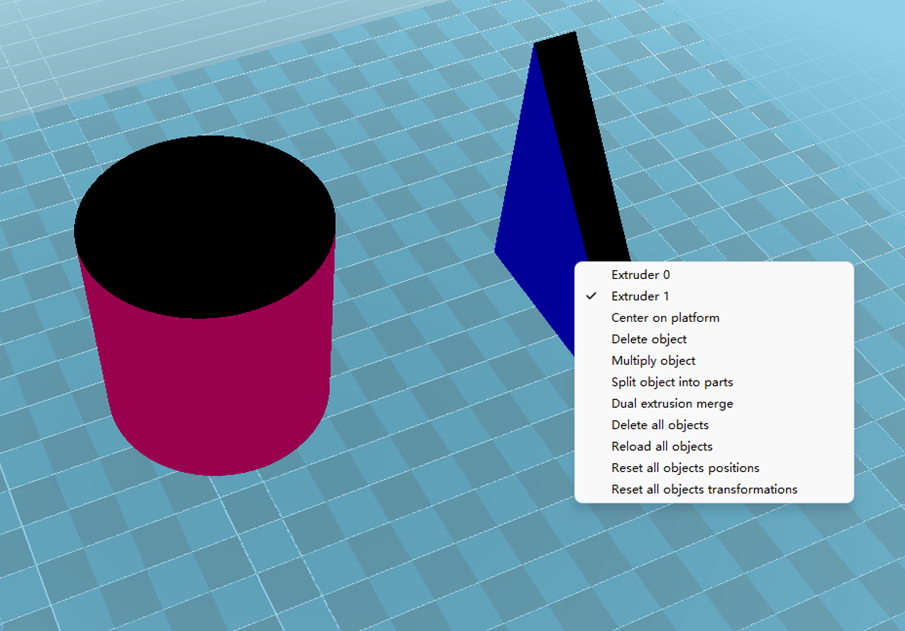
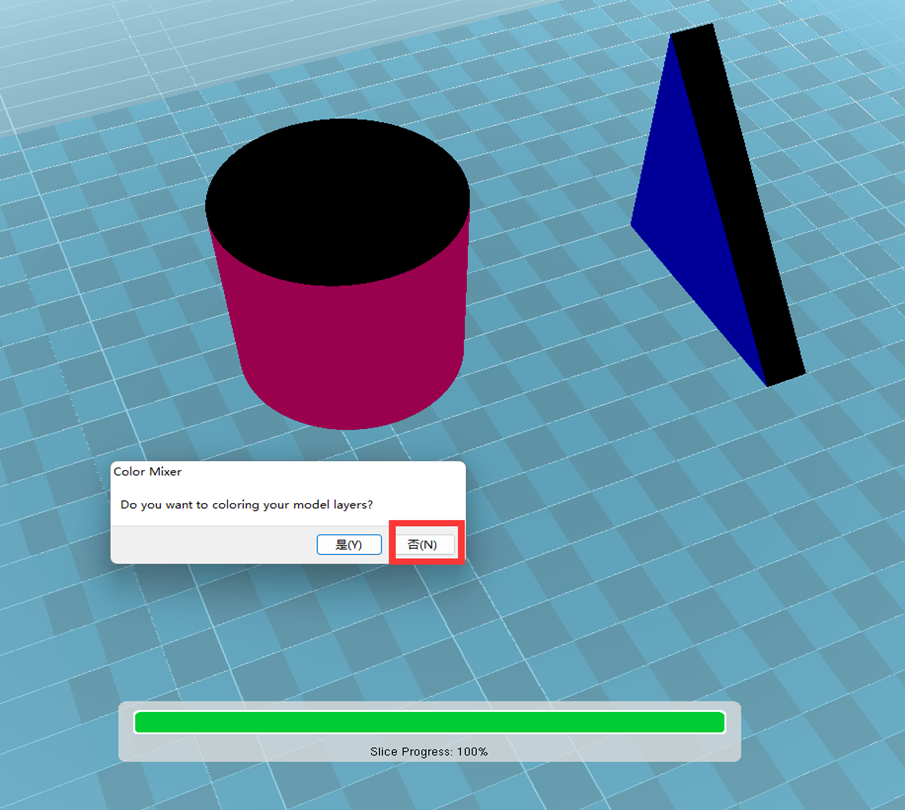
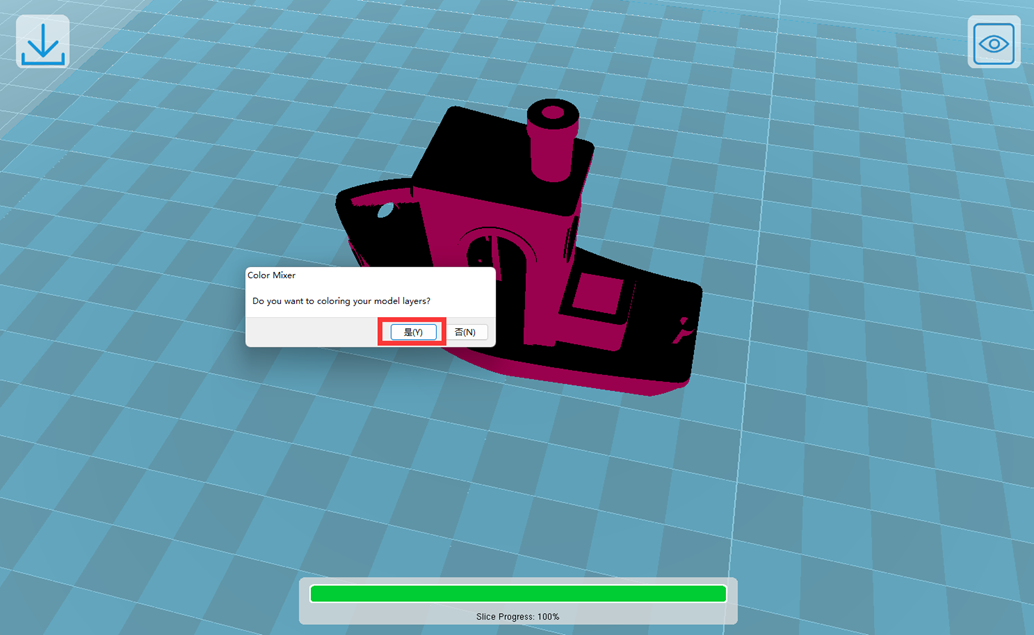
Import 2 or more models, the size of a single model is no more than 200M, add a prime tower, and set the extrusion head for each model. After slicing, select "No" in the prompt box for whether to mix colors.
Gradient Color Printing
Make sure to install the Gradient Color module in advance.
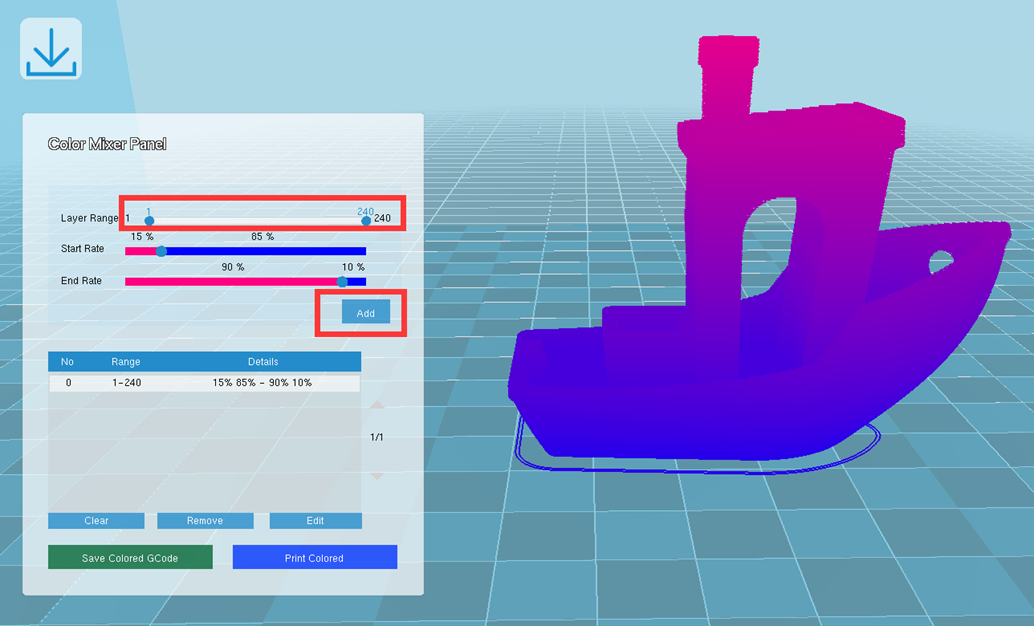
- Mix-color printing in gradient proportions
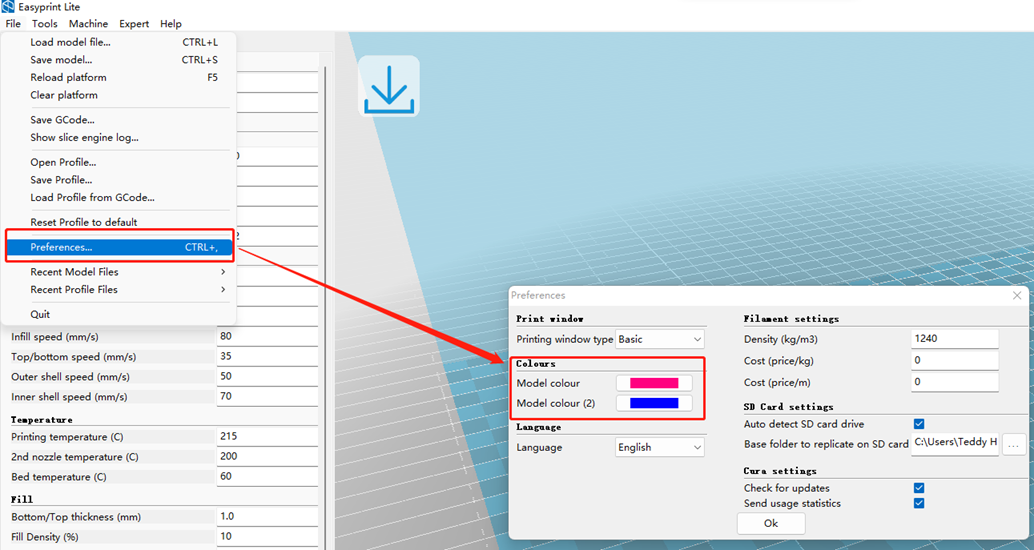
Easy Print adopts visual color mixing effect slice, please set the E0/E1 extruder color in advance, import the model, select the color mixing effect after slicing.
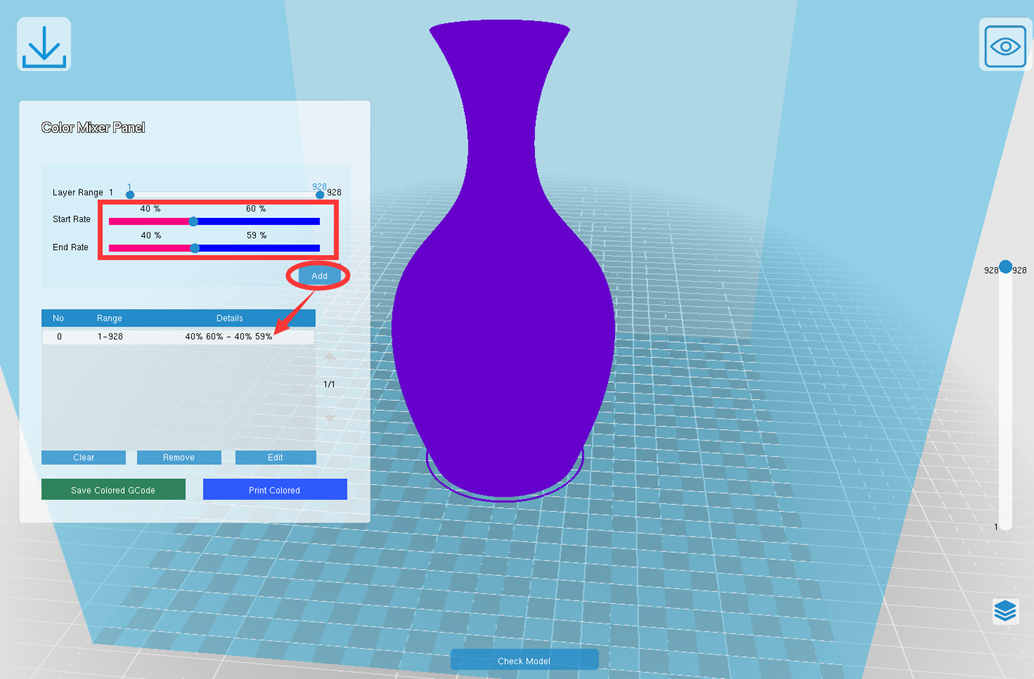
- Gradient color printing in a fixed proportion
Keep the Start Rate and End Rate consistent, and click "Add" to complete the section.
Prusa Slicer
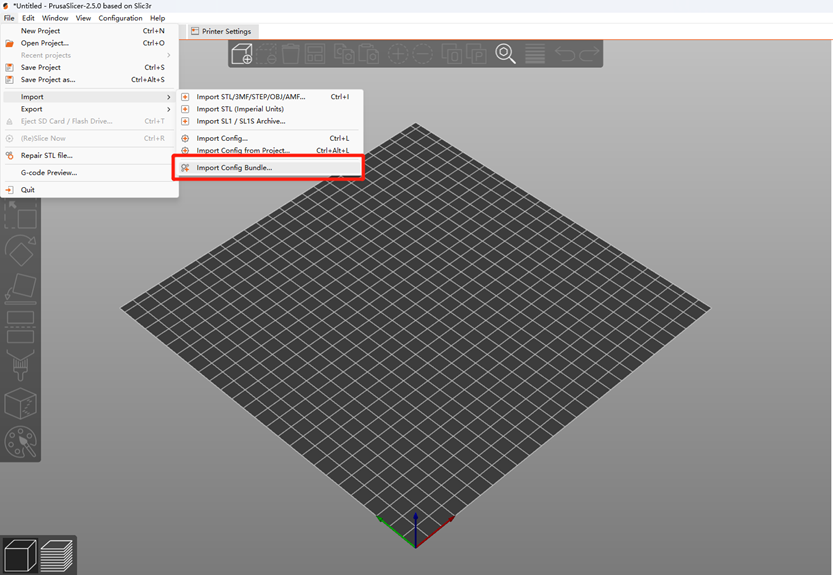
Mizar M Prusa Configuration
Separate Color Module
Applied to both Gradient Color module and Separate Color module.
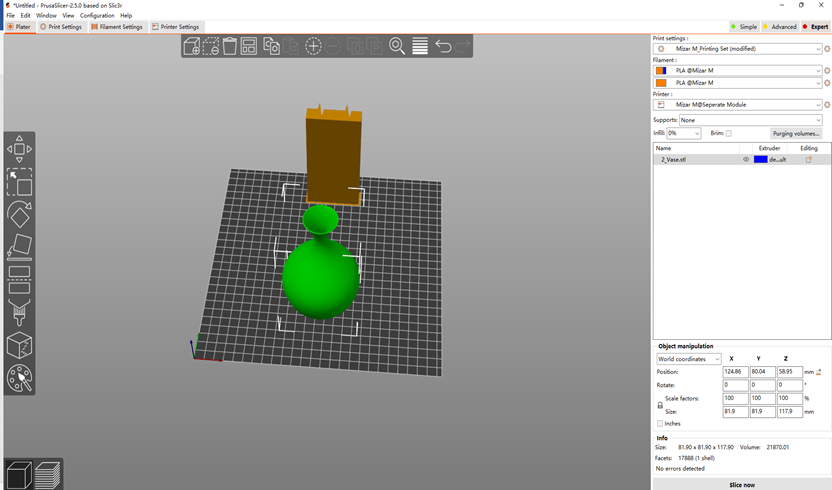
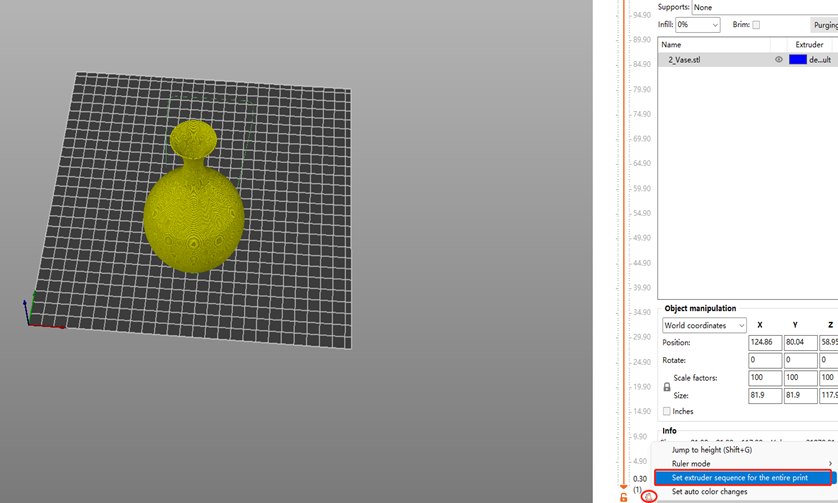
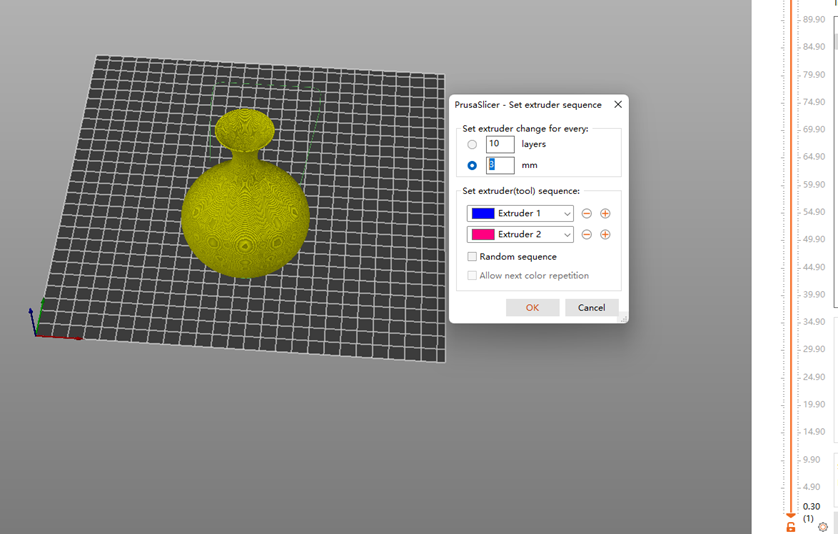
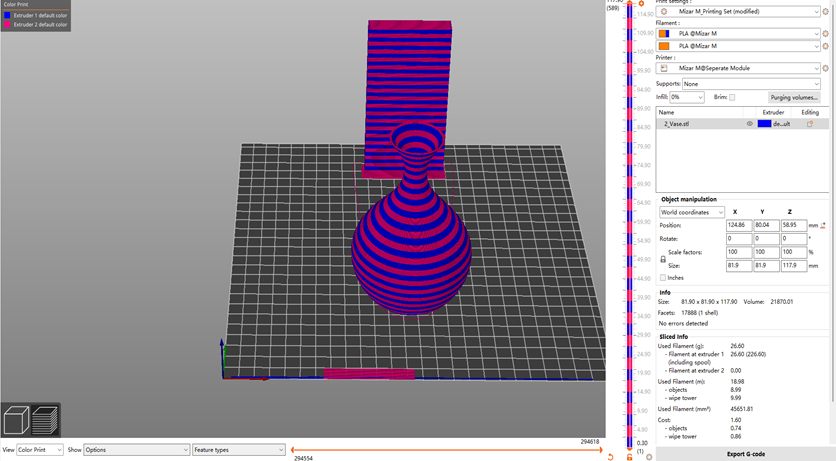
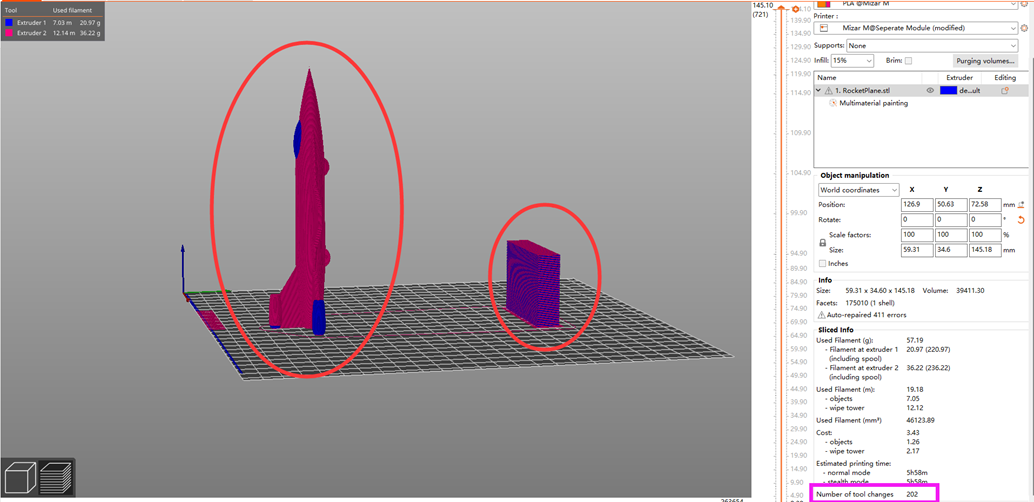
- PrusaSlicer can print a single model with different height separations.
Import the configuration file and the stl model file, set the printing order and height after slicing, and re-slice to preview as shown in the figures.
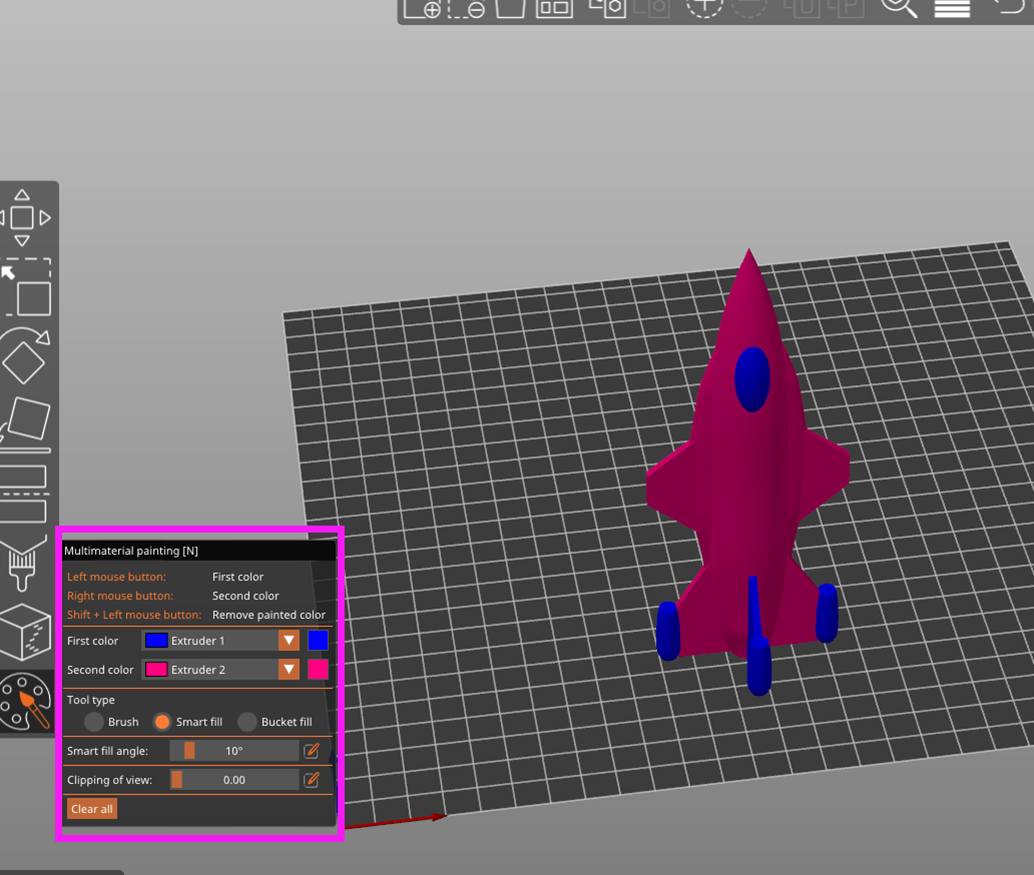
- Prusa Slicer also has the capability to color separate printing after coloring parts of a single model.
Through the tool Multimaterial painting multi-layer painting palette, the left and right keys respectively select the area to be allocated to different extruder printing, in order to prevent the printing of tainted colors or 3D Touch
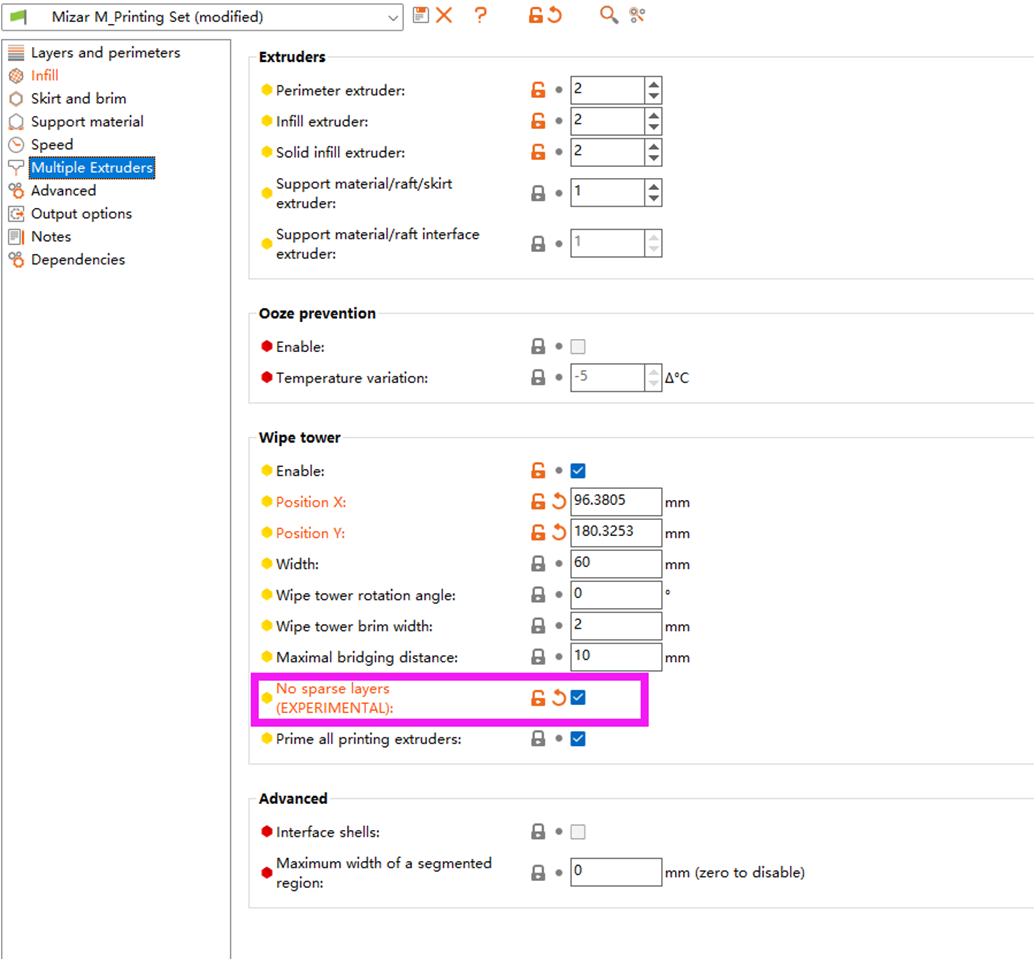
impact on the prime tower, it is necessary to change the shape and volume of the prime tower appropriately. What is more worth mentioning is that the prime tower can be made smaller and save filament. The function of "No sparse
layers(EXPERIMENTAL)" in the printing setting should be enabled, but the size of the printing head should be paid attention to in this function to prevent collision with the model.
Gradient Color Module
Make sure to install the Gradient Color module in advance.
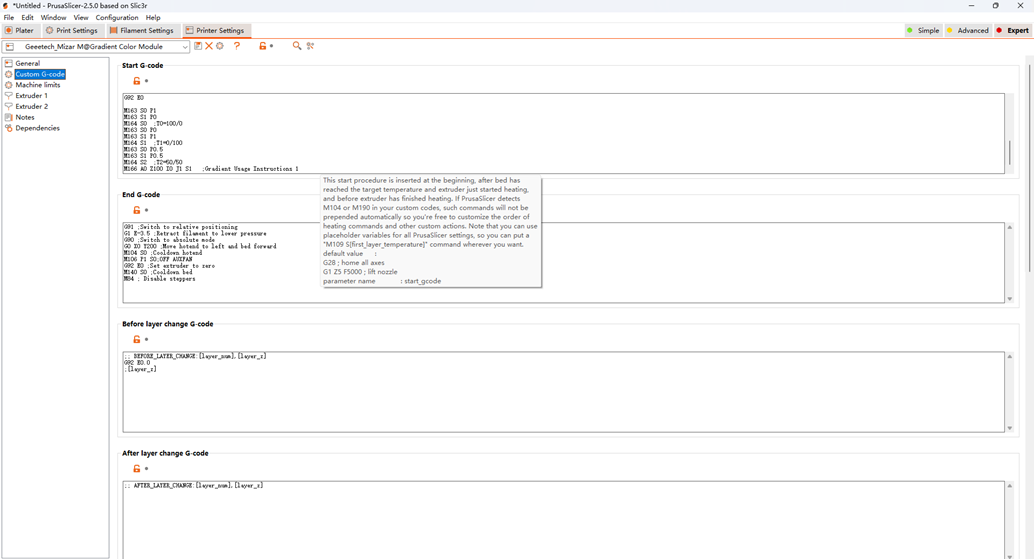
Start G-code is the same with Cura. For the script, please see Cura Gradient Color printing description.
For more frequently asked questions about PrusaSlicer Slicer, please refer to the FAQ on the official website.
https://help.prusa3d.com/article/faq-prusaslicer_1789
Simplify 3D
Mizar M Simplify 3D Configuration
Mizar M Simplify 3D Configuration
Separate Color Printing
Applied to both Gradient Color module and Separate Color module.
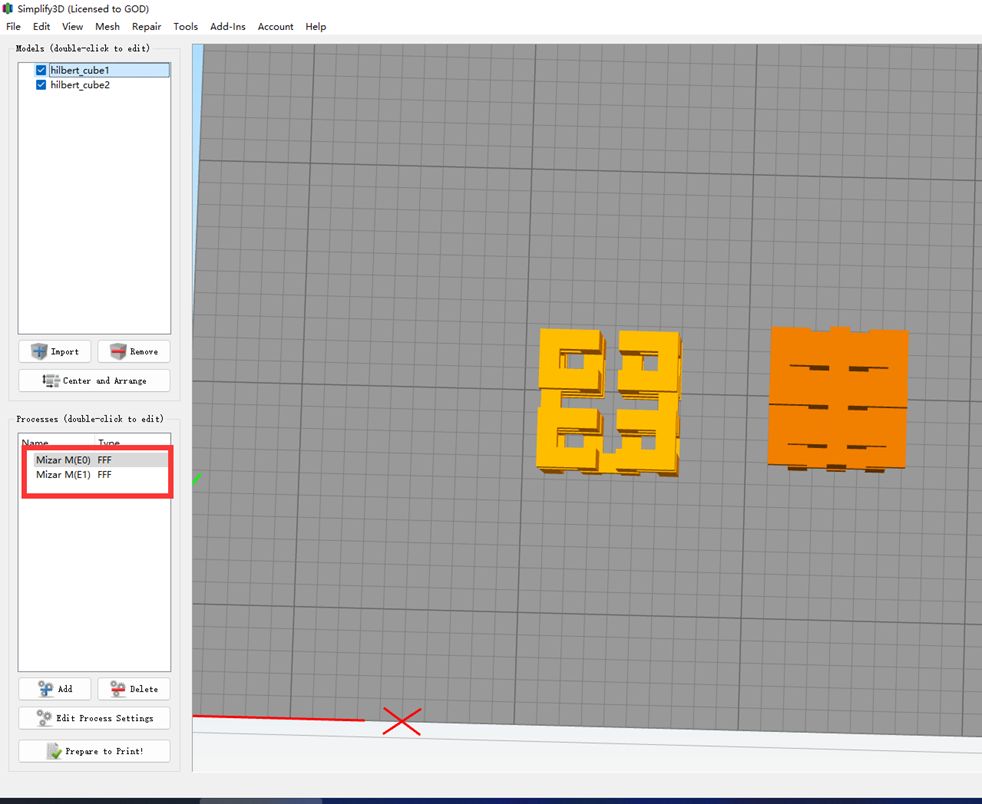
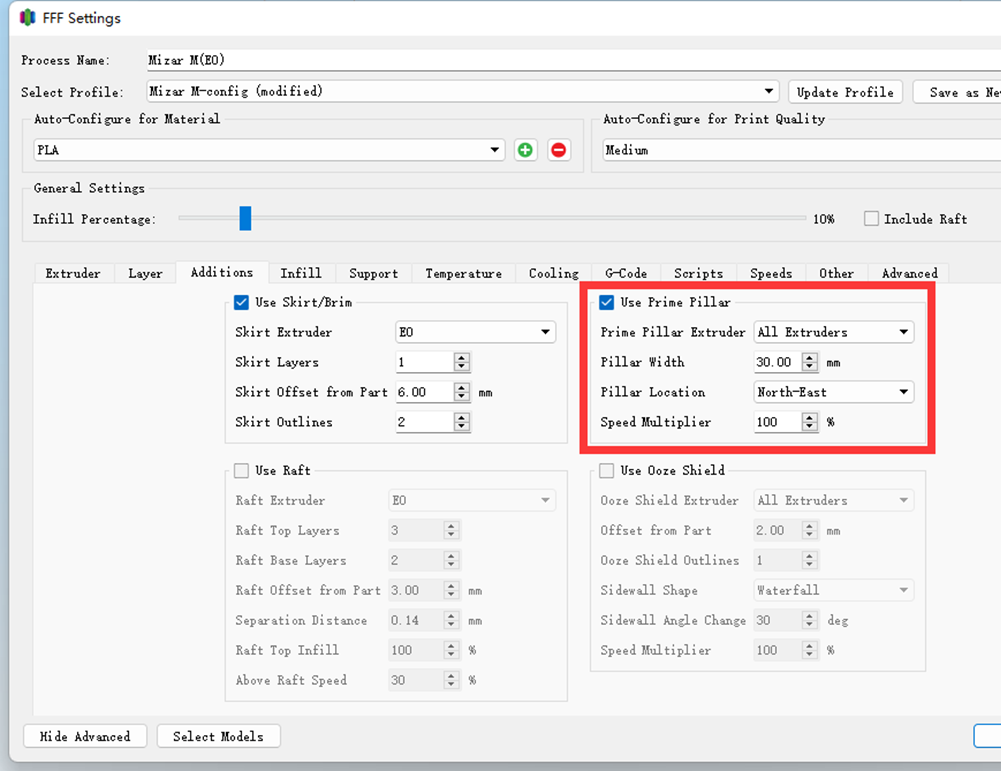
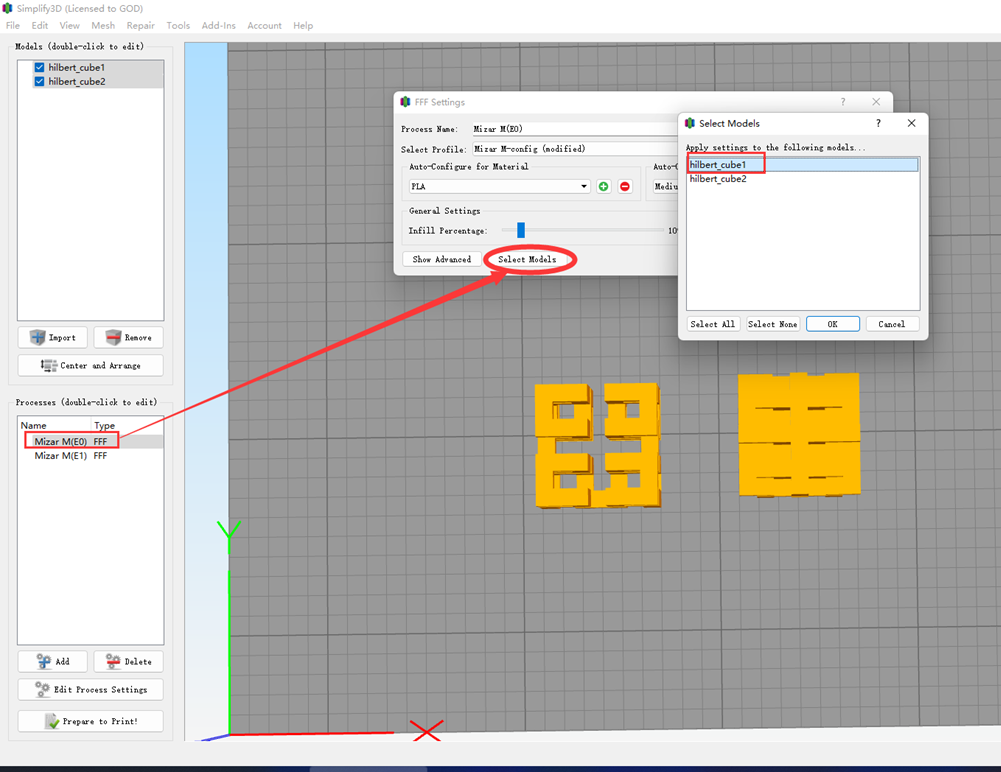
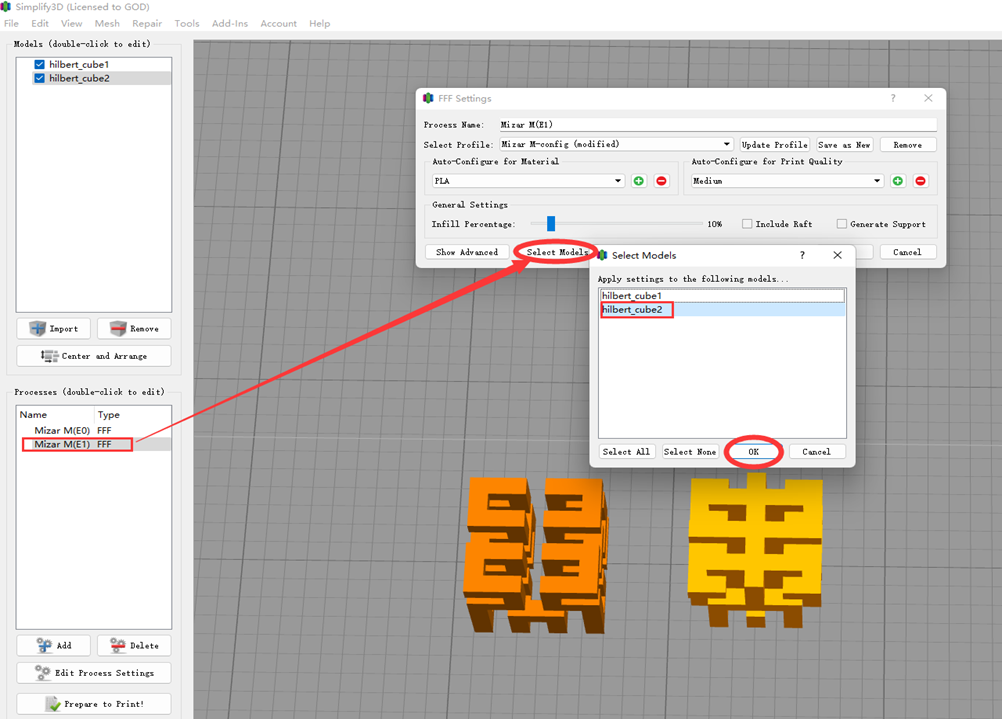
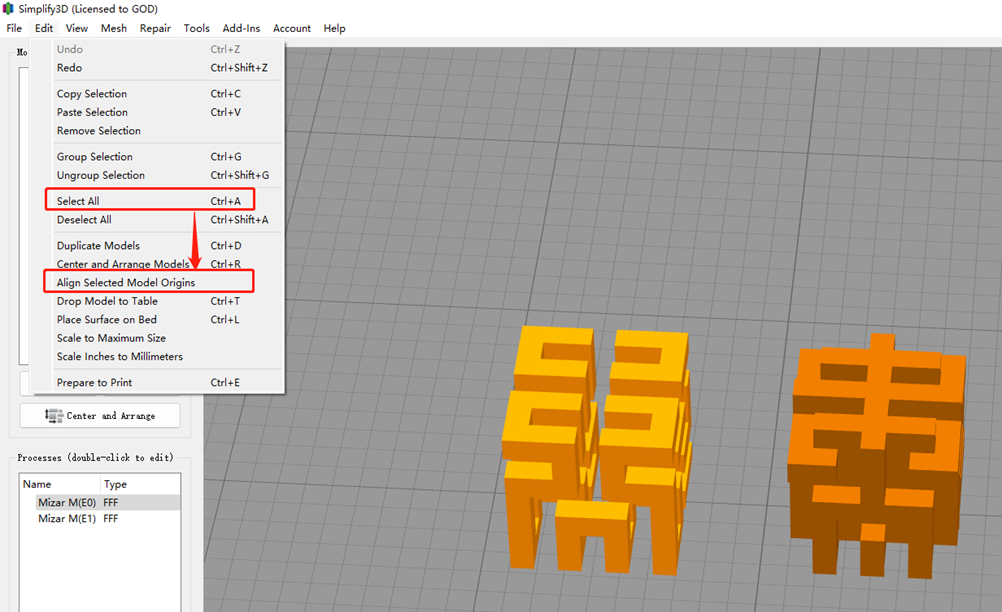
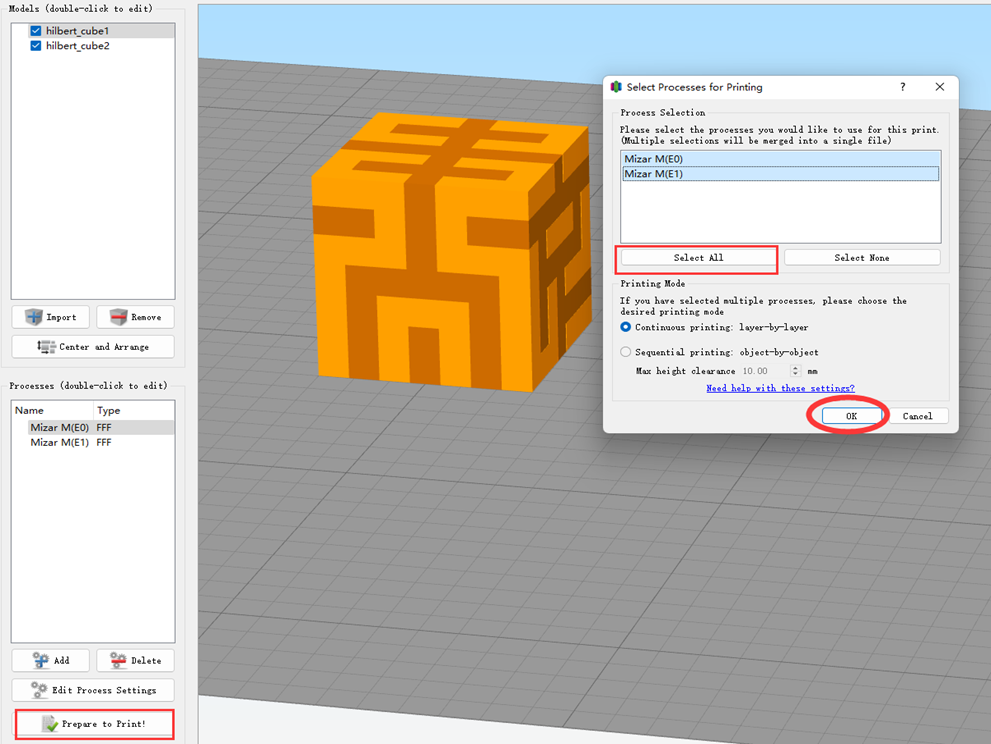
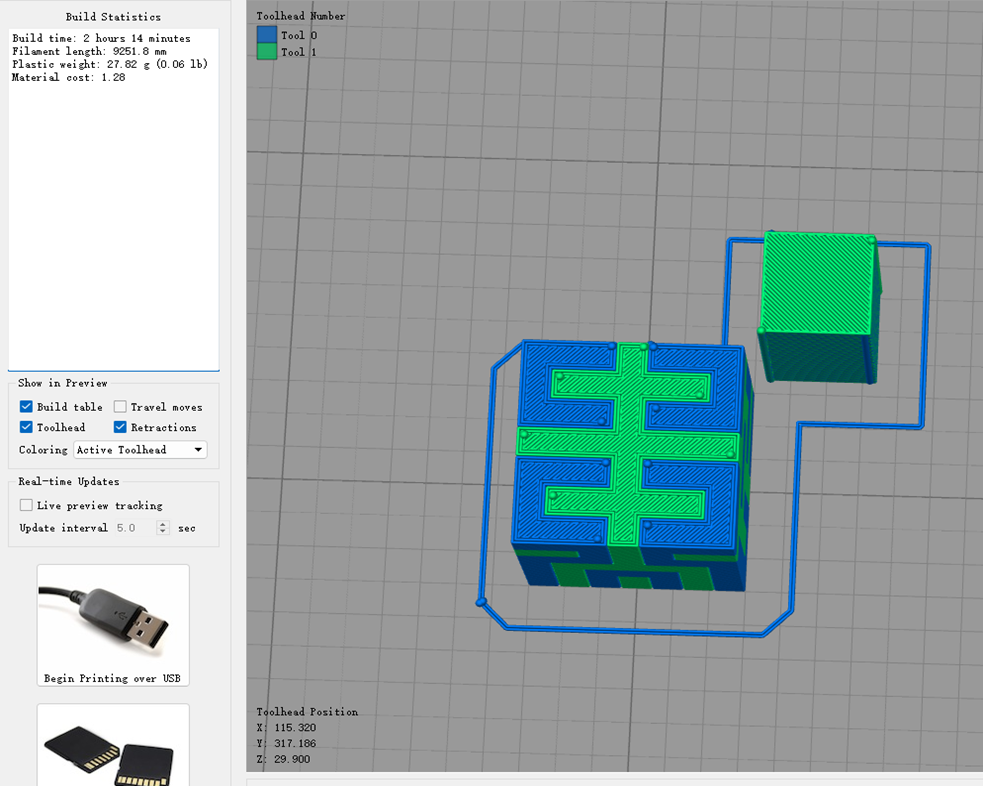
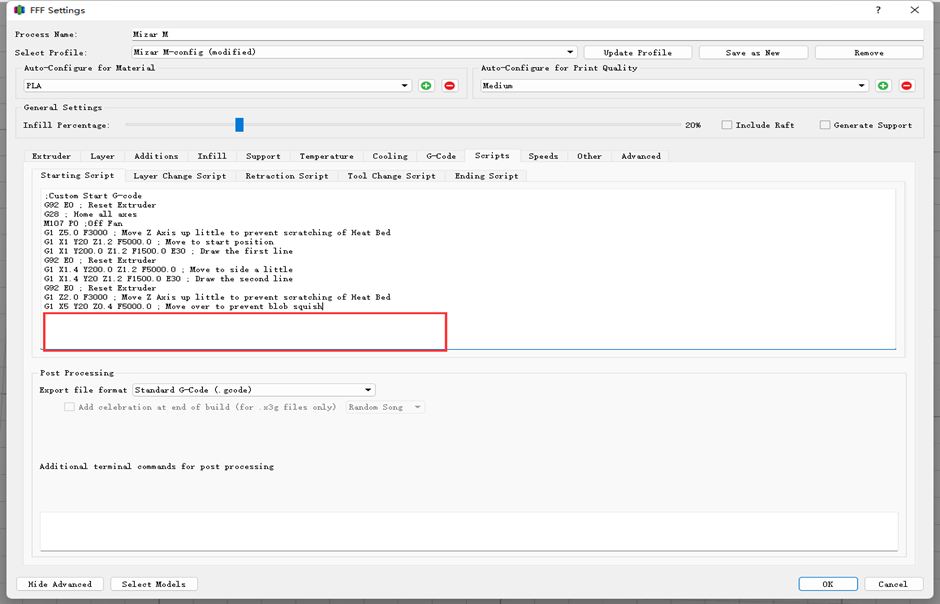
Simplify3D needs to set up separate FFF processes for extruder E0/E1. Set Mizar M(E0) and Mizar M(E1) as shown below. Import 2 or more models, set the extruder head for each model, and set the size and location of the prime tower (for each process). Select all models after Ctrl A, enter the menu and select "Align Selected Model Origins". Select two processes to complete slicing.
Gradient Color Printing
Make sure to install the Gradient Color module in advance.
Start G-code is the same with Cura. For the script, see Cura Gradient Color printing description.
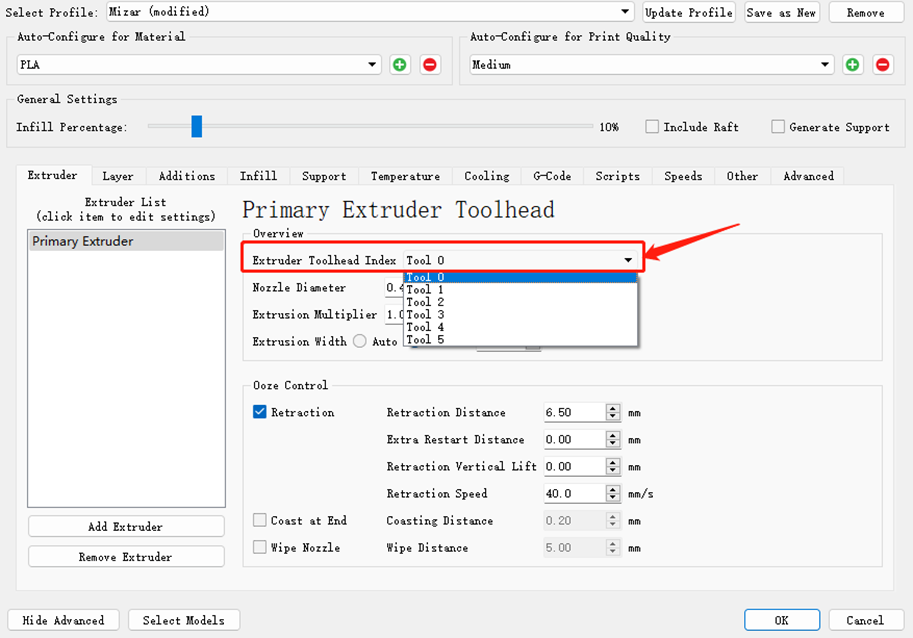
- When you use a single extruder, Simplify3D deposit the default E0 extruder. If you need to switch E1, select the extruder number "Tool 1" from the advanced options, as shown in the below figure.
