Difference between revisions of "System Installing"
(Created page with "==Overview== Tiny210 uses Android for development platform (support Android 2.3 and Android4), we also transplant all software in Android on 6410 platform to Tiny210. Combi...") |
(No difference)
|
Latest revision as of 06:31, 7 July 2012
Contents
Overview
Tiny210 uses Android for development platform (support Android 2.3 and Android4), we also transplant all software in Android on 6410 platform to Tiny210. Combining the powerful software with the powerful hardware not only meets your project needs, but also makes you concentrate on the upper development.
Experience the newest version Android 4.0.3:
Not only fully functional Android is provided to our customers, we also transplant Android 4.0.3 on Tiny210/mini210, Android 4.0.3’s image is located in “images /Android”, The steps of installing it is below.
Installing Android2.3
Note: This step is based on that the Superboot has been burned in your SD card’s root directory.
- Step1
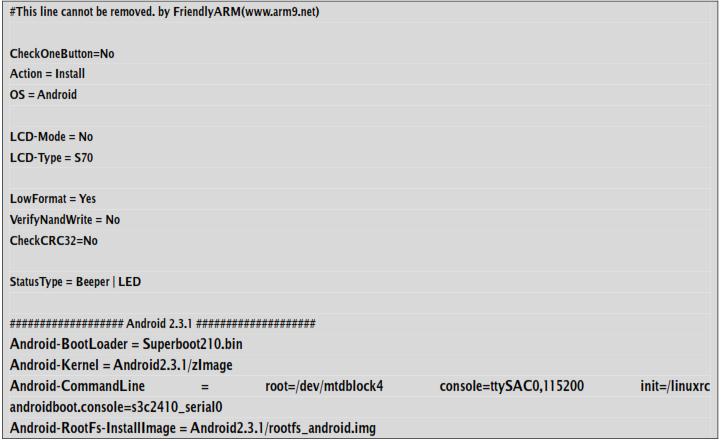
- Plug your SD card in to your computer, open “images/FriendlyARM.ini”, Modify the content of the FriendlyARM.ini as below(default is that)
Note: If the LCD is connected to development board when installing system ,LCD parameters needn’t to be specified in FriendlyARM.ini because the Superboot will identify the LCD type automatically. If installing the system without LCD connected, LCD-Type parameters need to be specified, the supported LCD type includes H43,W50, A56, S70,A70, L80, G10.
- Step2
- Check the files below exist in SD card, if it doesn’t existed , images folder need to be copied to SD card’s root.
- Step3
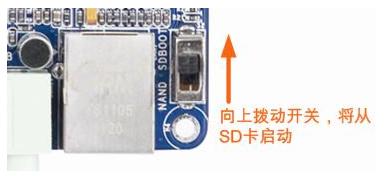
- Plug the SD card into SD card slot, after that toggle the switch to SD boot and power on the board. Then the installing will start.
- Step4
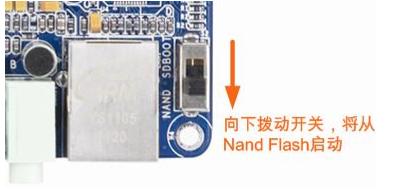
- After the installing is completed ,the buzzer beeps and LCD displays that the installing is completed. Then toggle the switch S2 to “Nand Flash” boot. Then power on the board to boot the system.
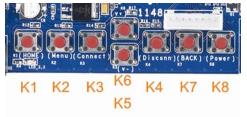
The 8 user keys is below and their definition in Android is below.
Display Inverting
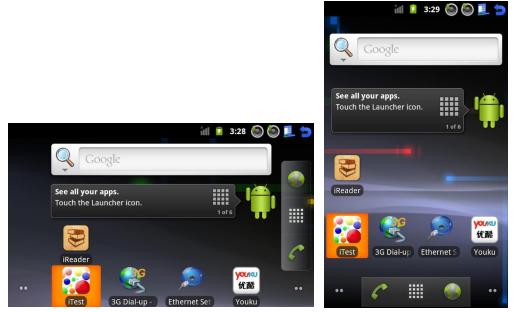
Android2.3 is in landscape mode after booting, long pressing the Menu button will switch to portrait mode.
Installing Android4.0.3
Android4.0.3 is just for experiencing and test. Some function is not complete. Android 4.0.3’s image is located in images/Android, the steps of installing is same as Android2.3 except for the FriendlyARM.ini.
Installing Linux
Note: This step is based on that the Superboot has been burned in your SD card’s root directory.
- Step1
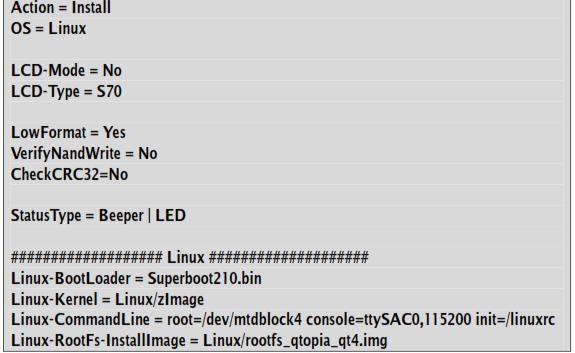
- Plug your SD card in to your computer, open “images/FriendlyARM.ini”, Modify the content of the FriendlyARM.ini as below(default is that)
Note: If the LCD is connected to development board when installing system ,LCD parameters needn’t to be specified in FriendlyARM.ini because the Superboot will identify the LCD type automatically. If installing the system without LCD connected, LCD-Type parameters need to be specified, the supported LCD type includes H43,W50, A56, S70,A70, L80, G10.
- Step2
- Check the files below exist in SD card, if it doesn’t existed , images folder need to be copied to SD card’s root.
- Step3
- Plug the SD card into SD card slot, after that toggle the switch to SD boot and power on the board. Then the installing will start.
- Step4
- After the installing is completed ,the buzzer beeps and LCD displays that the installing is completed. Then toggle the switch S2 to “Nand Flash” boot. Then power on the board to boot the system.
Installing WinCE6.0
Note: This step is based on that the Superboot has been burned in your SD card’s root directory.
- Step1
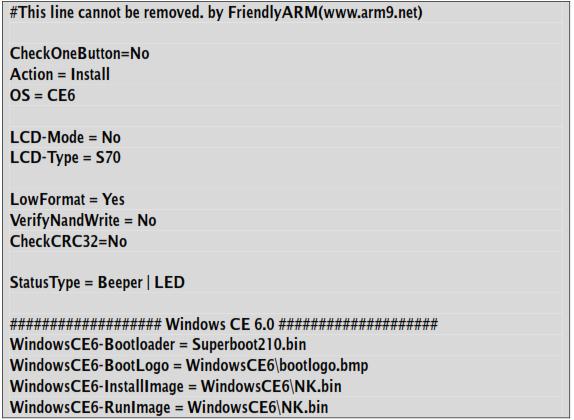
- Plug your SD card in to your computer, open “images/FriendlyARM.ini”, Modify the content of the FriendlyARM.ini as below(default is that)
Note: If the LCD is connected to development board when installing system ,LCD parameters needn’t to be specified in FriendlyARM.ini because the Superboot will identify the LCD type automatically. If installing the system without LCD connected, LCD-Type parameters need to be specified, the supported LCD type includes H43,W50, A56, S70,A70, L80, G10.
- Step2
- Check the files below exist in SD card, if it doesn’t existed , images folder need to be copied to SD card’s root.
- Step3
- Plug the SD card into SD card slot, after that toggle the switch to SD boot and power on the board. Then the installing will start.
- Step4
- After the installing is completed ,the buzzer beeps and LCD displays that the installing is completed. Then toggle the switch S2 to “Nand Flash” boot. Then power on the board to boot the system.
Run WinCE6.0 with SD card
Note: This step is based on that the Superboot has been burned in your SD card’s root directory.
- Step1
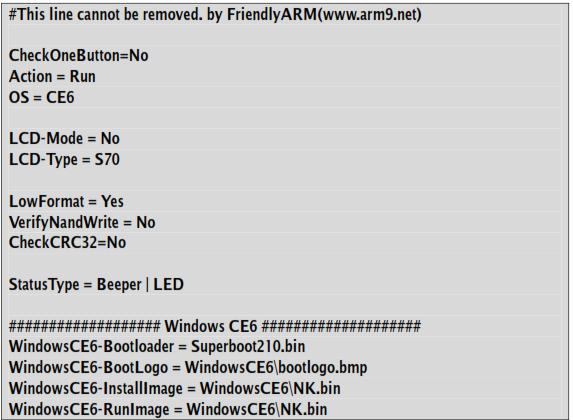
- Plug your SD card in to your computer, open “images/FriendlyARM.ini”, Modify the content of the FriendlyARM.ini as below(default is that)
Note: If the LCD is connected to development board when installing system ,LCD parameters needn’t to be specified in FriendlyARM.ini because the Superboot will identify the LCD type automatically. If installing the system without LCD connected, LCD-Type parameters need to be specified, the supported LCD type includes H43,W50, A56, S70,A70, L80, G10.
- Step2
- Check the files below exist in SD card, if it doesn’t existed , images folder need to be copied to SD card’s root.
- Step3
- Plug the SD card into SD card slot, after that toggle the switch to SD boot and power on the board. Then the installing will start.

