Difference between revisions of "3DR Radio Telemetry"
(→Legal frequency for different countries/regions) |
(→Mission Planner setting) |
||
| Line 105: | Line 105: | ||
The latest version of APM Mission Planner can set 3DR Radio Module on the simple graphical user interface, choose 3DR Set serial port which has been connected to ground station from the Mission Planner(top right corner), and please choose the baud rate 57600. | The latest version of APM Mission Planner can set 3DR Radio Module on the simple graphical user interface, choose 3DR Set serial port which has been connected to ground station from the Mission Planner(top right corner), and please choose the baud rate 57600. | ||
| − | + | Click the load button and read the initial configuration of the current radio. | |
===Both SEIRAL_SPEED and AIR_SPEED are "single-byte" format=== | ===Both SEIRAL_SPEED and AIR_SPEED are "single-byte" format=== | ||
Revision as of 05:45, 25 September 2014
Contents
- 1 Introduction
- 2 Interfaces
- 3 Development Environment setting
- 3.1 Interface Connecting and Setting
- 3.2 File Burning
- 3.3 Software Setting
- 3.3.1 Earth station debugging software Mission Planner setting
- 3.3.2 Mission Planner setting
- 3.3.3 Both SEIRAL_SPEED and AIR_SPEED are "single-byte" format
- 3.3.4 Choose AIR_SPEED
- 3.3.5 Error Corrector
- 3.3.6 MAVLink framework
- 3.3.7 MAVLink returns
- 3.3.8 Duty Cycle (Duty Cycle) Settings
- 3.3.9 Listen Before Talk (LBT)
- 3.3.10 Legal frequency for different countries/regions
Introduction
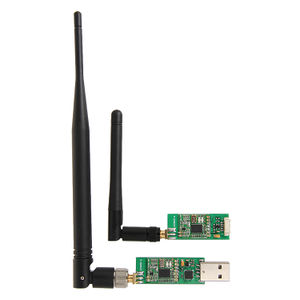
The 3DR Radio Telemetry of 3D Robotics is an ideal module to set the remote sensing connection module between APM and ground station. It features small volume, cost effective, wider transmission range, and it allows us to do things that other data transmission modules can’t do.
Features:
1.Very small volume
2.Selectable operating frequency: 915MHZ 433HZ
3.Receiving sensitivity: -121 dBm
4.Transmission power :20 DBM (100 mw)
5.Transparent serial links
6.Air data transfer rate is as high as 250 KBPS
7.MAVLink frame protocol and status report
8.Frequency-hopping spread-spectrum (FHSS)
9.Adaptive Time Division Multiplex (TDM)
10.Support LBT and AFA
11.Configurable duty ratio
12.Built-in error correction code (can correct up to 25% of the data error)
13.Transmission range can reach miles with the small Omni-directional antenna
14.Use bilateral amplifier to gain greater scope
15.AT command deploys data transmission
16.RT command remotely deploys data transmission
17.self- adapt to the flow control when used with APM
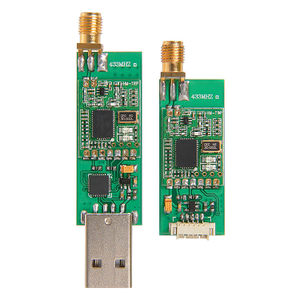
18.Based on HM - TRP wireless module, equipped with Si1000 8051 micro controller and the Si4432 radio module.
19.The Master collocates with long antenna and the Slave collocates with a short antenna to reduce the load of the aircraft.
Overview and Hardware Resources
Size:18mmx51mm(Slave) 18mmx71mm(Master)
Weight:50g
Software Resources
3DR Radio Master Drive:cp2102 usb to uart bridge controller
PC software:MissionPlanner
Component:Net Flamework 4
Source
Interfaces
Interface Layout
Please pay attention to Plus-n-Minus of the power supply, the chip and circuit would be burned if connecting the power supply inversely. The Working voltage of this module is 5V, the power supply is as the APM2.52 interface showing.
Interface specifications
LED indicators elaboration:
3DR Radio module has two status indicator lights, one red and the other green. The meanings of the LED's different status are as follows:
1. The green LED blinking– searching for another radio
2. The green LED solid - is established link with another radio
3. The red LED blinking –transmitting data
4. The red LED solid – in firmware update mode
Development Environment setting
Interface Connecting and Setting
File Burning
All our products have been tested rigorously before shipping, bootloader and firmware have been burned, and the corresponding parameters have been configured,they can be put into use directly
Software Setting
Earth station debugging software Mission Planner setting
First of all, it needs net Framework 4.0 components of Microsoft to install and run Mission Planner, so please download and set net Framework 4.0 components before installing Mission Plammer. Start to download Mission Planner installation package after installing the NetFramework, and every version of the download page provides MSI version and ZIP version to choose from. MSI version is application installation package, the APM USB driver will be installed at the same time. YOU can use the MSI only plug the APM USB cable after installation. ZIP version is green and free installation, it can be used only after decompression, but after connecting APM, you need to install the APM USB driver program which is in the decompression Driver folder. Please choose MSI or ZIP version by yourself, but if you install and use it for the first time, suggest you download MSI version. Take the MSI version installation for example(Note: Please do not connect the APM USB cable before installation ),double-click the MSI file after download, then click "Next" step by step, just when the installation wizard of the device driver program popups in the process, pls click “Next” to continue, or the driver program installation will be skipped.
Mission Planner setting
The latest version of APM Mission Planner can set 3DR Radio Module on the simple graphical user interface, choose 3DR Set serial port which has been connected to ground station from the Mission Planner(top right corner), and please choose the baud rate 57600.
Click the load button and read the initial configuration of the current radio.
Both SEIRAL_SPEED and AIR_SPEED are "single-byte" format
The parameter of the SEIRAL_SPEED and AIR_SPEED are the same as the SERIAL3_SPEED EEPROM parameter format which is used by APM。It’s unit is kbps,but it is cut into integer, so‘9’ refers to 9600 bps,‘38’ to 38400,‘115’to ‘115200’ and so on.
Choose AIR_SPEED
AIR_SPEED is the key parameter for the radio to control the transmission rate. The default value is 64 (64 kbps), the transmission range of using omni-directional antenna can be up to 1 km. The lower the AIR_SPEED value is set, the further the transmission range is. But the amount of data transferred will also decrease if the AIR_SPEED value reduces. These radio modules support only 13 kinds of air data transfer rate, including 2, 4, 8, 16, 19, 24, 32, 48, 64, 96, 128, 192 and 250.If you select a rate not supported, the program will choose the next highest rate supported. The choice of air data rate depends on several factors as follows:
1. The transmission range required
2. The transmission rate
3. One-way transmission or two-way transmission
4. Whether the ECC is open or not
5. Whether the APM firmware has self-adaptive flow control or not
Under the given AIR_SPEED, the supported transmission rate will vary according to the ECC parameters. If the ECC is set to 0, there will be no correcting information for mistakes; this radio module uses a simple 16 Bit CRC to detect transmission errors. In this case, the data transmitted in one direction supported by radio is about 90% of AIR_SPEED.
If you open the ECC (strongly recommended), the transfer rate will be cut in half, but it is worth it, error rate will drop sharply, a more reliable connection can be received within a farther range. If you have the latest version of the APM firmware(ArduPlane 2.33 or above, or ArduCopter 2.54 or above), APM will automatically adjust the corresponding rate of the remote radio according to the MAVLink RADIO package inserted in MAVLink flow by radio firmware. So that you can 'excess define' the connection, that is to say, you can set the SERIAL_SPEED greater than the radio module can actually handle.
The other factor to select the data transfer rate is TDM "synchronization time". Two radio need to compute mutually the frequency hopping pattern. The principle is to change receive channel slowly while rapidly change the transmission channel. This program synchronization with other radio module just needs a few seconds to transfer when it's at a higher data transmission rate, but if using a low transmission, the rate is slower. For most amateur unmanned aerial vehicle (UAV) equipment, it's usually well by setting AIR_SPEED default 64, and then opening the function of the ECC.
Error Corrector
As mentioned above, if your ECC parameter is set to 1, the radio module will support 12/24 gray error correcting code. This means that every 12 bits radio module will send 24 bits, and bit computing is to use gray code reference table. The process at the receiving end is on the contrary, it allows 3 bits wrong of 12 transmitted bit radio module calibration (25% error rate). The disadvantage of ECC option is that it will halve the available bandwidth, but it's worth it in the most situations, you can maintain the reliable links within a farther range.
MAVLink framework
If you settle MAVLINK option to 1, the radio module will be in "MAVLINK framework". MAVLink protocol APM is to deliver telemetry data to ground stations. When using MAVLink framework, radio module will align at the data packet of radio module according to the MAVLink packet boundary. That means if packets are lost, your receiving end can't receive half of the MAVLink packet, which will display a linear noise in ground station control panel. The radio module firmware will try to integrate the multiple MAVLink packets to a wireless packet, in order to get the best efficiency. The largest radio module packet capacity is 252 bytes. The radio module firmware supports MAVLink 0.9 and 1.0 MAVLink transmission format.
MAVLink returns
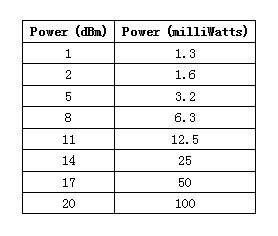
If you set the MAVLINK to 1, the radio module firmware will seek from the MAVLINK HEARTBEAT messages sent by serial port .When it receives the HEARTBEAT message, it will know MAVLink protocol is in use, it will start to write MAVLink radio module state packet into the serial stream . The radio module packet contains the RSSI (Received Signal Strength Indicator) information on both ends of links, which can let the ground station or the plane take action when the Signal is not good. The radio module packet also contains the information of the error rate and serial transmission buffer being enough or not (percentage).The latest version of the APM firmware can use this information to automatically match telemetry streaming rate to data rate maintained by the radio module. Regarding the power level, you must be very careful to deploy the radio module, and you should obey the legal authority limits of the country when operating. The default power rating is 20 dBm, which is legal in the United States and Australia, the license of 915-928 MHZ frequency hopping frequency modulation LIPD levels will be needed if more than 30 dBm. So as long as your antenna gain is below 10 dBi, you should have the provisions complied with the ISM. The radio module can't support arbitrary power level. It can only support the power levels in the table below.
If you choose a radio module with the power level not supported, it will choose the highest power lever from the above table. Please carefully check the power limit of their own EIRP (Equivalent isotropically radiated power), make sure you take the antenna gain into consideration 3DR radio module is a DIY radio module components, it's your responsibility to make sure that using it is in line with the local regulations. For example, if your local rules and regulations allow 30dbm (1 w) EIRP to be maximum, you use 12dB transmit gain, and the antenna gain is 3dBi,your TXPOWER can only be set to 14 as the most.
Duty Cycle (Duty Cycle) Settings
Most users will set DUTY_CYCLE to 100. DUTY_CYCLE is the time percentage of the largest radio module transmission packet. The reason of placing duty cycle is that some parts of the world allow a higher transmission power or more frequency; your duty cycle can be used when it's below a certain value. So in Europe, for example, if your duty cycle is less than 10%, you can use a 433 bandwidth transmission. When your duty cycle is set below 100%, your available bandwidth will reduce, so you will find the best way is that the remote sensing module uses a higher baud rate. It's still quite practical to use 10% duty cycle of APM to achieve good telemetry, but the communication task of the telemetry module is with high bursty, so the average transmission time is generally not high. For example, if you set AIR_SPEED to 128, star ECC and set DUTY_CYCLE to 10, you can easily receive all the 2HZ telemetry signals. As long as you set DUTY_CYCLE to 0, the radio module can be set to the receiver. You'd better set NUM_CHANNELS to a lower value when operating; otherwise, the effect of clock synchronization will become very poor.
Listen Before Talk (LBT)
3DR radio module can realize "listen before talk" (LBT) function, and enable it to meet the broader regional regulatory requirements. LBT is a system whose radio modules needs to be monitored for a period of time to see if there are other radio module signals, and then be allowed to transfer. You must first set LBT_RSSI parameters if you want to open LBT in the radio module.
Radio module will record this parameter and then convert it to the signal intensity, which means that the channel is occupied. If you set LBT_RSSI to 0, LBT will close. Minimum value shall not be 0, 25 means it's a few dB over the receiver sensitivity (-121 dBm).You need to know the local signal level regulations of the radio module with LBT function. For LBT_RSSI whose amount of increase is more than 25, its receiving sensitivity is equal to the radio module above 0.5 dB. So, if you set the LBT_RSSI to 40, the radio module will consider the channel empty, but it is in the signal strength of receiver sensitivity lower than 7.5 dB. In addition, you can use this formula to calculate DBm's received signal strength: signal_dBm = (RSSI / 1.9) – 127. This formula is the approximation, you need to check the local regulatory requirements, and see what kind of LBT_RSSI setting you should use. The implementation of LBT in 3DR radio module due to using the lowest 5ms receiving time and the random receiving time is the same as the European 9.2.2.2 rules. Please note that in many areas, you need to combine AFA (the Adaptive Frequency Agility) to perform the LBT.As long as you set NUM_CHANNELS more than 1, 3DR radio module can realize AFA.
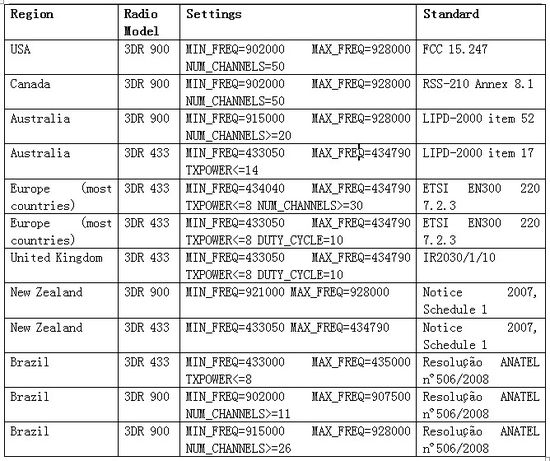
Legal frequency for different countries/regions
It is very important to clear the statutory frequency of different country or region, frequency hopping channel, power rating; 3DR radio module can be configured correctly and in accordance with your local regulations. The following general data can help you understand.


