Difference between revisions of "Geeetech Alkaid 3D Printer"
(→Trouble Shooting) |
(→How to clean and maintain the resin tank and FEP film) |
||
| (14 intermediate revisions by the same user not shown) | |||
| Line 5: | Line 5: | ||
<big>Main Specification</big> | <big>Main Specification</big> | ||
| − | Printing Technology LCD Light Curing Surface Forming Technology | + | '''Printing Technology''' LCD Light Curing Surface Forming Technology |
| − | Printing Size 82X130X190 mm | + | '''Printing Size''' 82X130X190 mm |
| − | XY Resolution 0.051 mm | + | '''XY Resolution''' 0.051 mm |
| − | LCD Size 6.08 inch | + | '''LCD Size''' 6.08 inch |
| − | LCD Resolution 2560X1620 Pixels | + | '''LCD Resolution''' 2560X1620 Pixels |
| − | Z-axis Precision 0.001 mm | + | '''Z-axis Precision''' 0.001 mm |
| − | Layer Thickness | + | '''Layer Thickness''' 0.01~0.2 mm |
| − | Printing Speed 30 mm/h | + | '''Printing Speed''' 30 mm/h |
| − | UV Lamp Rated Power 45 W | + | '''UV Lamp Rated Power''' 45 W |
| − | Resin 405 nm Wavelength Ultraviolet Resin | + | '''Resin 405 nm Wavelength Ultraviolet Resin''' |
| − | Slicer Software CHITUBOX | + | '''Slicer Software CHITUBOX''' |
| − | File Type .CTB | + | '''File Type''' .CTB |
| − | Working Environment Temperature 10 ℃~35 ℃ | + | '''Working Environment Temperature''' 10 ℃~35 ℃ |
| − | Working Environment Humidity 30%~70% | + | '''Working Environment Humidity''' 30%~70% |
<big>Electrical Parameter</big> | <big>Electrical Parameter</big> | ||
| − | Power Adapter Input: 100V~240V, 50/60Hz, Output: 12V/5A | + | '''Power Adapter''' Input: 100V~240V, 50/60Hz, Output: 12V/5A |
| − | Connectivity | + | '''Connectivity''' USB |
| − | Touch Screen 3.5 -Inch Full-color Touch Screen | + | '''Touch Screen''' 3.5 -Inch Full-color Touch Screen |
| − | LCD Screen Resolution 2K Forming Screen | + | '''LCD Screen Resolution''' 2K Forming Screen |
<big>Mechanical Parameter</big> | <big>Mechanical Parameter</big> | ||
| − | Printer Size 286(L)*226(W)*372(H) mm | + | '''Printer Size''' 286(L)*226(W)*372(H) mm |
| − | Package Size 353(L)*293(W)*464(H) mm | + | '''Package Size''' 353(L)*293(W)*464(H) mm |
| − | Net Weight 4.2 kg | + | '''Net Weight''' 4.2 kg |
| − | Gross Weight 5.8 kg | + | '''Gross Weight''' 5.8 kg |
| Line 84: | Line 84: | ||
The following is a video tutorial to replace the UV lamp, please follow the tutorial. | The following is a video tutorial to replace the UV lamp, please follow the tutorial. | ||
| − | + | [https://www.youtube.com/watch?v=_T1C7oRtg7g replace UV light] | |
| − | https://www.youtube.com/watch?v=_T1C7oRtg7g | ||
==How to replace motherboard== | ==How to replace motherboard== | ||
The following is a video tutorial to replace the motherboard, please follow the tutorial. | The following is a video tutorial to replace the motherboard, please follow the tutorial. | ||
| − | + | [https://www.youtube.com/watch?v=SpL1zfbAV0k replace motherboard] | |
| − | https://www.youtube.com/watch?v=SpL1zfbAV0k | + | purchase link |
| + | [https://www.geeetech.com/alkaid-lcd-printer-control-board-p-1455.html motherboard] | ||
==How to replace FEP film== | ==How to replace FEP film== | ||
| Line 98: | Line 98: | ||
Unscrew the screws in the picture below. | Unscrew the screws in the picture below. | ||
| − | [[File: | + | [[File:A13.png]] |
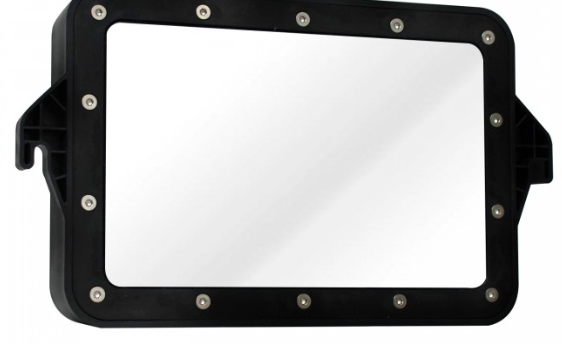
Install the new FEP film, take care not to exhaust the screws when screwing, just make sure to screw well. Because too much force will cause damage to the pressure plate fixing FEP film, as shown in the figure below. | Install the new FEP film, take care not to exhaust the screws when screwing, just make sure to screw well. Because too much force will cause damage to the pressure plate fixing FEP film, as shown in the figure below. | ||
[[File:A2.png]] | [[File:A2.png]] | ||
| + | |||
| + | At the same time, FEP film is a consumable and vulnerable part, and needs to be cleaned and maintained in time after use. | ||
==How to replace power supply== | ==How to replace power supply== | ||
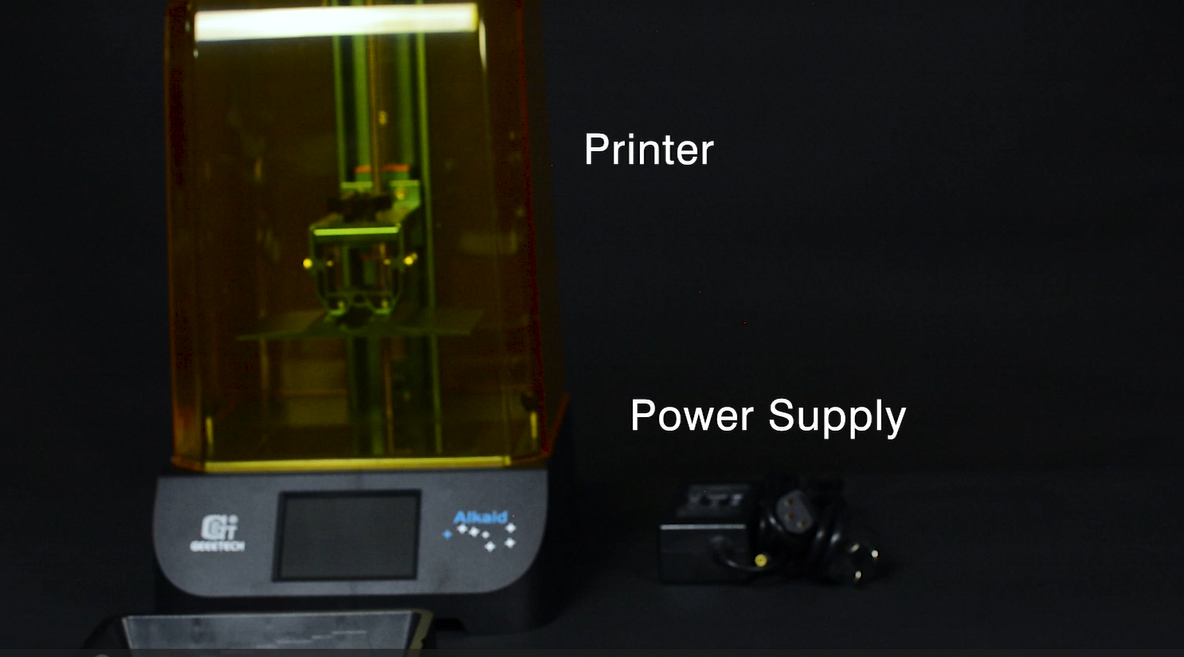
| Line 114: | Line 116: | ||
Please check whether the print screen under the exposure test is as shown below. If the effect is not good, you need to replace the print screen. | Please check whether the print screen under the exposure test is as shown below. If the effect is not good, you need to replace the print screen. | ||
| + | |||
| + | Print screen purchase link [https://www.geeetech.com/alkaid-lcd-printer-608-inch-print-screen-p-1452.html Print screen] | ||
[[File:A7.png]] | [[File:A7.png]] | ||
| − | Unscrew the screen and replace it with a new screen. | + | Unscrew the screen and replace it with a new screen. |
| + | |||
| + | ==How to replace Forming Platform== | ||
| + | |||
| + | Unscrew the four screws of the forming platform and then remove the forming platform. When installing a new forming platform, be careful not to tighten all the screws at once. As with the leveling operation, screw the four screws to half loose and half tight, make sure the platform is level, and then tighten all the screws. Purchase link [https://www.geeetech.com/alkaid-lcd-printer-forming-platform-attachment-bracket-p-1453.html Forming Platform] | ||
| + | |||
| + | [[File:A8.png]] | ||
| + | |||
| + | |||
| + | ==How to clean and maintain the resin tank and FEP film== | ||
| + | |||
| + | Cleaning the resin tank and FEP film | ||
| + | |||
| + | 1. Preparation: | ||
| + | Wear protective gloves and avoid direct contact with the resin. | ||
| + | Prepare cleaning tools, including a soft scraper, a fine mesh filter, isopropyl alcohol (IPA, concentration above 95%), a soft cloth or paper towel. | ||
| + | |||
| + | 2. Cleaning the resin tank: | ||
| + | Carefully pour the uncured resin from the resin tank back into the resin bottle and filter it with a fine mesh filter to remove any cured particles or impurities that may exist. | ||
| + | |||
| + | 3. Remove the FEP film (if necessary): | ||
| + | Depending on the design of the resin tank, use appropriate tools (such as a screwdriver) to remove the screws or clamps that secure the FEP film. | ||
| + | |||
| + | 4. Cleaning the resin tank: | ||
| + | Pour an appropriate amount of isopropyl alcohol (IPA) into the resin tank and shake it gently to dissolve the remaining resin. | ||
| + | Use a soft cloth or paper towel to gently wipe the tank walls and bottom to ensure that all the resin is removed. Avoid using rough or hard tools to avoid scratching the resin tank. | ||
| + | |||
| + | 5. Cleaning the FEP film: | ||
| + | Soak the FEP film in isopropyl alcohol for a few minutes and shake it gently to dissolve the remaining resin. | ||
| + | Use a soft cloth or paper towel to gently wipe the surface of the film to ensure thorough cleaning. | ||
| + | |||
| + | 6. Drying: | ||
| + | Use a clean cloth or paper towel to wipe the isopropyl alcohol on the surface of the resin tank and FEP film. Make sure it is completely dry before the next print. | ||
| + | |||
| + | |||
| + | Maintaining the resin tank and FEP film | ||
| + | |||
| + | 1. Regular inspection: | ||
| + | Check the status of the resin tank and FEP film regularly to ensure that there are no scratches, perforations or deformations. If any damage is found, replace it in time. | ||
| + | |||
| + | 2. Avoid direct sunlight: | ||
| + | Resin is sensitive to ultraviolet rays, so avoid exposing the resin tank to direct sunlight to prevent unused resin from curing prematurely. | ||
| + | |||
| + | 3. Storage Note: | ||
| + | If the printer is not used for a long time, it is recommended to pour out the resin in the resin tank and clean it, and store the resin tank and FEP film in a dry and cool place. | ||
| + | |||
| + | 4. Handle with care: | ||
| + | When cleaning and handling the resin tank, be as gentle as possible and avoid using sharp tools or excessive force to reduce damage to the film. | ||
| + | |||
| + | |||
| + | Through regular cleaning and maintenance, the service life of the resin tank and FEP film can be maximized to ensure the continuous and stable operation of the 3D printer. | ||
=Trouble Shooting= | =Trouble Shooting= | ||
==The pressure plate is damaged== | ==The pressure plate is damaged== | ||
| − | The pressure plate is broken as shown in the figure below. | + | The pressure plate is broken as shown in the figure below. The pressure plate purchase link [https://www.geeetech.com/lcd-printer-resin-lcd-printer-accessories-c-131_156.html The pressure plate] |
[[File:A2.png]] | [[File:A2.png]] | ||
| − | The rupture of the pressure plate will cause the resin in the resin box to leak onto the printing screen, and the resin is corrosive and likely to corrode the printing screen. When replacing the FEP film, please be careful not to use too much force, just make sure that the screw is screwed properly, if too much force will cause the pressure plate to crack | + | The rupture of the pressure plate will cause the resin in the resin box to leak onto the printing screen, and the resin is corrosive and likely to corrode the printing screen. When replacing the FEP film, please be careful not to use too much force, just make sure that the screw is screwed properly, if too much force will cause the pressure plate to crack. |
==Print screen damage== | ==Print screen damage== | ||
| Line 191: | Line 245: | ||
Check that the model support is adequate. When the model support is not in place and the density is not enough, it is easy to cause the model to shake slightly when printing and demoulding. In this case, it is recommended to increase the support density or manually add the support fixed model. | Check that the model support is adequate. When the model support is not in place and the density is not enough, it is easy to cause the model to shake slightly when printing and demoulding. In this case, it is recommended to increase the support density or manually add the support fixed model. | ||
| − | 2.Check | + | 2.Check FEP film |
Check whether the release film of the material box is relaxed. If there is slack, it is recommended to tighten the release film steel ring. | Check whether the release film of the material box is relaxed. If there is slack, it is recommended to tighten the release film steel ring. | ||
| + | |||
| + | [[File:A13.png]] | ||
3.Check Z-axis operation status | 3.Check Z-axis operation status | ||
Latest revision as of 09:09, 14 June 2024
Contents
- 1 Printer Introduction
- 2 Printer Maintenance
- 3 Trouble Shooting
- 3.1 The pressure plate is damaged
- 3.2 Print screen damage
- 3.3 Resin non-stick forming platform
- 3.4 The display does not light up
- 3.5 Cleaning of resin after printing
- 3.6 The printer cannot recognize the file
- 3.7 Support adding technique when slicing
- 3.8 The model is split-level
- 3.9 There is residual resin in the model
- 3.10 Precautions for resin
Printer Introduction
Alkaid is made in black and white with 6.08 "2K resolution, enabling X/Y accuracy up to 0.05mm. Alkaid's z axis uses a high-cost linear guide rail, which has the characteristics of high rigidity, high load, automatic self-aligning, absorbing assembly errors, etc., which can effectively improve the overall printing quality of 3D printers. A new generation of matrix light source, using 15 pieces of high-light power quartz lamp beads, with professional optical materials made of matrix lenses, so that ultraviolet irradiation on the LCD screen more uniform, higher intensity, effectively improve the printing speed and accuracy.The rugged Alkaid innovates by integrating UV lamp beads on the aluminum substrate at the bottom of the machine, allowing for greater heat dissipation area. With the cooling fan, it can effectively reduce the temperature of the lamp board and extend the service life of the UV lamp beads. Alkaid is easy to operate and affordable, making it ideal for beginners and amateurs. In addition, geeetech is able to provide ODM and OEM custom design and manufacturing.
Main Specification
Printing Technology LCD Light Curing Surface Forming Technology
Printing Size 82X130X190 mm
XY Resolution 0.051 mm
LCD Size 6.08 inch
LCD Resolution 2560X1620 Pixels
Z-axis Precision 0.001 mm
Layer Thickness 0.01~0.2 mm
Printing Speed 30 mm/h
UV Lamp Rated Power 45 W
Resin 405 nm Wavelength Ultraviolet Resin
Slicer Software CHITUBOX
File Type .CTB
Working Environment Temperature 10 ℃~35 ℃
Working Environment Humidity 30%~70%
Electrical Parameter
Power Adapter Input: 100V~240V, 50/60Hz, Output: 12V/5A
Connectivity USB
Touch Screen 3.5 -Inch Full-color Touch Screen
LCD Screen Resolution 2K Forming Screen
Mechanical Parameter
Printer Size 286(L)*226(W)*372(H) mm
Package Size 353(L)*293(W)*464(H) mm
Net Weight 4.2 kg
Gross Weight 5.8 kg
Watch the user manual and unboxing video before assembling the printer.
Note before printing
- The desktop to be placed must be very stable and does not shake, the device weighs about 25kg(shaking the desktop is easy to lead to print delamination)
- The surrounding area is not less than 0.3 meters, so as not to affect heat dissipation
- Can not be placed close to the window position, as far as possible is backlit indoors
- Can not be placed in the spotlight, strong light
- The room should be ventilated
- Ambient temperature 20-28°, not more than 30°
- Printer shutdown: The power must be turned off after the normal shutdown of the operating interface, (to prevent the printer's system damage)
- The printer is formed on the principle of light curing and should be placed in an environment with less dust.
- Do not operate the machine during the printing process, do not shake the machine and place the desktop.
Printer Maintenance
How to replace UV light
The following is a video tutorial to replace the UV lamp, please follow the tutorial. replace UV light
How to replace motherboard
The following is a video tutorial to replace the motherboard, please follow the tutorial. replace motherboard purchase link motherboard
How to replace FEP film
First please prepare a sheet of FEP film, which can be purchased from the link below. FEP film
Unscrew the screws in the picture below.
Install the new FEP film, take care not to exhaust the screws when screwing, just make sure to screw well. Because too much force will cause damage to the pressure plate fixing FEP film, as shown in the figure below.
At the same time, FEP film is a consumable and vulnerable part, and needs to be cleaned and maintained in time after use.
How to replace power supply
Below is the power supply, if the light on the power supply is not bright, it needs to be replaced. Please contact technical support.
How to replace Print screen
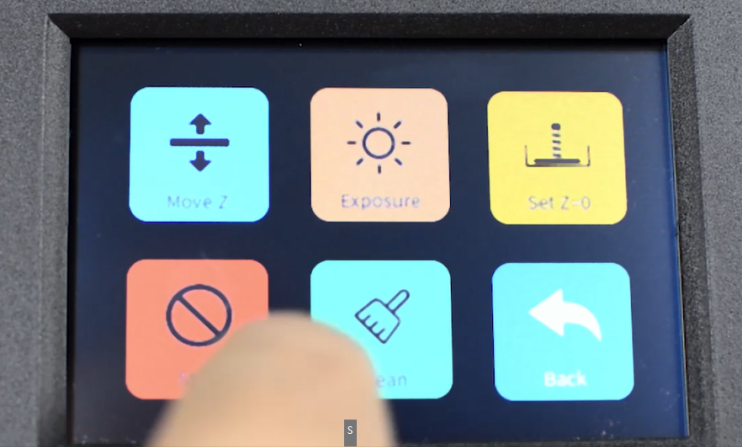
Please click the exposure test button in the image below to perform the exposure test.
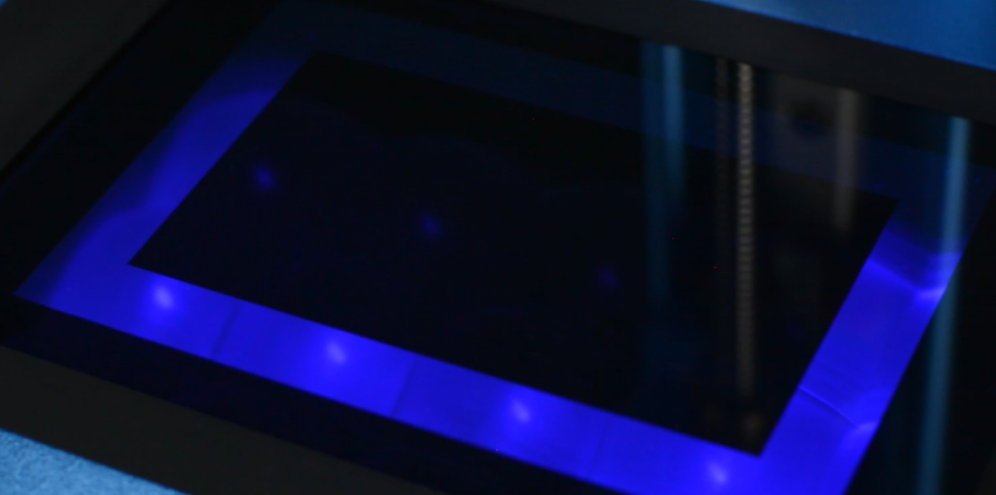
Please check whether the print screen under the exposure test is as shown below. If the effect is not good, you need to replace the print screen.
Print screen purchase link Print screen
Unscrew the screen and replace it with a new screen.
How to replace Forming Platform
Unscrew the four screws of the forming platform and then remove the forming platform. When installing a new forming platform, be careful not to tighten all the screws at once. As with the leveling operation, screw the four screws to half loose and half tight, make sure the platform is level, and then tighten all the screws. Purchase link Forming Platform
How to clean and maintain the resin tank and FEP film
Cleaning the resin tank and FEP film
1. Preparation: Wear protective gloves and avoid direct contact with the resin. Prepare cleaning tools, including a soft scraper, a fine mesh filter, isopropyl alcohol (IPA, concentration above 95%), a soft cloth or paper towel.
2. Cleaning the resin tank: Carefully pour the uncured resin from the resin tank back into the resin bottle and filter it with a fine mesh filter to remove any cured particles or impurities that may exist.
3. Remove the FEP film (if necessary): Depending on the design of the resin tank, use appropriate tools (such as a screwdriver) to remove the screws or clamps that secure the FEP film.
4. Cleaning the resin tank: Pour an appropriate amount of isopropyl alcohol (IPA) into the resin tank and shake it gently to dissolve the remaining resin. Use a soft cloth or paper towel to gently wipe the tank walls and bottom to ensure that all the resin is removed. Avoid using rough or hard tools to avoid scratching the resin tank.
5. Cleaning the FEP film: Soak the FEP film in isopropyl alcohol for a few minutes and shake it gently to dissolve the remaining resin. Use a soft cloth or paper towel to gently wipe the surface of the film to ensure thorough cleaning.
6. Drying: Use a clean cloth or paper towel to wipe the isopropyl alcohol on the surface of the resin tank and FEP film. Make sure it is completely dry before the next print.
Maintaining the resin tank and FEP film
1. Regular inspection: Check the status of the resin tank and FEP film regularly to ensure that there are no scratches, perforations or deformations. If any damage is found, replace it in time.
2. Avoid direct sunlight: Resin is sensitive to ultraviolet rays, so avoid exposing the resin tank to direct sunlight to prevent unused resin from curing prematurely.
3. Storage Note: If the printer is not used for a long time, it is recommended to pour out the resin in the resin tank and clean it, and store the resin tank and FEP film in a dry and cool place.
4. Handle with care: When cleaning and handling the resin tank, be as gentle as possible and avoid using sharp tools or excessive force to reduce damage to the film.
Through regular cleaning and maintenance, the service life of the resin tank and FEP film can be maximized to ensure the continuous and stable operation of the 3D printer.
Trouble Shooting
The pressure plate is damaged
The pressure plate is broken as shown in the figure below. The pressure plate purchase link The pressure plate
The rupture of the pressure plate will cause the resin in the resin box to leak onto the printing screen, and the resin is corrosive and likely to corrode the printing screen. When replacing the FEP film, please be careful not to use too much force, just make sure that the screw is screwed properly, if too much force will cause the pressure plate to crack.
Print screen damage
Please refer to the replacement print screen above. If the resin in the resin box leaks onto the printing screen, the resin is corrosive and is likely to corrode the printing screen.
Resin non-stick forming platform
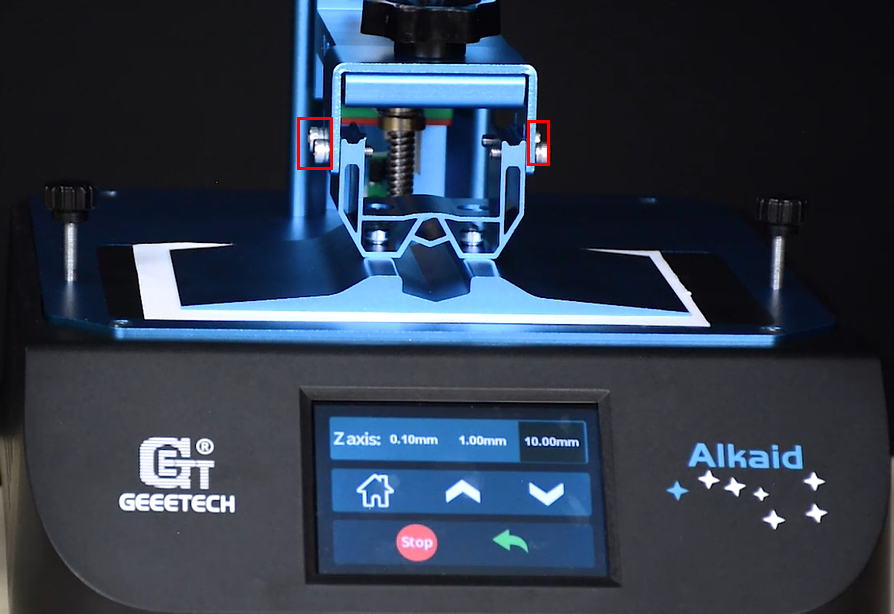
1.Please re-level, be careful not to tighten all screws at once after zero, which will cause the forming platform to skew. Turn the four screws in turn until they are half loose and half tight, and then tighten all screws after ensuring that they are level. Try printing another model after leveling it.
If the hot bed is still non-stick, please perform an exposure test to check that the print screen and UV etc. can work properly.
2.If the support is not added enough, it is easy to lead to the failure of model printing, if this is the reason, it is necessary to re-slice the model and add enough support;
3.Exposure time is too short also easily lead to printing failure, then the exposure time can be extended appropriately (in s);
The display does not light up
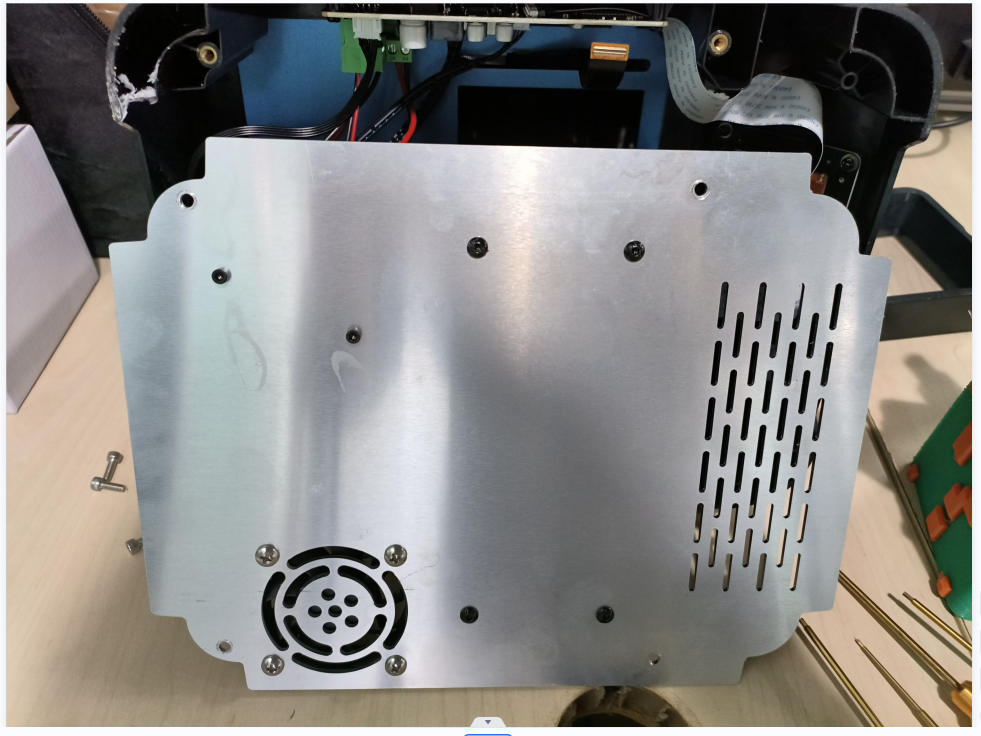
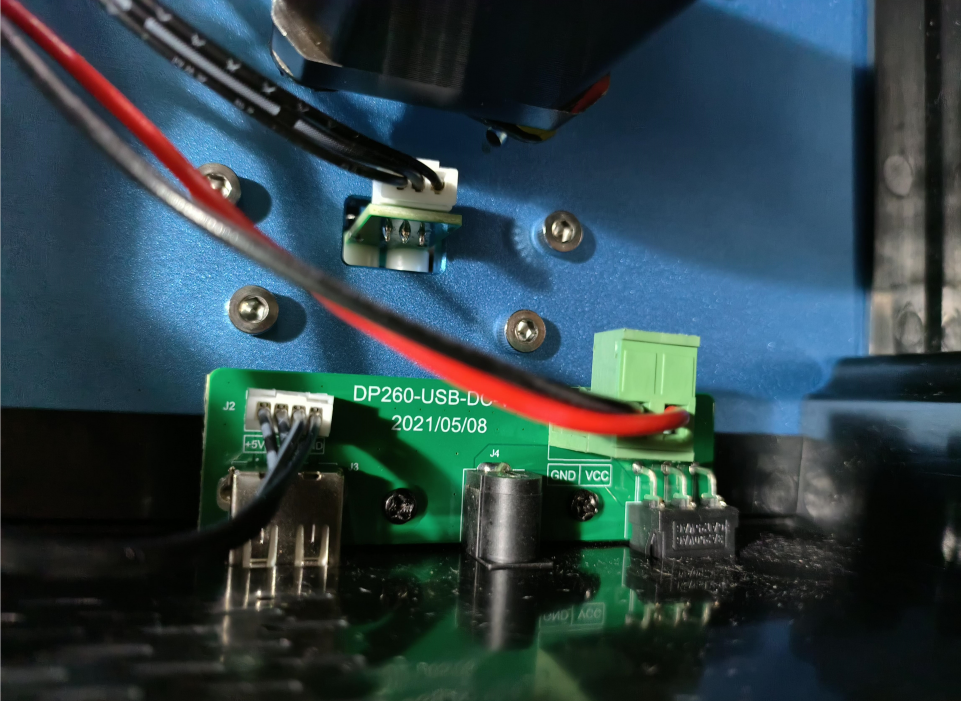
Check whether the power indicator is on when the power is powered on. If the indicator is on normally, disassemble the base according to the following figure.
Check whether the cable connecting the power supply to the mainboard is loose.
If it is not loose, please connect the motherboard and the computer with a USB cable, and check whether the device manager on the computer can recognize the motherboard. If not, the motherboard is broken and needs to be replaced. If it can be identified, it is the display is broken, need to replace the display, please contact technical support to buy.
Cleaning of resin after printing
Please click the button on the screen to clean the tray and clean it with alcohol or professional IPA cleaner. If the cleaning is still incomplete, please click the link below to buy a cleaner. GWC01GWC02
The printer cannot recognize the file
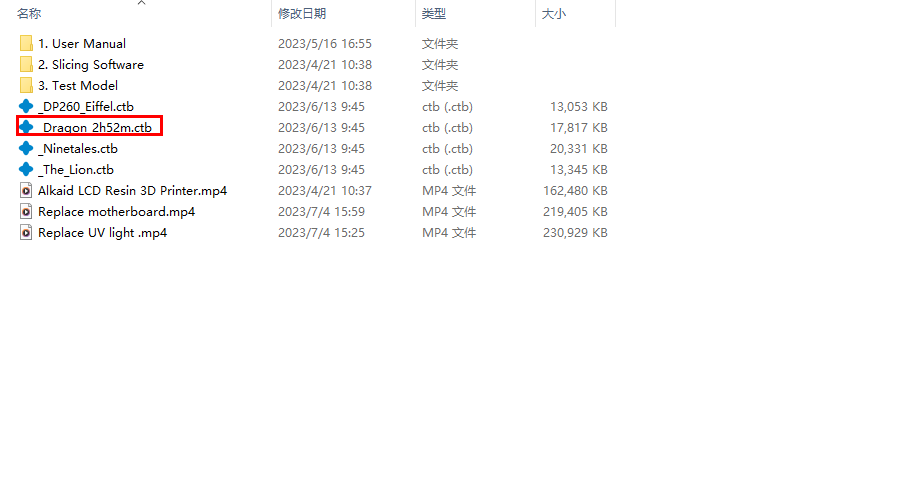
Alkaid can only identify files with the suffix.ctb and print them. Please print the cut files on the USB flash drive.
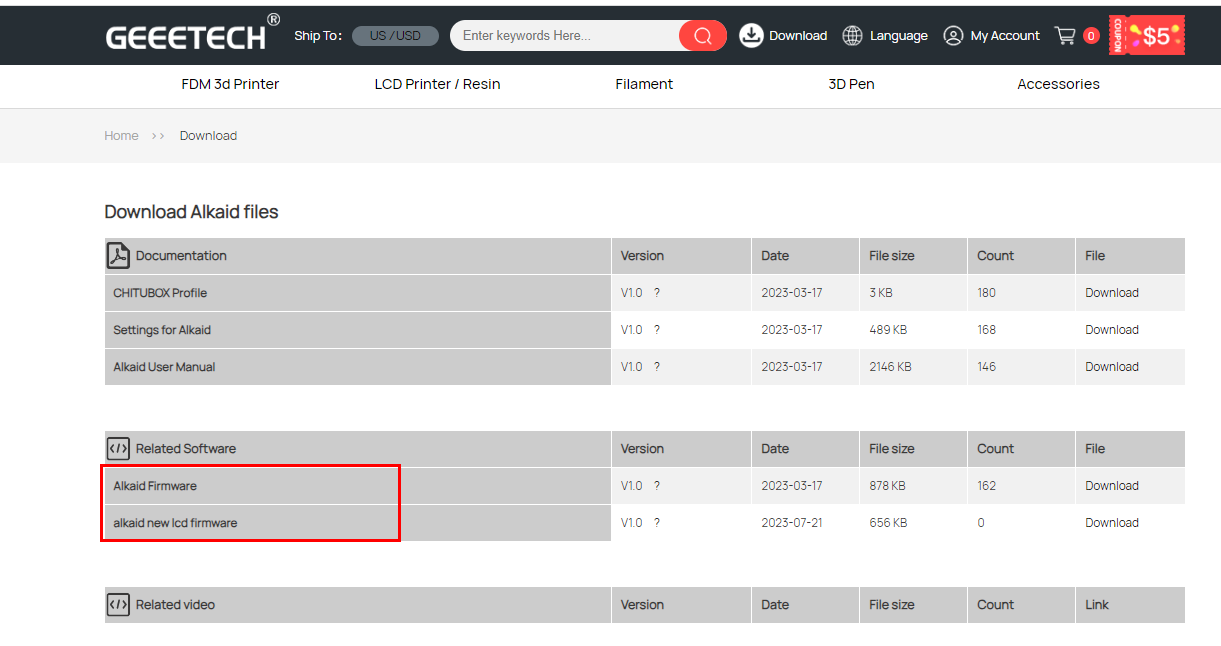
If the printer cannot print.ctb files, refresh the firmware. Below is the firmware link, please download the firmware file in the red box and refresh it.
If the file is still not recognized after updating the firmware, then the USB port is damaged and needs to be replaced, please contact technical support to replace it.
Support adding technique when slicing
1.Thin supports are easier to remove and cause less damage to the model, but a higher support density is required to ensure the strength of the support.
2.Check again after automatically adding support. Some places where the support density is not enough, you need to manually add some, or some of the bottom of the suspension without support, you can also increase appropriately.
3.When the model is printed without a bottom, pay attention to the amount of support closest to the bottom must be sufficient.
4.For models that need to be pumped and punched, support is added after the shell is pumped and punched.
5.Some models are uneven at the bottom, and can be appropriately raised to print, or offset a little downward (if the bottom is not high), which is equivalent to cutting a small part of the bottom.
6.Hollow models or after the shell, remember to drill holes so that the resin inside can drain out.
The model is split-level
1.Check model support
Check that the model support is adequate. When the model support is not in place and the density is not enough, it is easy to cause the model to shake slightly when printing and demoulding. In this case, it is recommended to increase the support density or manually add the support fixed model.
2.Check FEP film
Check whether the release film of the material box is relaxed. If there is slack, it is recommended to tighten the release film steel ring.
3.Check Z-axis operation status
If there is abnormal noise in the Z-axis operation, the swing amplitude is too large, or when the Z-axis is running up and down, the manual printing platform is stuck, you need to loosen (do not screw off) the 8 screws that fix the printing platform on the wire rail, and then move the Z-axis up and down, and lock it again after smooth
4.Check print platform
Check that the printing platform is locked. When locking, pay attention to the diagonal lock, and pre-lock first, and then lock all.
5.Check tank
Check the tank for residue. Residue can cause the model to print faults, so check the tank before each print and clean the internal residue in time.
There is residual resin in the model
1.The support is too little to pull the model. Need to re-slice to modify the support.
2.If there is a problem with the model itself, the problem can be solved by modifying the modeling;
3.Wall thickness is also a very important parameter, less than 0.5mm mechanical strength will be relatively poor, want to ensure the effect of the wall thickness can be increased to more than 1 mm;
4.If the material tank or release film is damaged, it will lead to poor light transmission, and the liquid resin can not cure well, in this case, a new release film needs to be replaced.
Precautions for resin
1. The resin is disposable and cannot be reused.
2. Do not touch eyes, skin or clothing, taste or ingest the resin material. Use only under good ventilation.Please pay attention to air circulation and take protective measures. Wash thoroughly after operation.
3. Resin is liquid state, there is a slight smell, please wear a mask when using, so as to avoid inhalation of aerosol, causing infection.
4. The resin should be stored in a sealed container, sealed in time after use, and placed in a dry and well-ventilated place, not exposed to sunlight.
5. In case of accidental inhalation, leave the scene and seek medical attention.
6. In case of contact with skin, wash skin with soap and water or seek medical advice.
7. In case of contact with eyes, immediately open eyelids, rinse with soapy water for about 20 minutes and seek medical attention.
8. If accidentally inhaled or swallowed, do not induce vomiting, keep the state of rest, and promptly sent to the hospital for treatment.
9. Disposal of waste in accordance with local environmental regulations.
