Difference between revisions of "Raspberry Pi Camera Module"
(→Documents) |
(→Documents) |
||
| (One intermediate revision by the same user not shown) | |||
| Line 182: | Line 182: | ||
==Documents== | ==Documents== | ||
| − | Datasheet ( | + | Datasheet (OV5647_full) [[Media:Ov5647full.pdf]] |
| − | Datasheet ( | + | Datasheet (ov5647_brief) [[Media:OV5647 breif.pdf]] |
Datasheet (RaspiCam-Documentation) [[Media:RaspiCam-Documentation.pdf]] | Datasheet (RaspiCam-Documentation) [[Media:RaspiCam-Documentation.pdf]] | ||
Information(OV5647) http://www.ovt.com/products/sensor.php?id=66 | Information(OV5647) http://www.ovt.com/products/sensor.php?id=66 | ||
| + | |||
| + | Quick Start Guide http://www.raspberrypi.org/help/camera-module-setup/ | ||
Latest revision as of 04:02, 3 September 2014
Contents
Introduction
The Raspberry Pi camera module can be used to take high-definition video, as well as stills photographs. It’s easy to use for beginners, but has plenty to offer advanced users if you’re looking to expand your knowledge. There are lots of examples online of people using it for time-lapse, slow-motion and other video cleverness. You can also use the libraries we bundle with the camera to create effects.
If you’re interested in the nitty-gritty, you’ll want to know that the module has a five megapixel fixed-focus camera that supports 1080p30, 720p60 and VGA90 video modes, as well as stills capture. It attaches via a 15cm ribbon cable to the CSI port on the Raspberry Pi. It can be accessed through the MMAL and V4L APIs, and there are numerous third-party libraries built for it, including the Picamera Python library.
The camera module is very popular in home security applications, and in wildlife camera traps.
You can also use it to take snapshots.
Features
- 5MP sensor
- Wider image, capable of 2592x1944 stills, 1080p30 video
- 1080p video supported
- CSI
- Size: 25 x 20 x 9 mm
Camera Details
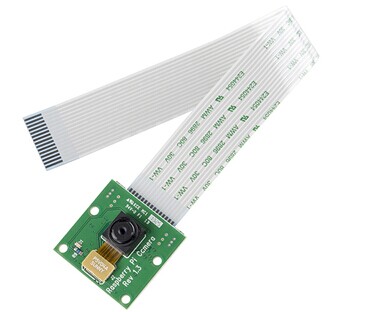
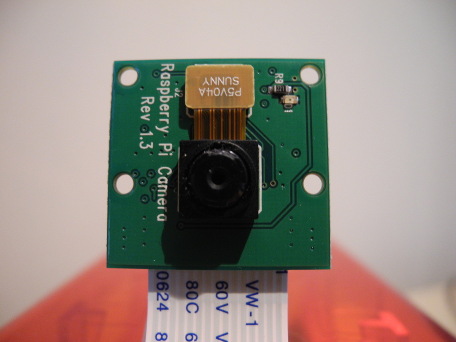
The camera consists of a small (25mm by 20mm by 9mm) circuit board, which connects to the Raspberry Pi's Camera Serial Interface (CSI) bus connector via a flexible ribbon cable. The camera's image sensor has a native resolution of five megapixels and has a fixed focus lens. The software for the camera supports full resolution still images up to 2592x1944 and video resolutions of 1080p30, 720p60 and 640x480p60/90. The camera module is shown below:
Installation involves connecting the ribbon cable to the CSI connector on the Raspberry Pi board. This can be a little tricky, but if you watch the videos that demonstrate how it is done, you shouldn't have any trouble.
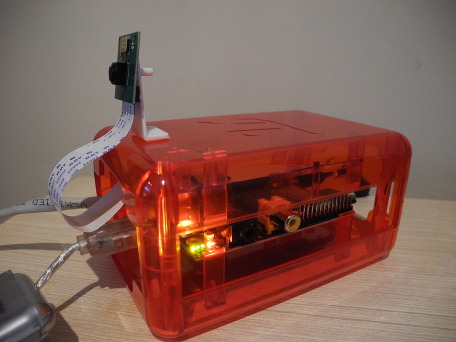
When you purchase the camera, you will receive a small camera board and cable. You'll want to devise some method of supporting the camera in order to use it. Some camera stands and Raspberry Pi cases are now available. You can also rig up something simple yourself if you wish. I attached mine to a case using a small piece of plastic and double-sided tape, as shown below:
Once the hardware is set up, you can move on to configuring the software.
Connect to the camera
- The flex cable inserts into the connector situated between the Ethernet and HDMI ports, with the silver connectors facing the HDMI port. The flex cable connector should be opened by pulling the tabs on the top of the connector upwards then towards the Ethernet port. The flex cable should be inserted firmly into the connector, with care taken not to bend the flex at too acute an angle. The top part of the connector should then be pushed towards the HDMI connector and down, while the flex cable is held in place.
- Update the SD card
In order to use the camera you must be using a recent operating system that knows that the camera exists. The easiest way to do this is to grab the latest Raspbian image from the RaspberryPi.org site and create a fresh SD card.
- Enable camera in raspi-config settings
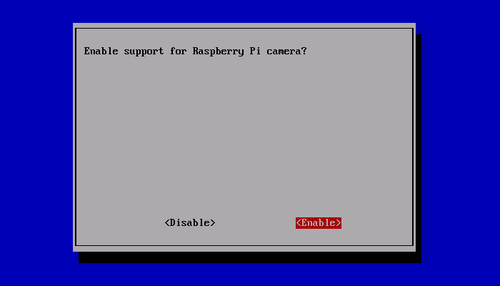
Reboot. If you are using a fresh image the raspi-config utility should load. If it doesn’t then you can run it manually using : sudo raspi-config Sekect the “Camera” option and press “Enter”.
Select “Enable” and press “Enter”.
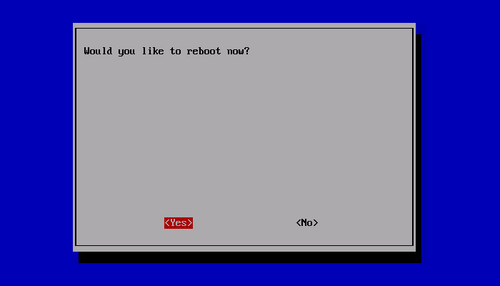
Select “Yes” and press “Enter”. Your Pi will reboot.
Updating your operating and enabling the camera using raspi-config did two things. It told your Pi that there is a camera attached and it added two command line utilities. raspistill raspivid These allow you to capture still photos and HD video respectively.
You are now ready to start having fun!
Software
Since its inception, the camera is supported in the latest version of Raspbian, the preferred operating system for Raspberry Pi. The instructions in this blog post assume you are running Raspbian. The first step is to get the latest Raspberry Pi firmware, which supports the camera. You can do that from a console by running:
   sudo apt-get update
   sudo apt-get upgrade
You then need to enable the camera from the Raspberry Pi configuration program by running:
sudo raspi-config
Choose "camera" from the program and then select "Enable support for Raspberry Pi camera". You should then reboot when prompted by the raspi-config program. The camera will be enabled on subsequent boots of the Raspberry Pi.
Several applications should now be available for the camera: the rapistill program captures images, raspivid captures videos, and raspiyuv takes uncompressed YUV format images. These are command line program. They accept a number of options, which are documented if you run the commands without options. That reference also describes some more sophisticated things you can do, like streaming the video over the network and viewing it on another computer.
The following shell command runs the video capture program with a preview showing all of the built-in camera effects and makes for an interesting demonstration:
for effect in none negative solarise sketch denoise emboss oilpaint hatch gpen pastel watercolour film blur saturation colourswap
washedout posterise colourpoint colourbalance cartoon
   do
       echo $effect
       raspivid -d -ifx$effect
   done
If you want to examine the source code for the programs, report bugs or compile them yourself, they are maintained at the project on github. You can either cross-compile or build the tools natively on the Raspberry Pi.
- User Space V4L2 Driver
The camera drivers are proprietary in the sense that they do not follow any standard APIs. That means that applications have to be written specifically for the Raspberry Pi camera. Under Linux, the standard API for cameras (including web cams) is V4L (Video for Linux), and a number of applications have been written that support any camera with a V4L driver. An independent developer has now written a user space V4L driver for the Raspberry Pi camera. With that driver, you can use generic Linux applications written for cameras. The driver has a few limitations: it is closed sourced, and can be a little slow because it runs as a user program rather than a kernel driver. The program worked reasonably well when I tested it and it is expected to continue to improve.
- Official V4L2 Driver
Recognizing that a V4L driver is needed, the Raspberry Pi Foundation reported that they were working with Broadcom to develop an official kernel V4L driver. As a kernel driver, it should be faster than the user space driver. The official driver became available in December 2013. The driver
is still quite new and not many people appear to have tried it yet. The latest Raspbian distribution and latest Raspberry Pi boot firmware is required for use. You will also need to build some code yourself. If you want to try it, some brief instructions showing the commands to build it are listed below (these commands should be run from a shell).
   # Get the latest Raspbian packages
   sudo apt-get update
   sudo apt-get upgrade
   # Get the latest firmware
   sudo rpi-update
   # Get the source code for the V4L utilities
   git clone git
   cd v4l-utils
   # Install some packages needed to build it
   sudo apt-get install autoconf gettext libtool libjpeg62-dev
   # Configure and build it.
   autoreconf -vfi
   ./configure
   make
   sudo make install
Building the software should take about fifteen minutes. You need to have the camera enabled and sufficient Graphics Processing Unit (GPU) memory configured. Here are some example commands to get started:
   # Load the module
   sudo modprobe bcm2835-v4l2
   # Control the viewfinder
   v4l2-ctl --overlay=1 # enable viewfinder
   v4l2-ctl --overlay=0 # disable viewfinder
   # Record a video
   v4l2-ctl --set-fmt-video=width=1920,height=1088,pixelformat=4
   v4l2-ctl --stream-mmap=3 --stream-count=100 --stream-to=somefile.264
   # Capture a JPEG image
   v4l2-ctl --set-fmt-video=width=2592,height=1944,pixelformat=3
   v4l2-ctl --stream-mmap=3 --stream-count=1 --stream-to=somefile.jpg
   # Set the video bitrate
   v4l2-ctl --set-ctrl video_bitrate=10000000
   # List the supported formats
   v4l2-ctl --list-formats
In theory, any camera application written to use the V4L APIs should work with the driver. I encourage you to try it out and report all positive or negative outcomes back to the developers.
Application case
Stream Video from the Raspberry Pi Camera to Web Browsers
- Motion JPEG to the rescue
What is Motion JPEG? Pretty simple, it's just a stream of individual JPEG pictures, one after another. I was surprised to find that most modern browsers can play MJPEG streams natively.
The down side of MJPEG streams is that they are not as efficient as H.264, which greatly improves quality and reduces size by encoding only the differences from one frame to the next. With MJPEG each frame is encoded as an entire JPEG picture. For my needs this isn't a concern, though.
Continuing with my research I stumbled upon MJPG-streamer, a small open source MJPEG streaming server written in C that I was easily able to compile for the Raspberry Pi.
The following sections describe how I've used this tool to create a very flexible, play anywhere, streaming server for my Raspberry Pi camera.
- Installing MJPEG-streame
UPDATE: This section is outdated. Please use the instructions on my updated guide to build and install MJPG-Streamer.
Unfortunately there isn't a package for MJPEG-streamer that can be installed with apt-get, so it needs to be compiled from source.
MJPEG-streamer is hosted at sourceforge.net, so head over to the project's download page to get the source tarball.
To compile this application I used the following commands:
$ sudo apt-get install libjpeg8-dev
$ sudo apt-get install imagemagick
$ tar xvzf mjpg-streamer-r63.tar.gz
$ cd mjpg-streamer-r63
$ make
This tool requires libjpeg and the convert tool from ImageMagick, so I had to install those as well.
The makefile does not include an installer, if you want to have this utility properly installed you will need to copy the mjpg_streamer and its plugins input_*.so and output_*.so to a directory that is in the path, like /usr/local/bin. It is also possible to run this tool directly from the build directory.
- Setting up the JPEG source stream
The streaming server needs a sequence of JPEG files to stream, and for this we are going to use the raspistill utility that is part of Raspbian. For those that are concerned about performance, keep in mind that the JPEG encoder used by raspistill runs in the GPU, the load required to generate JPEGs is pretty small.
To setup a constant stream of JPEG images the command is as follows:
$ mkdir /tmp/stream
$ raspistill -w 640 -h 480 -q 5 -o /tmp/stream/pic.jpg -tl 100 -t 9999999 -th 0:0:0 &
Let's go over the arguments to raspistill one by one:
- -w sets the image width. For an HD stream use 1920 here.
- -h sets the image height. For an HD stream use 1080 here.
- -q sets the JPEG quality level, from 0 to 100. I use a pretty low quality, better quality generates bigger pictures, which reduces the frame rate.
- -o sets the output filename for the JPEG pictures. I'm sending them to a temp directory. The same file will be rewritten with updated pictures.
- -tl sets the timelapse interval, in milliseconds. With a value of 100 you get 10 frames per second.
- -t sets the time the program will run. I put a large number here, that amounts to about two hours of run time.
- -th sets the thumbnail picture options. Since I want the pictures to be as small as possible I disabled the thumbnails by setting everything to zero.
- & puts the application to run in the background.
- Starting the streaming server
Okay, so now we have a background task that is writing JPEGs from the camera at a rate of ten per second. All that is left is to start the streaming server. Assuming you are running it from the build directory the command is as follows:
$ LD_LIBRARY_PATH=./ ./mjpg_streamer -i "input_file.so -f /tmp/stream" -o "output_http.so -w ./www"
Let's break this command down to understand it:
- LD_LIBRARY_PATH sets the path for dynamic link libraries to the current directory. This is so that the application can find the plugins, which are in the same directory.
- -i sets the input plugin. We are using a plugin called input_file.so. This plugin watches a directory and any time it detects a JPEG file was written to it it streams that file. The folder to watch is given as the -f argument.
- -o sets the output plugin. We are using the HTTP streaming plugin, which starts a web server that we can connect to to watch the video. The root directory of the web server is given as the -w argument. We will use the default web pages that come with the application for now, these can be changed and customized as necessary.
- Watching the stream
Now everything is ready. Go to any device that has a web browser and connect to the following website:
http://<IP-address>:8080
Where IP-address is the IP address or hostname of your Raspberry Pi.
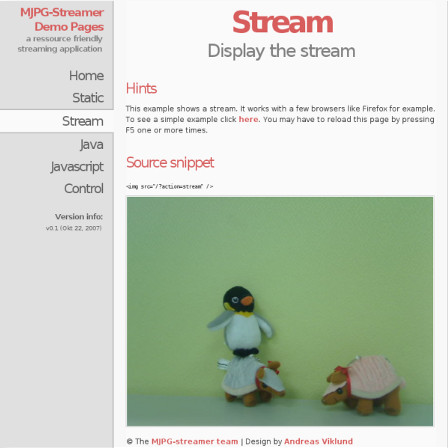
The default website served by the streaming server provides access to several players to watch the stream. I've found that the "Stream" option worked on most devices I tried. For a few that "Stream" didn't show video I went to "Javascript" and I was able to play the video just fine.
Documents
Datasheet (OV5647_full) Media:Ov5647full.pdf
Datasheet (ov5647_brief) Media:OV5647 breif.pdf
Datasheet (RaspiCam-Documentation) Media:RaspiCam-Documentation.pdf
Information(OV5647) http://www.ovt.com/products/sensor.php?id=66
Quick Start Guide http://www.raspberrypi.org/help/camera-module-setup/
