Difference between revisions of "Teensylu"
(→Building and Programming the Firmware (applying to the AT90USB1286 preinstalled the LUFA CDC bootloader)) |
(→Introduction) |
||
| (16 intermediate revisions by the same user not shown) | |||
| Line 1: | Line 1: | ||
==Introduction== | ==Introduction== | ||
| + | [[File:Teensylu 3.jpg|500px]] | ||
| − | This is a project that is based on Sanguinololu. The | + | This is a project that is based on Sanguinololu. The ATMEGA1284P has been replaced with an Atmel AT90USB1286 MCU. This Microcontroller has on-chip USB, removing the need for the FTDI USB UART. LUFA CDC bootloader preinstalled on the AT90USB1286 allows you to upload the firmware through USB cable directly. All of the through hole resistors and capacitors have been replaced with 0805 SMT components. Like the Sanguinololu the Teensylu has expansion headers supporting I2C, SPI, UART, and ADC pins. All extra I/O ports of the AT90USB have been broken out to headers for prototyping. |
==Features== | ==Features== | ||
*Small design - board is 100mm x 60mm | *Small design - board is 100mm x 60mm | ||
*Teensylu clone, Atmel's AT90USB1286 | *Teensylu clone, Atmel's AT90USB1286 | ||
| + | *LUFA CDC bootloader preinstalled on the AT90USB1286 allows you to upload the firmware through USB cable. | ||
*Up to 4 A4988/4983 stepstick or Pololu stepper driver boards on-board (X,Y,Z,Extruder) | *Up to 4 A4988/4983 stepstick or Pololu stepper driver boards on-board (X,Y,Z,Extruder) | ||
*Supports multiple power configurations (Carried from Sanguinololu) | *Supports multiple power configurations (Carried from Sanguinololu) | ||
| Line 25: | Line 27: | ||
**Analog I/O (6) | **Analog I/O (6) | ||
*Additional 14 pin header with 11 I/O for prototyping | *Additional 14 pin header with 11 I/O for prototyping | ||
| − | *SMT Components sized at 0805 for easier soldering. | + | *SMT Components sized at 0805 for easier soldering. |
==Compatible Firmwares== | ==Compatible Firmwares== | ||
| Line 32: | Line 34: | ||
*Marlin | *Marlin | ||
*Repetier | *Repetier | ||
| − | ==Building and Programming the Firmware ( | + | ==Building and Programming the Firmware (For LUFA CDC bootloader pre-installed)== |
*Download the arduino environment and install. http://arduino.cc/en/Main/Software | *Download the arduino environment and install. http://arduino.cc/en/Main/Software | ||
*Download the [http://pjrc.com/teensy/td_download.html Teensyduino library] from pjrc and install. Be sure to select "all" when asked which additional libraries to install | *Download the [http://pjrc.com/teensy/td_download.html Teensyduino library] from pjrc and install. Be sure to select "all" when asked which additional libraries to install | ||
| − | *Replace the avrdude.exe located in arduino-0023\hardware\tools\avr\bin with this version avrdude | + | *Replace the avrdude.exe located in arduino-0023\hardware\tools\avr\bin with this version [http://www.geeetech.com/Documents/teensylu-0.8.rar avrdude] and better backup the original avrdude.exe which has been replaced, otherwise uploading error will appear.If you have installed the Teensyduino library in Arduino 1.0 or higher version, skip this step |
*Add the following to arduino-xx/hardware/teensy/boards.txt file at the bottom: | *Add the following to arduino-xx/hardware/teensy/boards.txt file at the bottom: | ||
| Line 55: | Line 57: | ||
*Remove the HWB jumper on the board to boot into the bootloader. | *Remove the HWB jumper on the board to boot into the bootloader. | ||
| − | *Connect the USB cable to Teensylu, the virtual serial port appears. Remember this Serial port number, because this port is only for communication, not for programming. | + | *Connect the USB cable to Teensylu, windows will found new hardware. Install the [http://www.geeetech.com/Documents/teensylu-0.8.rar CDC driver], the virtual serial port appears. Remember this Serial port number, because this port is only for communication, not for programming. |
*Push the Reset button, the serial port number changes. This serial port is what we want for programming the firmware. | *Push the Reset button, the serial port number changes. This serial port is what we want for programming the firmware. | ||
*Select the board Teensylu/Printrboard and uploding your firmware. | *Select the board Teensylu/Printrboard and uploding your firmware. | ||
| + | *After the uploading is done, replace the HWB jumper and push the reset button. | ||
| − | ==Building and Programming the Firmware ( | + | [[File:Teensylu 1.jpg|400px]] |
| + | |||
| + | ==Building and Programming the Firmware (For LUFA HID bootloader)== | ||
| + | The steps below apply to the user who has the board with the LUFA HID bootloader installed. | ||
===Sprinter(compatible for Arduino 023)=== | ===Sprinter(compatible for Arduino 023)=== | ||
*Download the arduino environment and install. http://arduino.cc/en/Main/Software | *Download the arduino environment and install. http://arduino.cc/en/Main/Software | ||
| Line 96: | Line 102: | ||
==How to buy== | ==How to buy== | ||
| − | Click here to buy Teensylu | + | Click here to buy [http://www.geeetech.com/teensylu-rev-07hi3d-reprap-prusa-mendel-printer-driver-board-p-646.html?zenid=o910ps5psvrtd5gd22jl5nqr66 Teensylu] |
Latest revision as of 01:24, 3 April 2015
Contents
Introduction
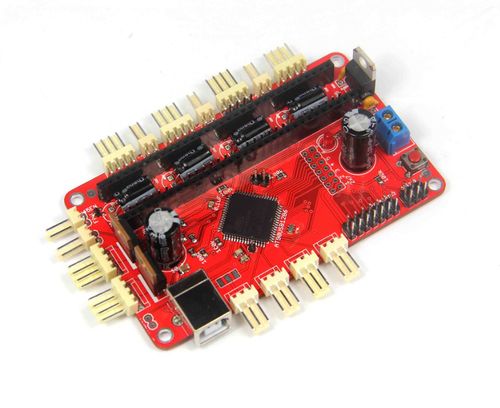
This is a project that is based on Sanguinololu. The ATMEGA1284P has been replaced with an Atmel AT90USB1286 MCU. This Microcontroller has on-chip USB, removing the need for the FTDI USB UART. LUFA CDC bootloader preinstalled on the AT90USB1286 allows you to upload the firmware through USB cable directly. All of the through hole resistors and capacitors have been replaced with 0805 SMT components. Like the Sanguinololu the Teensylu has expansion headers supporting I2C, SPI, UART, and ADC pins. All extra I/O ports of the AT90USB have been broken out to headers for prototyping.
Features
- Small design - board is 100mm x 60mm
- Teensylu clone, Atmel's AT90USB1286
- LUFA CDC bootloader preinstalled on the AT90USB1286 allows you to upload the firmware through USB cable.
- Up to 4 A4988/4983 stepstick or Pololu stepper driver boards on-board (X,Y,Z,Extruder)
- Supports multiple power configurations (Carried from Sanguinololu)
- Logic & Motors supplied by ATX power supply (needs molex harddrive connector, and optional 4pin atx connector for additional 12v)
- Motors supplied by 5mm screw terminal 7-35V
- Logic supplied by USB bus
- Logic supplied by optional on-board voltage regulator (molex harddrive connector cannot be installed at the same time)
- on-board USB connectivity
- 2 thermistor connectors with circuitry
- 2 N-MOSFETs for extruder/bed heaters
- 1 N-MOSFET for low power fan or motor
- Selectable 12v/5v endstop voltage
- 4 endstops including 4th stop called E-Stop to be used as an emergency stop, or extruder stop (to be added in firmware).
- 14 Extra pins available for expansion and development - 6 analog and 8 digital (Fully compatabile with Sanguinololu), with the following capabilities
- UART1 (RX and TX)
- I2C (SDA and SCL)
- SPI (MOSI, MISO, SCK)
- PWM pin (1)
- Analog I/O (6)
- Additional 14 pin header with 11 I/O for prototyping
- SMT Components sized at 0805 for easier soldering.
Compatible Firmwares
- Sprinter
- Marlin
- Repetier
Building and Programming the Firmware (For LUFA CDC bootloader pre-installed)
- Download the arduino environment and install. http://arduino.cc/en/Main/Software
- Download the Teensyduino library from pjrc and install. Be sure to select "all" when asked which additional libraries to install
- Replace the avrdude.exe located in arduino-0023\hardware\tools\avr\bin with this version avrdude and better backup the original avrdude.exe which has been replaced, otherwise uploading error will appear.If you have installed the Teensyduino library in Arduino 1.0 or higher version, skip this step
- Add the following to arduino-xx/hardware/teensy/boards.txt file at the bottom:
cdcteensylu.name=[BootloaderCDC]Teensylu/Printrboard
cdcteensylu.upload.protocol=avr109
cdcteensylu.upload.maximum_size=130048
cdcteensylu.build.mcu=at90usb1286
cdcteensylu.build.f_cpu=16000000L
cdcteensylu.build.core=teensy
cdcteensylu.build.define0=-DUSB_SERIAL
cdcteensylu.build.define1=-DLAYOUT_US_ENGLISH
cdcteensylu.upload.speed=115200
- Download Sprinter firmware. https://github.com/kliment/Sprinter
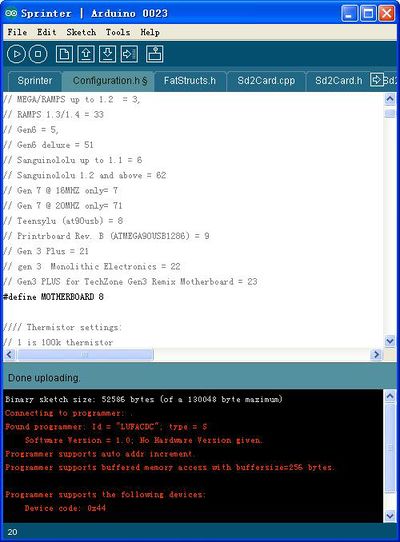
- Open Sprinter in arduino and configure configuration.h file.
- Motherboard should be set to 8: #define MOTHERBOARD 8
- Turn off endstops if you didn't install endstops: const bool ENDSTOPS_INVERTING = true;
- Turn comment out SD card support, not working yet: //#define SDSUPPORT
- Remove the HWB jumper on the board to boot into the bootloader.
- Connect the USB cable to Teensylu, windows will found new hardware. Install the CDC driver, the virtual serial port appears. Remember this Serial port number, because this port is only for communication, not for programming.
- Push the Reset button, the serial port number changes. This serial port is what we want for programming the firmware.
- Select the board Teensylu/Printrboard and uploding your firmware.
- After the uploading is done, replace the HWB jumper and push the reset button.
Building and Programming the Firmware (For LUFA HID bootloader)
The steps below apply to the user who has the board with the LUFA HID bootloader installed.
Sprinter(compatible for Arduino 023)
- Download the arduino environment and install. http://arduino.cc/en/Main/Software
- Download the Teensyduino library from pjrc and install. Be sure to select "all" when asked which additional libraries to install
- Download Sprinter firmware. https://github.com/kliment/Sprinter
- Open Sprinter in arduino and configure configuration.h file.
- Motherboard should be set to 8: #define MOTHERBOARD 8
- Turn off endstops if you didn't install endstops: const bool ENDSTOPS_INVERTING = true;
- Turn comment out SD card support, not working yet: //#define SDSUPPORT
- Go to Tools menu and set Board to Teensy++ 2.0, or Teensylu if using alternate bootloader
- Go to Sketch menu and click "Verify/Compile"
- A program will popup for the teensy programmer after sprinter is done compiling
- open the HEX File in teensy loader and move sprinter.cpp.hex to root folder of C drive for programming
Programming the Firmware
AT90USB1286 on the Teensylu has been preinstalled the LUFA HID bootloader for that allows for programming the firmware using USB port or USBtiny ISP.
Windows
- Remove the HWB jumper beside the chip.
- Press the rest button to start the bootloader.
- Windows will find the new hardware as the virtual com port. If windows find the unrecognized hardware, install the USB Serial driver
- Install the WinAVR
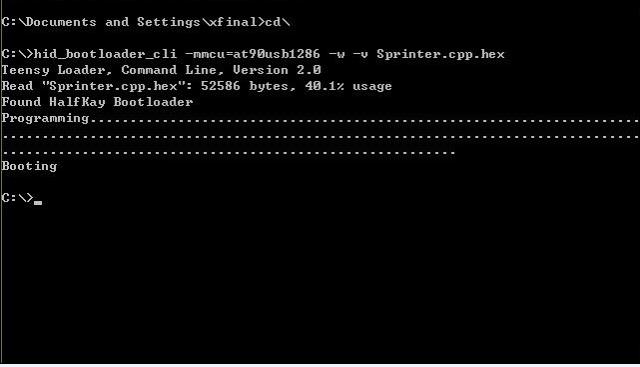
- Run the cmd.exe in windows, input the command line
hid_bootloader_cli -mmcu=at90usb1286 -w -v Sprinter.cpp.hex
- After flashing the firmware, replace the HWB jumper and push the reset button to run the firmware.
Schematics
Burn the bootloader
How to buy
Click here to buy Teensylu


