Difference between revisions of "Sound Sensor"
From Geeetech Wiki
(Created page with "==Overview== The Sound sensor module is a simple microphone based on a opamp LM358 to amplify the sound strength of the environment like door knocks, etc loud enough to be pic...") |
(→Overview) |
||
| (7 intermediate revisions by the same user not shown) | |||
| Line 1: | Line 1: | ||
==Overview== | ==Overview== | ||
| − | The Sound sensor module is a simple microphone based on a opamp LM358 to amplify the sound strength of the environment like door knocks | + | [[File:Sound sensor.jpg|300px]] |
| + | |||
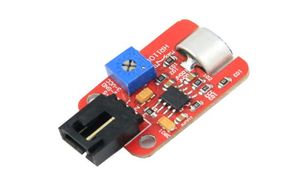
| + | The Sound sensor module is a simple microphone based on a opamp LM358 to amplify the sound strength of the environment like door knocks and etc loud enough to be picked up by a microcontroller's Analog to Digital converter. The value of output can be adjusted by the potentiometer. | ||
==Applications== | ==Applications== | ||
| − | Simple microphone | + | *Simple microphone |
| − | Sound detection | + | *Sound detection |
==Connection Diagram== | ==Connection Diagram== | ||
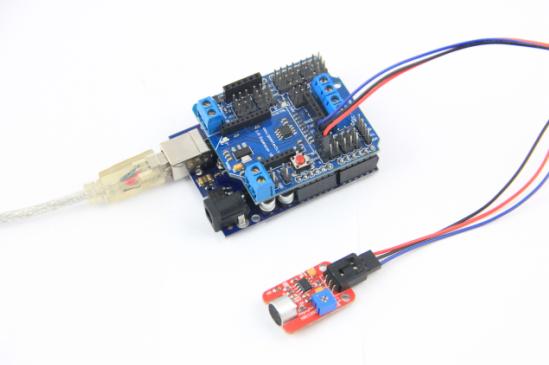
| + | Here is the guide illustrates how to connect an Arduino to the sound sensor. The following is a table describing which pins on the Arduino should be connected to the pins on the sound sensor: | ||
| + | |||
| + | |||
| + | [[File:BT.jpg]] | ||
| + | |||
| + | VCC <-------> VCC | ||
| + | GND <-------> GND | ||
| + | S <-------> Analog 0 | ||
==Examples== | ==Examples== | ||
| − | void setup() | + | void setup() |
| − | { | + | { |
Serial.begin(9600); // open serial port, set the baud rate to 9600 bps | Serial.begin(9600); // open serial port, set the baud rate to 9600 bps | ||
| − | } | + | } |
| − | void loop() | + | void loop() |
| − | { | + | { |
int val; | int val; | ||
val=analogRead(0); //connect mic sensor to Analog 0 | val=analogRead(0); //connect mic sensor to Analog 0 | ||
Serial.println(val,DEC);//print the sound value to serial | Serial.println(val,DEC);//print the sound value to serial | ||
delay(100); | delay(100); | ||
| − | } | + | } |
==How to buy== | ==How to buy== | ||
Click here to buy [http://www.geeetech.com/analog-voice-sound-sensor-module-p-600.html Sound sensor] | Click here to buy [http://www.geeetech.com/analog-voice-sound-sensor-module-p-600.html Sound sensor] | ||
Latest revision as of 02:54, 17 September 2012
Overview
The Sound sensor module is a simple microphone based on a opamp LM358 to amplify the sound strength of the environment like door knocks and etc loud enough to be picked up by a microcontroller's Analog to Digital converter. The value of output can be adjusted by the potentiometer.
Applications
- Simple microphone
- Sound detection
Connection Diagram
Here is the guide illustrates how to connect an Arduino to the sound sensor. The following is a table describing which pins on the Arduino should be connected to the pins on the sound sensor:
VCC <-------> VCC
GND <-------> GND
 S  <-------> Analog 0
Examples
void setup()
{
 Serial.begin(9600); // open serial port, set the baud rate to 9600 bps
}
void loop()
{
     int val;
     val=analogRead(0);   //connect mic sensor to Analog 0
     Serial.println(val,DEC);//print the sound value to serial
     delay(100);
}
How to buy
Click here to buy Sound sensor

