Difference between revisions of "Arduino Infrared proximity switch module"
From Geeetech Wiki
(→Usage) |
|||
| Line 15: | Line 15: | ||
==Usage== | ==Usage== | ||
| − | When sensor detect object, it | + | When sensor detect object, it is connected to 0V. |
[[File:Infared proximity switch1.jpg]] | [[File:Infared proximity switch1.jpg]] | ||
| Line 35: | Line 35: | ||
} | } | ||
} | } | ||
| − | |||
==How to buy it== | ==How to buy it== | ||
Click here to buy[http://www.geeetech.com/arduino-infrared-proximity-switch-module-p-205.html Infrared proximity switch module] | Click here to buy[http://www.geeetech.com/arduino-infrared-proximity-switch-module-p-205.html Infrared proximity switch module] | ||
Revision as of 09:51, 8 May 2012
overview
Arduino infared proximity switch module is a reflection-type photoelectric sensor which integrates transmitting and receiving infared beams function. Infrared proximity switches work by sending out beams of invisible infrared light. A photodetector on the proximity switch detects any reflections of this light. These reflections allow infrared proximity switches to determine whether there is an object nearby.
technical parameters
- Voltage :DC 5V
- Current :100mA
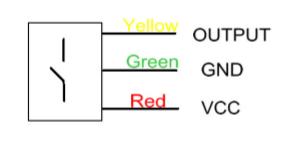
- Type :DC 3 Wire NPN-NO (Normal Open)
- Sensory Distance: 3-80 cm adjustable
- Sensory distance regulator and output indicator light on product back
- Control signal level:
- High:2.3V≤Vin≤5V
- Low:-0.3V≤Vin≤1.5V
Usage
When sensor detect object, it is connected to 0V.

Example code
int ledPin = 13; // choose pin for the LED
int inputPin = 2; // choose input pin (for Infrared sensor)
int val = 0; // variable for reading the pin status
void setup()
{
pinMode(ledPin, OUTPUT); // declare LED as output
pinMode(inputPin, INPUT); // declare Infrared sensor as input
}
void loop(){
val = digitalRead(inputPin); // read input value
if (val == HIGH) { // check if the input is HIGH
digitalWrite(ledPin, LOW); // turn LED OFF
} else {
digitalWrite(ledPin, HIGH); // turn LED ON
}
}
How to buy it
Click here to buyInfrared proximity switch module
