Difference between revisions of "3D wifi module"
(→Install EasyPrint 3D App) |
(→Features) |
||
| (29 intermediate revisions by the same user not shown) | |||
| Line 20: | Line 20: | ||
Thumb-size as it is, 3D WiFi module is integrated with two main high-performance components: control board and Wi-Fi module. It is these two parts that could seamlessly connect your 3D printer with our cloud server and allow you to control your device freely via EasyPrint 3D App. | Thumb-size as it is, 3D WiFi module is integrated with two main high-performance components: control board and Wi-Fi module. It is these two parts that could seamlessly connect your 3D printer with our cloud server and allow you to control your device freely via EasyPrint 3D App. | ||
| − | [[File: | + | [[File:Wi-Fi module.jpg]] |
2. Easy-to-Use | 2. Easy-to-Use | ||
| Line 32: | Line 32: | ||
Adopting high-performance chips and professionally coded by our devoted engineers, 3D WiFi module could send commands and files from the cloud server to your 3D printer in a fast and stable fashion. Provide you with smooth and satisfactory 3D printing experiences! | Adopting high-performance chips and professionally coded by our devoted engineers, 3D WiFi module could send commands and files from the cloud server to your 3D printer in a fast and stable fashion. Provide you with smooth and satisfactory 3D printing experiences! | ||
| − | [[File:3D-wifi | + | [[File:3D-wifi fast and stable.jpg]] |
4. 3D WiFi Module & EasyPrint 3D App | 4. 3D WiFi Module & EasyPrint 3D App | ||
| Line 64: | Line 64: | ||
5. 3D WiFi module--- High Compatibility | 5. 3D WiFi module--- High Compatibility | ||
| − | After extensive testing and iterations, we confirmed that 3D WiFi is compatible with a slew of 3D printers on the market. One of the compatible conditions is that the USB to serial chip of your printer falls into the three categories: CH340, FT232 and PL2303. The other one is that your printer runs with G.code commands. | + | After extensive testing and iterations, we confirmed that 3D WiFi is compatible with a slew of 3D printers on the market. One of the compatible conditions is that the USB to serial chip of your printer falls into the three categories: CH340, FT232,Atmega16U2 and PL2303. The other one is that your printer runs with G.code commands. |
[[File:3D-wifi 10.jpg]] | [[File:3D-wifi 10.jpg]] | ||
| + | [[File:Compatible1.jpg]] | ||
| + | |||
| + | [[File:Creality-CR-10.jpg]] | ||
| + | |||
| + | [[File:Anycubic-I3-Mega.jpg]] | ||
| + | |||
| + | [[File:Anet-A8.jpg]] | ||
| + | |||
| + | [[File:Monoprice2.jpg]] | ||
| + | |||
| + | [[File:Monoprice1.jpg]] | ||
| + | |||
| + | More printers are under testing, stay tuned! | ||
| + | |||
| + | |||
| + | 3D WIFI module is also compatible with 3d printers controlled by the following borad: | ||
| + | |||
| + | [[File:Arduino-Mega-R3.jpg]] | ||
| + | |||
| + | [[File:Iduino-Mega-R3.jpg]] | ||
| + | |||
| + | [[File:Rumba.jpg]] | ||
=Specifications= | =Specifications= | ||
| Line 107: | Line 129: | ||
=Install EasyPrint 3D App= | =Install EasyPrint 3D App= | ||
| − | Download the EasyPrint 3D APP and install it by following the instructions. | + | Download the EasyPrint 3D APP [https://www.geeetech.com/firmware/EasyPrint3D_Android.apk here] and install it by following the instructions. |
| + | |||
| − | |||
You could also download EasyPrint 3D App on Google Play and App Store. | You could also download EasyPrint 3D App on Google Play and App Store. | ||
| + | |||
| + | [[File:App-download.png|259px]] | ||
Once finishing installation, enter Me to register and log in. | Once finishing installation, enter Me to register and log in. | ||
| Line 119: | Line 143: | ||
Here are the login steps. | Here are the login steps. | ||
| − | Step1. Open EasyPrint 3D App. Click the [ | + | Step1. Open EasyPrint 3D App. Click the [Log in] button in the [Me] interface to finish your registration. |
[[File:Log in.jpg|259px]] | [[File:Log in.jpg|259px]] | ||
| Line 131: | Line 155: | ||
| − | [[File:16 register.jpg]] | + | [[File:16 register.jpg|259px]] |
| + | |||
| − | [[File:17 register.jpg]] | + | [[File:17 register.jpg|259px]] |
Step 3. Click [Register Now] and a pop-up interface will appear for your to check your email. | Step 3. Click [Register Now] and a pop-up interface will appear for your to check your email. | ||
| − | [[File:20 register.jpg]] | + | [[File:20 register.jpg|259px]] |
Step 4. Click OK and check your email. Log in with your account information. | Step 4. Click OK and check your email. Log in with your account information. | ||
| Line 147: | Line 172: | ||
Step 1. Click [My 3D printer]. | Step 1. Click [My 3D printer]. | ||
| − | [[File:13 Me.jpg]] | + | [[File:13 Me.jpg|259px]] |
| + | |||
Step 2. Click the “Start to bind”button. | Step 2. Click the “Start to bind”button. | ||
| − | [[File:21 start to bind.jpg]] | + | [[File:21 start to bind.jpg|259px]] |
| + | |||
Step 3. Click the button in the picture below to enter the serial number manually. | Step 3. Click the button in the picture below to enter the serial number manually. | ||
| − | [[File:Image021.jpg]] | + | [[File:Image021.jpg|259px]] |
| + | |||
| + | |||
| + | [[File:22 serial number.jpg|259px]] | ||
| − | |||
Step 4. Click “Next”and the picture below will pop up to inform you that the binding process is successful. | Step 4. Click “Next”and the picture below will pop up to inform you that the binding process is successful. | ||
| − | [[File:Image024.jpg]] | + | [[File:Image024.jpg|259px]] |
| + | |||
Step 5. Then you will see the following interface, showing that the printer is off-line. | Step 5. Then you will see the following interface, showing that the printer is off-line. | ||
| − | [[File:Image026.jpg]] | + | [[File:Image026.jpg|259px]] |
| + | |||
That’s the whole binding process. In the next part, we will finish the Wi-Fi configurations step by step. Be patient~ | That’s the whole binding process. In the next part, we will finish the Wi-Fi configurations step by step. Be patient~ | ||
| Line 175: | Line 206: | ||
Step 1. Connect your 3D printer to the USB port of 3D WiFi Module with your USB cable for data transmission. Use the power cable to connect 3D WiFi Module with your adapter to power it up. | Step 1. Connect your 3D printer to the USB port of 3D WiFi Module with your USB cable for data transmission. Use the power cable to connect 3D WiFi Module with your adapter to power it up. | ||
| − | [[File: | + | [[File:33(1).png|500px]] |
| + | |||
Step 2. Please check if the three indicator lights are on: Wi-Fi, USB, Power source from left to right orderly. Insert the TF card into the slot. | Step 2. Please check if the three indicator lights are on: Wi-Fi, USB, Power source from left to right orderly. Insert the TF card into the slot. | ||
| − | [[File: | + | [[File:11-(1).png|500px]] |
| + | |||
Step 3. Long press the hole labeled with “set”with a pin, until the Wi-Fi light turns dim and flickers quickly. Loosen the pin and 3D Wi-Fi will enter the config mode. | Step 3. Long press the hole labeled with “set”with a pin, until the Wi-Fi light turns dim and flickers quickly. Loosen the pin and 3D Wi-Fi will enter the config mode. | ||
| Line 187: | Line 220: | ||
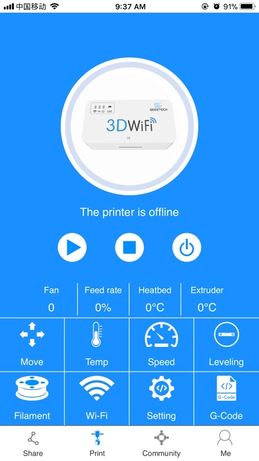
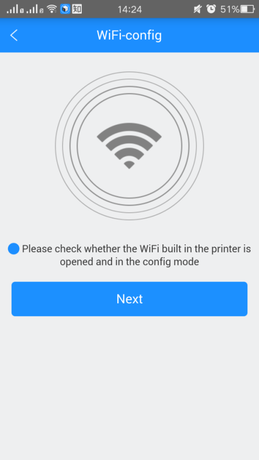
Step 4. Open EasyPrint 3D App and click “Print”. At the page of pop-up, click the “Wi-Fi”icon to enter Wi-Fi configuration mode, as shown in the picture below. | Step 4. Open EasyPrint 3D App and click “Print”. At the page of pop-up, click the “Wi-Fi”icon to enter Wi-Fi configuration mode, as shown in the picture below. | ||
| − | [[File:Image032.jpg]] | + | [[File:Image032.jpg|259px]] |
| + | |||
| + | |||
| + | [[File:Image034.jpg|259px]] | ||
| − | |||
| − | [[File:Image036.png]] | + | [[File:Image036.png|259px]] |
| + | |||
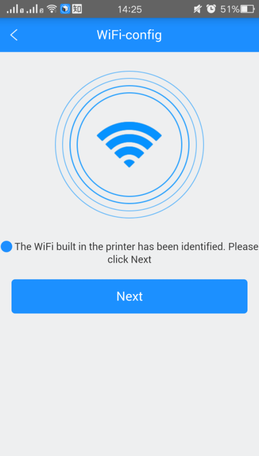
Step 5. Click [Next] to start to detect Wi-Fi built in the printer. If the Wi-Fi is detected, you could see the following picture. | Step 5. Click [Next] to start to detect Wi-Fi built in the printer. If the Wi-Fi is detected, you could see the following picture. | ||
| − | [[File:Image038.png]] | + | [[File:Image038.png|259px]] |
| + | |||
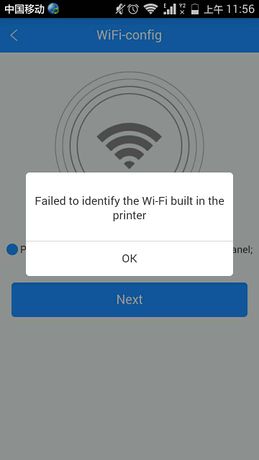
If not detected, it will pop up a prompt “Printer Wi-Fi is not detected”. Click [OK] and again click [Next] to redetect. | If not detected, it will pop up a prompt “Printer Wi-Fi is not detected”. Click [OK] and again click [Next] to redetect. | ||
| − | [[File:Image040.jpg]] | + | [[File:Image040.jpg|259px]] |
| + | |||
Step 6. After detecting the Wi-Fi built in the printer, click [Next] and choose a Wi-Fi hotspot, as shown in the picture below. | Step 6. After detecting the Wi-Fi built in the printer, click [Next] and choose a Wi-Fi hotspot, as shown in the picture below. | ||
| − | [[File:Image042.png]] | + | [[File:Image042.png|259px]] |
| + | |||
Step 7. Click [Next]. If the Wi-Fi hotspot needs password, the interface will show the Wi-Fi password input box. Just input the correct password, and then click [OK], as shown in the picture below. | Step 7. Click [Next]. If the Wi-Fi hotspot needs password, the interface will show the Wi-Fi password input box. Just input the correct password, and then click [OK], as shown in the picture below. | ||
| − | [[File:Image044.png]] | + | [[File:Image044.png|259px]] |
| + | |||
If there is no need to input the password, please continue with the next step. | If there is no need to input the password, please continue with the next step. | ||
| Line 213: | Line 253: | ||
Step 8. When you succeed in connecting the Wi-Fi, the interface will show that the configuration is finished. Click [OK] and the interface will show that the printer is on-line. | Step 8. When you succeed in connecting the Wi-Fi, the interface will show that the configuration is finished. Click [OK] and the interface will show that the printer is on-line. | ||
| − | [[File:Image046.png]] | + | [[File:Image046.png|259px]] |
| + | |||
| + | |||
| + | [[File:Image048.jpg|259px]] | ||
| − | |||
Till here, the configuration between App and your printer is finished. Now you can print and control the printing via EasyPrint 3D App. | Till here, the configuration between App and your printer is finished. Now you can print and control the printing via EasyPrint 3D App. | ||
| Line 225: | Line 267: | ||
Step 5. Click [Next] to start to detect Wi-Fi built in the printer. If the Wi-Fi is detected, you could see the “Settings”interface on your phone. | Step 5. Click [Next] to start to detect Wi-Fi built in the printer. If the Wi-Fi is detected, you could see the “Settings”interface on your phone. | ||
| − | [[File:Image036.png]] | + | [[File:Image036.png|259px]] |
| + | |||
| + | |||
| + | [[File:Image051.png|259px]] | ||
| − | |||
Step 6. Click the Wi-Fi button to connect “Geeetech-Printer” hotspot, as shown in the picture. | Step 6. Click the Wi-Fi button to connect “Geeetech-Printer” hotspot, as shown in the picture. | ||
| − | [[File:Image053.png]] | + | [[File:Image053.png|259px]] |
| + | |||
Step 7. Click the [Next] button in the picture below. | Step 7. Click the [Next] button in the picture below. | ||
| − | [[File:Image055.png]] | + | [[File:Image055.png|259px]] |
| + | |||
Step 8. Enter the WLAN name and password of your router. Click [OK] to connect your Wi-Fi. | Step 8. Enter the WLAN name and password of your router. Click [OK] to connect your Wi-Fi. | ||
| − | [[File:Image057.png]] | + | [[File:Image057.png|259px]] |
| + | |||
Step 9. When you succeed in connecting the Wi-Fi, the interface will show that the configuration is finished, as shown in the picture below. | Step 9. When you succeed in connecting the Wi-Fi, the interface will show that the configuration is finished, as shown in the picture below. | ||
| − | [[File:Image046.png]] | + | [[File:Image046.png|259px]] |
| + | |||
Step 10. Click [OK] and the interface will show that the printer is on-line. | Step 10. Click [OK] and the interface will show that the printer is on-line. | ||
| − | [[File:Image048.jpg]] | + | [[File:Image048.jpg|259px]] |
| + | |||
Till here, the configuration between App and your printer is finished. Now you can print and control the printing via EasyPrint 3D App. | Till here, the configuration between App and your printer is finished. Now you can print and control the printing via EasyPrint 3D App. | ||
| + | |||
| + | =Gallery= | ||
| + | |||
| + | <gallery> | ||
| + | Image:1 3D WiFi module.png| | ||
| + | Image:2 3D WiFi module.png| | ||
| + | Image:3 3D WiFi module.png| | ||
| + | Image:4 3D WiFi module.png| | ||
| + | Image:5 3D WiFi module.png| | ||
| + | Image:6 3D WiFi module.png| | ||
| + | Image:11 3D WiFi module.png| | ||
| + | Image:12 3D WiFi module.png| | ||
| + | Image:13 3D WiFi module.png| | ||
| + | </gallery> | ||
| + | |||
| + | =Video= | ||
| + | |||
| + | [https://www.youtube.com/playlist?list=PLODCkot3Griidzu-nEWJ_9L8QKTRFvAcN View 3D WiFi Module Playlist on Youtube] | ||
| + | |||
| + | =Document= | ||
| + | |||
| + | [https://www.geeetech.com/wiki/index.php/File:3D_WiFi_Module_User_Manual.pdf 3D WiFi Module User Manual] | ||
| + | |||
| + | =Software= | ||
| + | |||
| + | Find EasyPrint 3D App on [https://play.google.com/store/apps/details?id=com.gtech.sz.a3dp&hl=en Google Play] or on [https://itunes.apple.com/us/app/easyprint3d/id1281863664?mt=8&ign-mpt=uo%3D2 App Store] | ||
| + | |||
| + | =FAQ= | ||
| + | |||
| + | 1 When I press "stop" on my Easy Print 3D APP,the printer does not stop immediately,Why? | ||
| + | |||
| + | There is a program cache,when you press "stop" , the next instruction is stopped, but the printer will stop until it run current instruction fully. A instruction may contain many moves. | ||
| + | |||
| + | |||
| + | 2 WiFi connection is failed, how to solve it? | ||
| + | |||
| + | Make sure the 3D WiFi is in a good internet condition, then go into configuration mode and choose the WiFi with the strongest signal. | ||
| + | |||
| + | |||
| + | 3 What should I do that the LCD display shows two black rows of rectangles when I power my printer? | ||
| + | |||
| + | You should cut the power supply of 3D wifi or disconnect to the printer, then restart the printer. | ||
| + | |||
| + | =Where to buy= | ||
| + | 3D WiFi module is on [https://goo.gl/RL5tMp INDIEGOGO] now, you can get it at $29 for super early bird. | ||
Latest revision as of 09:00, 2 December 2017
Contents
[hide]Introduction
Geeetech developed 3D WiFi Module, with the only aim of enabling all the 3D printing hobbyists to control their printer wirelessly. Our rigorous tests confirm that 3D WiFi Module is broadly compatible with many different kinds of 3D printers on the market. As long as the USB to serial chip of your printer belongs to one of these three ones (CH340, FT232 and PL2303) and is controlled by G.code instructions, our 3D WiFi Module can upgrade your machine as Wi-Fi enabled and make it comparable to other prohibitively expensive Wi-Fi connected 3D printers.
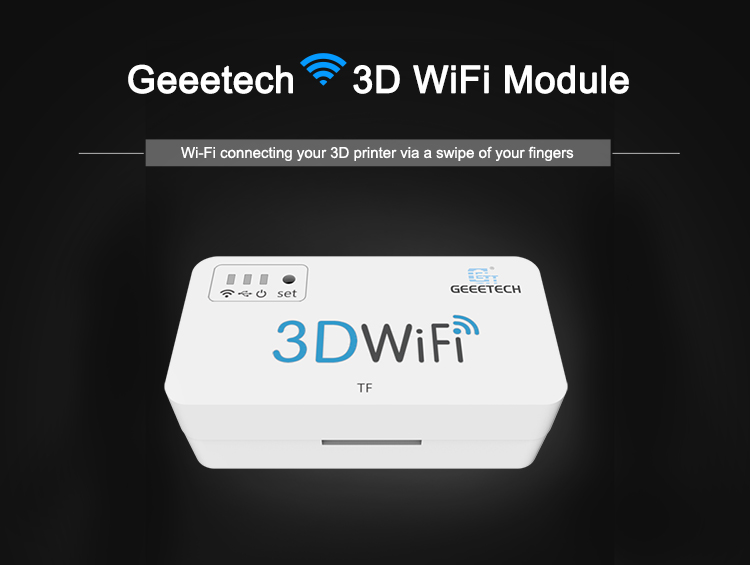
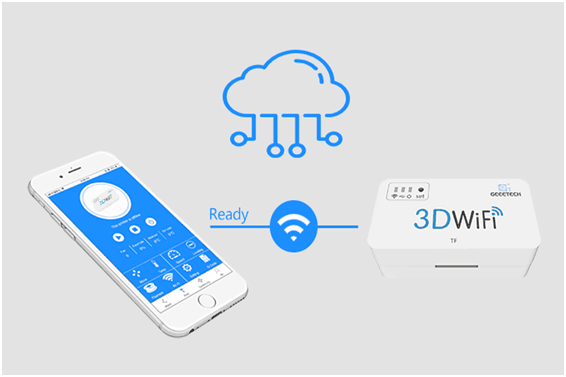
3D WiFi Module is mainly composed of two parts: control board and Wi-Fi module. Thumb-size as it is, it is powerful enough to connect your 3D printer with Geeetech’s cloud server, making it a reality for you to control your device on EasyPrint 3D App.
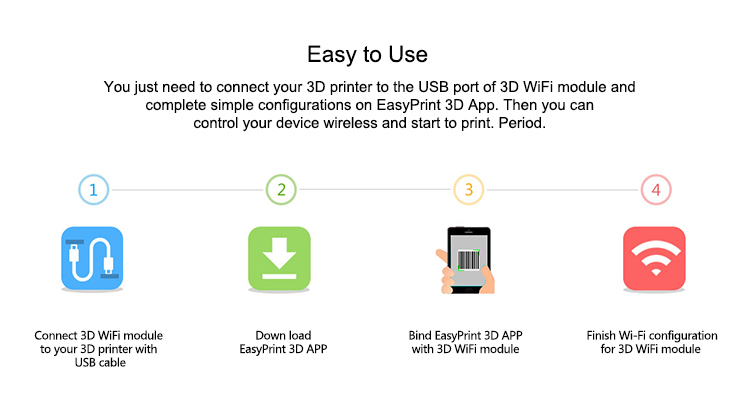
3D WiFi Module is ready to use right out of box. You just need to connect your printer to its USB port and finish simple configurations on EasyPrint 3D App. That’s all. Then you can start to control your printer wirelessly.
3D WiFi Module is cloud-based. Via EasyPrint 3D App, it is extremely simple and convenient to direct control over your printer anywhere and anytime. Besides, you would have access to a large cloud gallery, which covers 9 categories of 3D models for printing. What’s more exciting is that you could record and share your printing moments on EasyPrint 3D App in seconds.
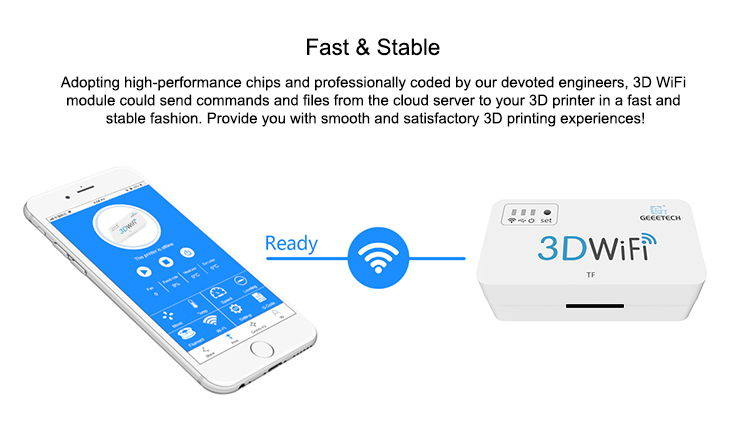
Coded professionally and adopting high-performance chips, 3D WiFi Module could transmit model files and your commands to your printer in a stable and reliable way.
Features
1. Tumb-size but Powerful
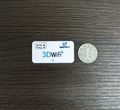
Thumb-size as it is, 3D WiFi module is integrated with two main high-performance components: control board and Wi-Fi module. It is these two parts that could seamlessly connect your 3D printer with our cloud server and allow you to control your device freely via EasyPrint 3D App.
2. Easy-to-Use
You just need to connect your 3D printer to the USB port of 3D WiFi module and complete simple configurations on EasyPrint 3D App. Then you can control your device wireless and start to print. Period.
3. Fast & Stable
Adopting high-performance chips and professionally coded by our devoted engineers, 3D WiFi module could send commands and files from the cloud server to your 3D printer in a fast and stable fashion. Provide you with smooth and satisfactory 3D printing experiences!
4. 3D WiFi Module & EasyPrint 3D App
3D WiFi module can’t be separated from its good partner --- EasyPrint 3D App. Our App enables you to remote control your 3D printer, make use of our free cloud gallery and share your prints online in seconds. Bring you unprecedented convenience and joys!
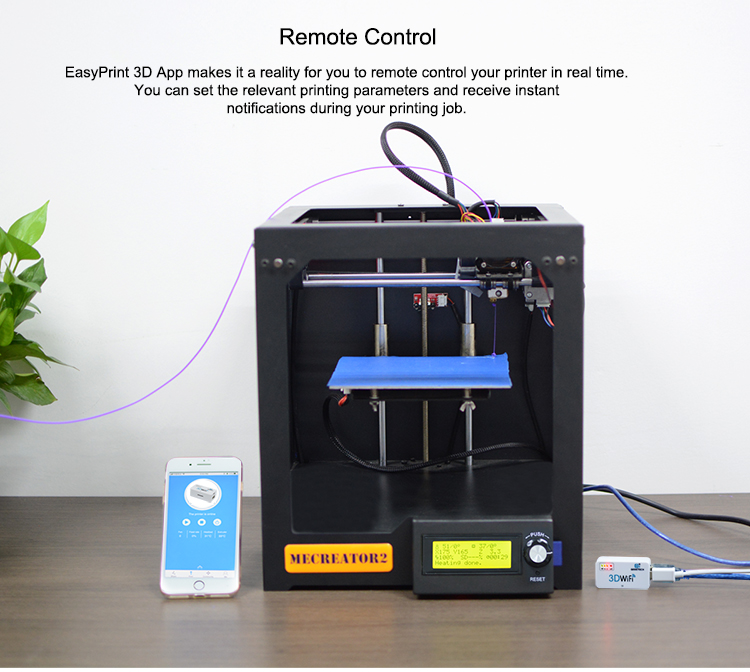
4.1 Remote Control
EasyPrint 3D App makes it a reality for you to remote control your printer in real time. You can set the relevant printing parameters and receive instant notifications during your printing job.
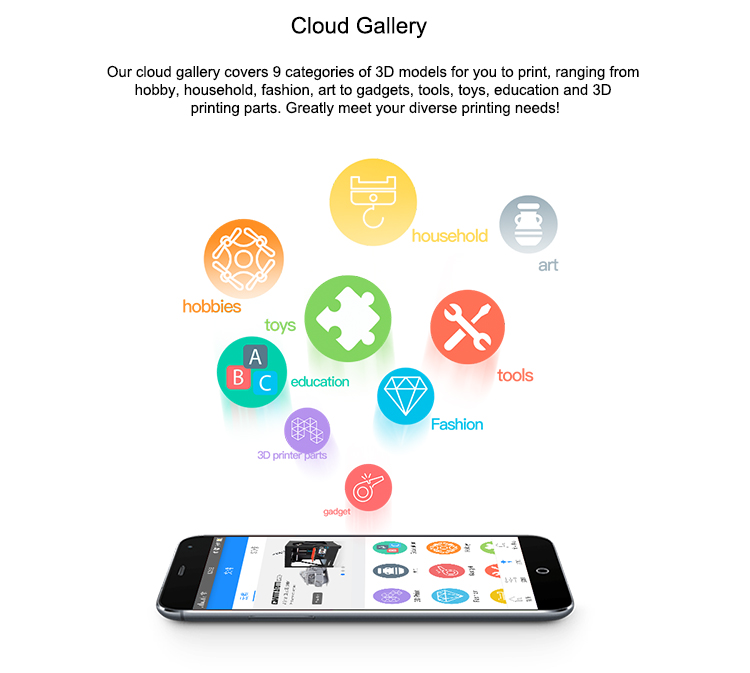
4.2 Cloud Gallery
Our cloud gallery covers 9 categories of 3D models for you to print, ranging from hobby, household, fashion, art to gadgets, tools, toys, education and 3D printing parts. Greatly meet your diverse printing needs!
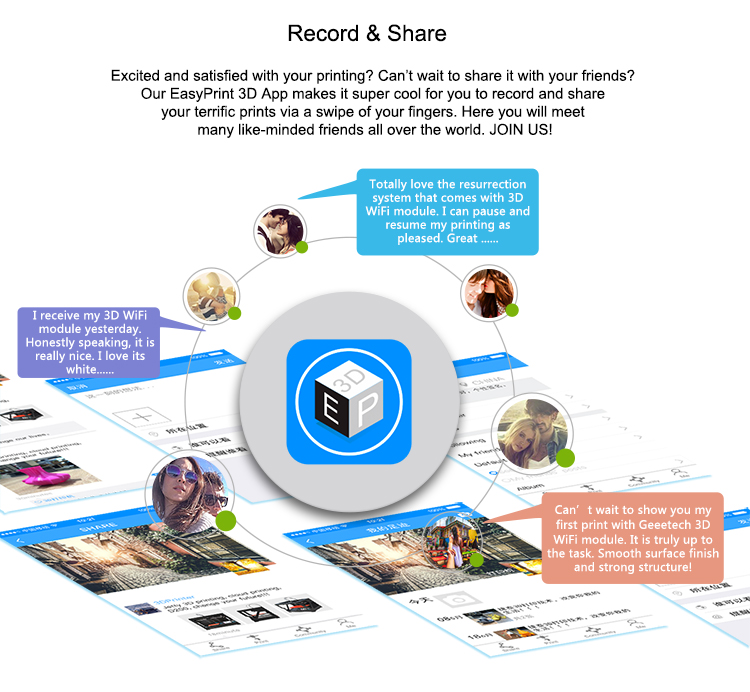
4.3 Record & Share
Excited and satisfied with your printing? Can’t wait to share it with your friends? Our EasyPrint 3D App makes it super cool for you to record and share your terrific prints via a swipe of your fingers. Here you will meet many like-minded friends all over the world. JOIN US!
4.4 Download EasyPrint 3D App
5. 3D WiFi module--- High Compatibility
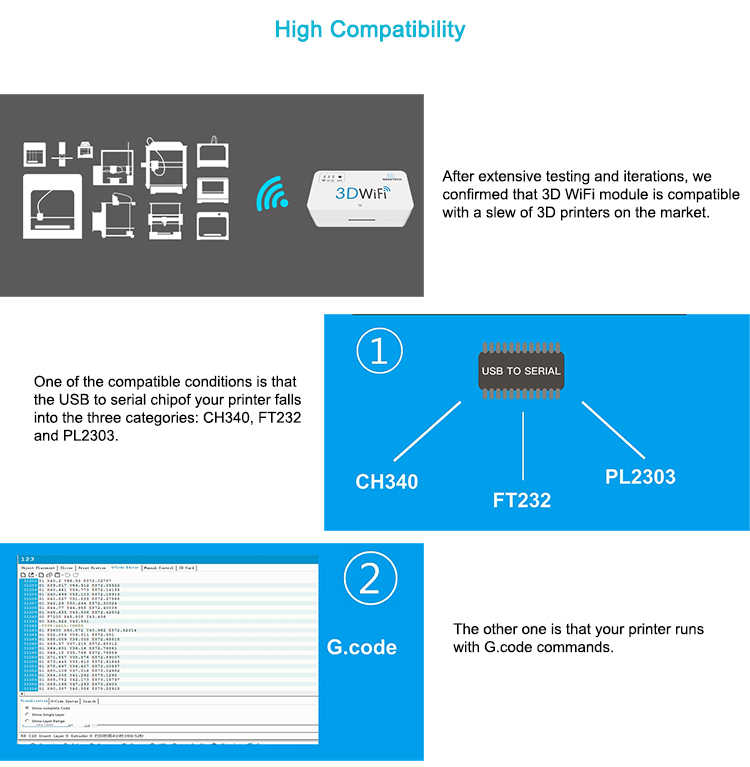
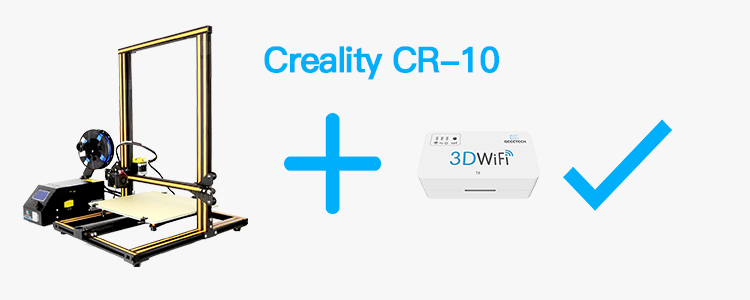
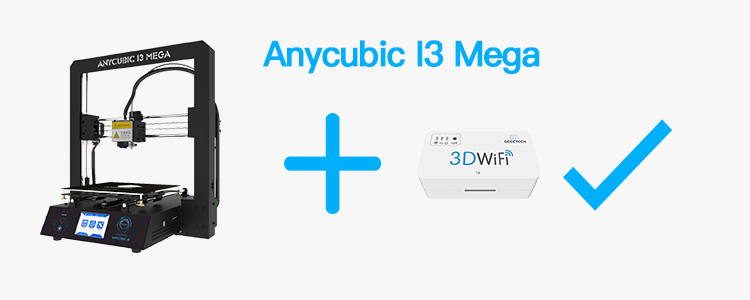
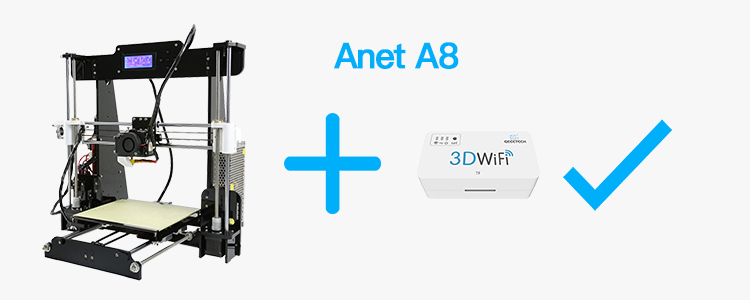
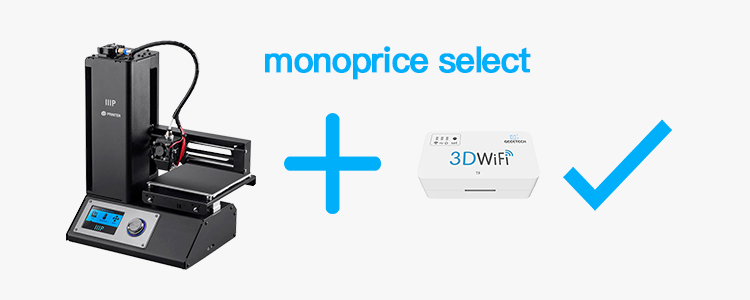
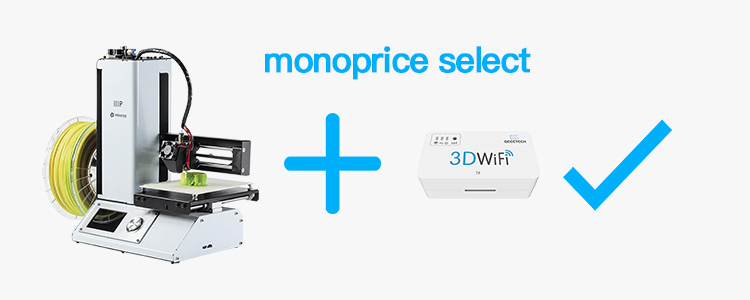
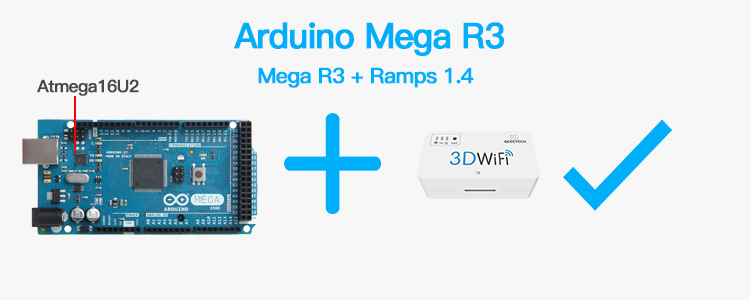
After extensive testing and iterations, we confirmed that 3D WiFi is compatible with a slew of 3D printers on the market. One of the compatible conditions is that the USB to serial chip of your printer falls into the three categories: CH340, FT232,Atmega16U2 and PL2303. The other one is that your printer runs with G.code commands.
More printers are under testing, stay tuned!
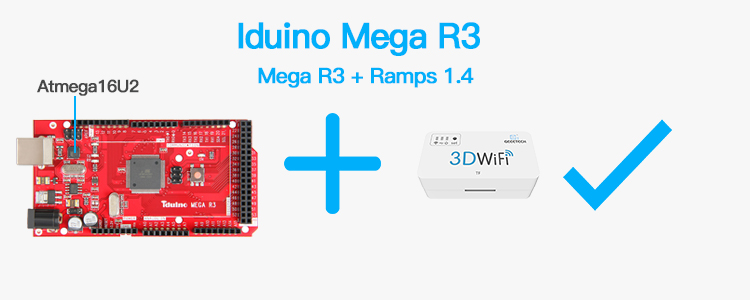
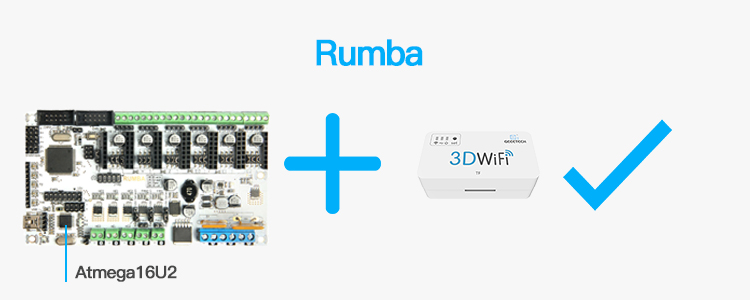
3D WIFI module is also compatible with 3d printers controlled by the following borad:
Specifications
CPU:STM32F107 +ESP8266
power supply: 5V DC
Working current: 150mA(on average),500mA(peak)
USB 2.0 full-speed host
TF card support: SDSC,SDHC(<32G);CLASS2,CLASS4
WIFI
Frequency: 2.4G~2.5G (2400M~2483.5M)
Transmission power: 802.11b: + 20 dBm / 802.11g: +17 dBm / 802.11n: +14 dBm
Receiving sensitivity: 802.11b: -91 dBm (11 Mbps) / 802.11g: -75 dBm (54 Mbps) / 802.11n: -72 dBm (MCS7)
Antenna: PCB on-board antenna
Wi-Fi mode: Station/SoftAP
WLAN standard: 802.11 b/g/n/
Security mechanism: WPA/WPA2
Encryption Type: WEP/TKIP/AES
Network protocol: IPv4、TCP/UDP/HTTP/FTP/MQTT
Size: 49.37*25.87*16.5mm
Packaging size: 52.44*28.94*17mm
Install EasyPrint 3D App
Download the EasyPrint 3D APP here and install it by following the instructions.
You could also download EasyPrint 3D App on Google Play and App Store.
Once finishing installation, enter Me to register and log in.
Note: As the EasyPrint 3D APP is continuously upgraded, some UI and workflow may be different, please follow the APP.
Here are the login steps.
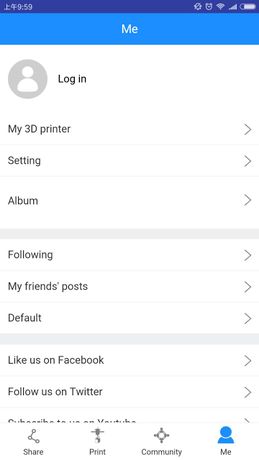
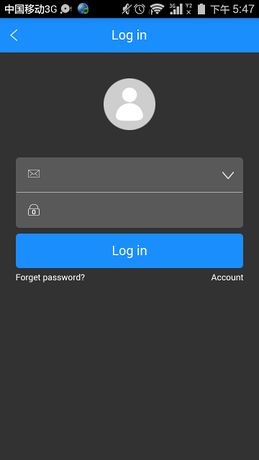
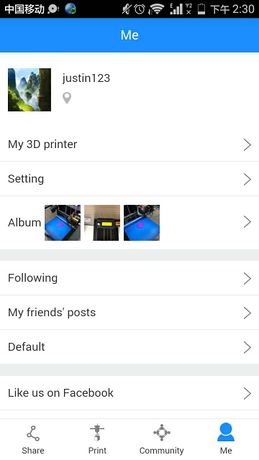
Step1. Open EasyPrint 3D App. Click the [Log in] button in the [Me] interface to finish your registration.
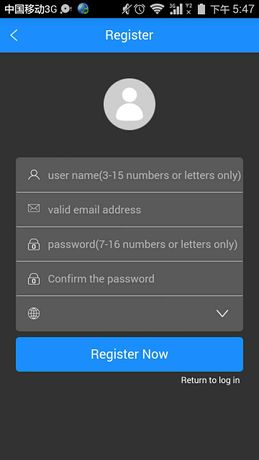
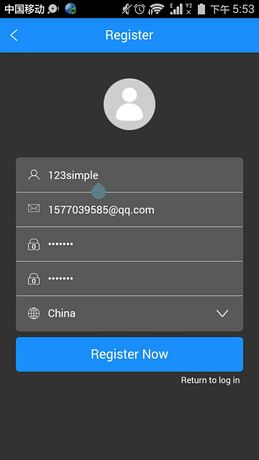
Step 2. For beginners, click [Account] to register. Enter your own account information.
(Note: There is no space in the user name. For foreign users, please choose “English” for your server address.)
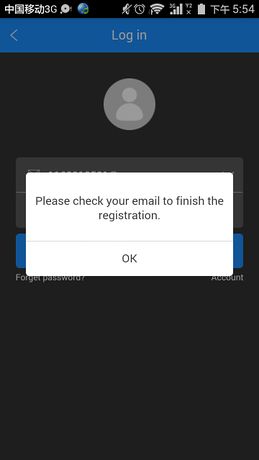
Step 3. Click [Register Now] and a pop-up interface will appear for your to check your email.
Step 4. Click OK and check your email. Log in with your account information.
Bind 3D printer to EasyPrint 3D App
Log in and bind the printer. In [Me]—[My 3D Printer], finish the binding process following the instructions on App.
Step 1. Click [My 3D printer].
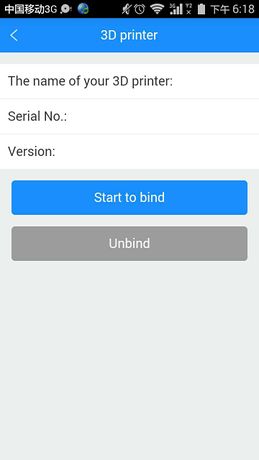
Step 2. Click the “Start to bind”button.
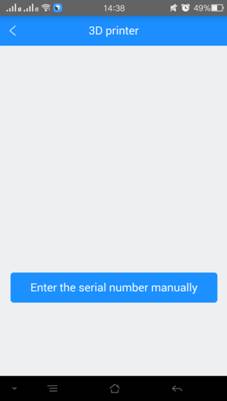
Step 3. Click the button in the picture below to enter the serial number manually.
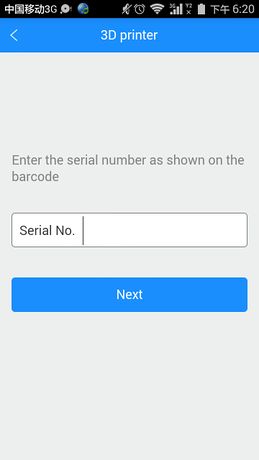
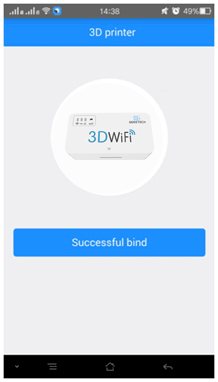
Step 4. Click “Next”and the picture below will pop up to inform you that the binding process is successful.
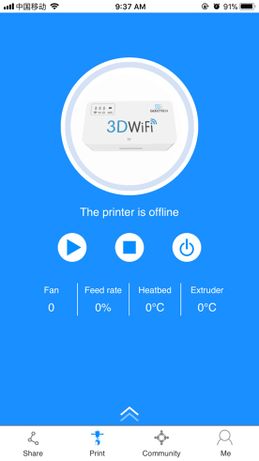
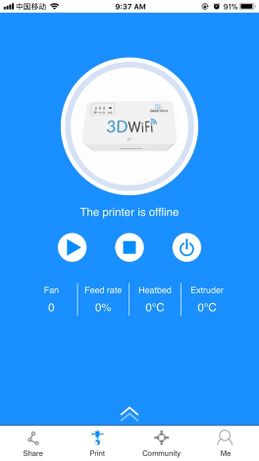
Step 5. Then you will see the following interface, showing that the printer is off-line.
That’s the whole binding process. In the next part, we will finish the Wi-Fi configurations step by step. Be patient~
Wi-Fi Configuration
Detailed configuration procedures are as follows:
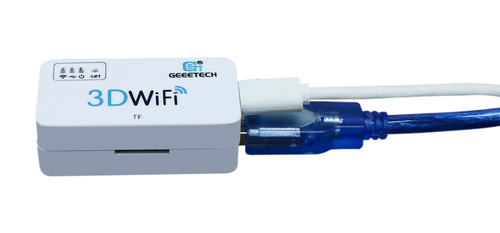
Step 1. Connect your 3D printer to the USB port of 3D WiFi Module with your USB cable for data transmission. Use the power cable to connect 3D WiFi Module with your adapter to power it up.
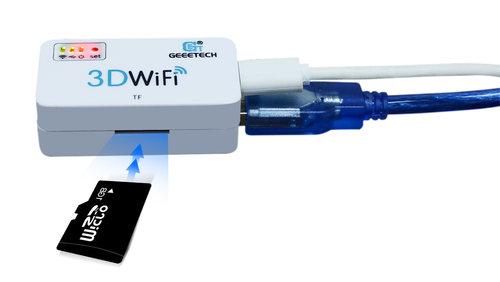
Step 2. Please check if the three indicator lights are on: Wi-Fi, USB, Power source from left to right orderly. Insert the TF card into the slot.
Step 3. Long press the hole labeled with “set”with a pin, until the Wi-Fi light turns dim and flickers quickly. Loosen the pin and 3D Wi-Fi will enter the config mode.
Note: If you do not loosen the pin, the light will flicker slowly to enter the reset mode.
Step 4. Open EasyPrint 3D App and click “Print”. At the page of pop-up, click the “Wi-Fi”icon to enter Wi-Fi configuration mode, as shown in the picture below.
Step 5. Click [Next] to start to detect Wi-Fi built in the printer. If the Wi-Fi is detected, you could see the following picture.
If not detected, it will pop up a prompt “Printer Wi-Fi is not detected”. Click [OK] and again click [Next] to redetect.
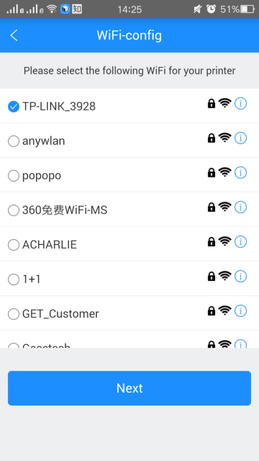
Step 6. After detecting the Wi-Fi built in the printer, click [Next] and choose a Wi-Fi hotspot, as shown in the picture below.
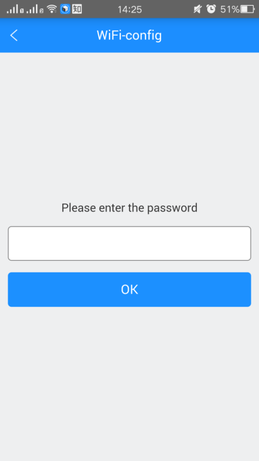
Step 7. Click [Next]. If the Wi-Fi hotspot needs password, the interface will show the Wi-Fi password input box. Just input the correct password, and then click [OK], as shown in the picture below.
If there is no need to input the password, please continue with the next step.
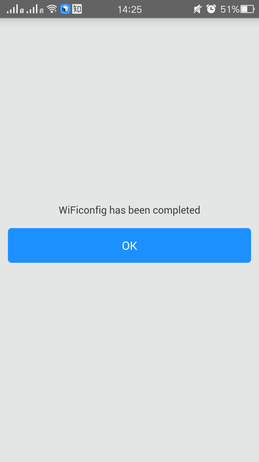
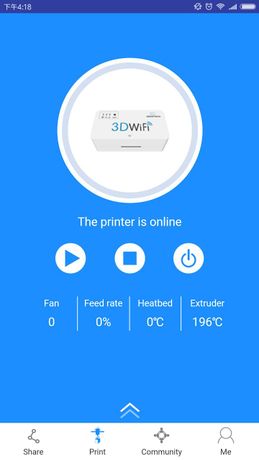
Step 8. When you succeed in connecting the Wi-Fi, the interface will show that the configuration is finished. Click [OK] and the interface will show that the printer is on-line.
Till here, the configuration between App and your printer is finished. Now you can print and control the printing via EasyPrint 3D App.
- Note:
For iOS users: The configuration steps are a little different from the Android version from Step 5.
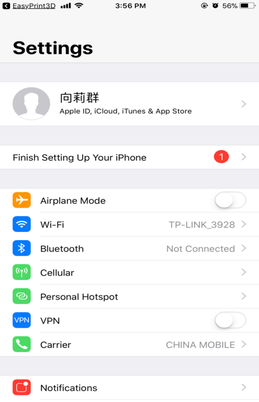
Step 5. Click [Next] to start to detect Wi-Fi built in the printer. If the Wi-Fi is detected, you could see the “Settings”interface on your phone.
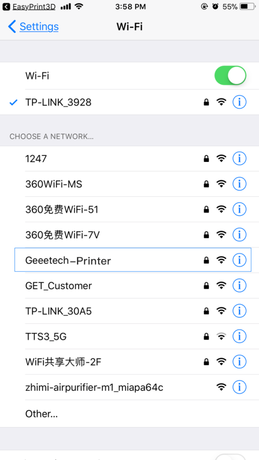
Step 6. Click the Wi-Fi button to connect “Geeetech-Printer” hotspot, as shown in the picture.
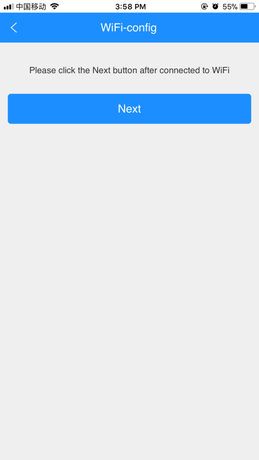
Step 7. Click the [Next] button in the picture below.
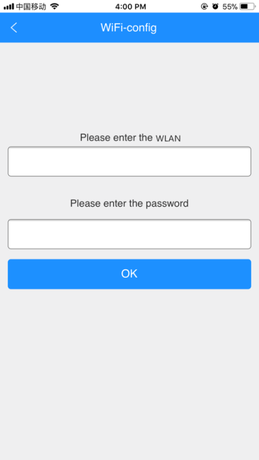
Step 8. Enter the WLAN name and password of your router. Click [OK] to connect your Wi-Fi.
Step 9. When you succeed in connecting the Wi-Fi, the interface will show that the configuration is finished, as shown in the picture below.
Step 10. Click [OK] and the interface will show that the printer is on-line.
Till here, the configuration between App and your printer is finished. Now you can print and control the printing via EasyPrint 3D App.
Gallery
Video
View 3D WiFi Module Playlist on Youtube
Document
Software
Find EasyPrint 3D App on Google Play or on App Store
FAQ
1 When I press "stop" on my Easy Print 3D APP,the printer does not stop immediately,Why?
There is a program cache,when you press "stop" , the next instruction is stopped, but the printer will stop until it run current instruction fully. A instruction may contain many moves.
2 WiFi connection is failed, how to solve it?
Make sure the 3D WiFi is in a good internet condition, then go into configuration mode and choose the WiFi with the strongest signal.
3 What should I do that the LCD display shows two black rows of rectangles when I power my printer?
You should cut the power supply of 3D wifi or disconnect to the printer, then restart the printer.
Where to buy
3D WiFi module is on INDIEGOGO now, you can get it at $29 for super early bird.
