Difference between revisions of "Geeetech Rostock mini G2 & G2s pro Quick Starter Manual"
(Created page with "Please DO NOT rush to start your first printing after assembly, as this is a DIY kit, some parameters of the printer may be different from each other, you need to modify the f...") |
(→How to modify and upload firmware.) |
||
| Line 39: | Line 39: | ||
[[File:Upload succesfully.png|500px]] | [[File:Upload succesfully.png|500px]] | ||
| + | |||
| + | |||
| + | Upload successfully | ||
| + | |||
| + | =Printer preparing= | ||
| + | |||
| + | ==Bed leveling== | ||
| + | |||
| + | Put a level meter on the bed when adjusting the 3 screws of the bed to check if it is level. | ||
| + | |||
| + | |||
| + | [[File:G2 & G2s pro7.png|500px]] | ||
| + | |||
| + | Or you can use the such a cube use a reference height about 10mm to make sure that each top of each bed mounting point is the same after tightening the wing nuts. | ||
| + | Simply place a 10mm cube next to the bed (not under!), and tighten the screw till the cube rightly fill gap between the bed and the base plate. Take out the cube and repeat for the other two mounts. | ||
| + | |||
| + | [[File:2 Printer preparing2 (2).png|500px]] | ||
| + | |||
| + | * To protect the bed and the nozzle from crashing, please attach a piece of tape on the bed. | ||
| + | |||
| + | [[File:Printer preparing.png|500px]] | ||
| + | |||
| + | =Printer setting= | ||
| + | |||
| + | Step1. Connect the USB to your Rostock mini G2 or G2s and power it up. You can see the LED lights and fan come to life, you may be able to hear the motors idling. | ||
| + | |||
| + | Step 2. Open Repetier Host and ensure that you have a valid port selected for communications. To do this, simply click “Printer Settings” in the upper right-hand corner to bring up the printer settings menu. | ||
| + | |||
| + | [[File:3 Printer setting1.png|500px]] | ||
| + | |||
| + | If you don’t know what the parameters mean, just hover your mouse over the item, the explanatory note will prompt up. As shown below: | ||
| + | |||
| + | [[File:3 Printer setting2.png|500px]] | ||
| + | |||
| + | Step 3. Choose the Connection menu to select the COM6 port and the Baud rate 250000. Click OK to continue. | ||
| + | |||
| + | [[File:3 Printer setting3.png|500px]] | ||
| + | |||
| + | If you can not find the COM port, you can check the device manager to see which port it is). | ||
| + | |||
| + | If you still cannot find the port, please re -install your USB driver here | ||
| + | |||
| + | Step4 set the printing speed. And un-check the disable the motors after job/kill. | ||
| + | |||
| + | [[File:3 Printer setting4.png|500px]] | ||
| + | |||
| + | Step5. Set the number and the offset of the extruders (offset only need for duan extruder printer),choose the nozzle size and different colors for each. | ||
| + | |||
| + | [[File:3 Printer setting5.png|500px]] | ||
| + | [[File:3 Printer setting6.png|500px]] | ||
| + | |||
| + | Step6 Choose printer shape. This is very important. Choose printer type as Rostock Printer (circular shape) and set the following parameters | ||
| + | |||
| + | Home X: 0 | ||
| + | |||
| + | Home Y: 0 | ||
| + | |||
| + | Home Z: Max | ||
| + | |||
| + | Printer Radius: 100mm | ||
| + | |||
| + | Printable height: 200mm ( this is the corresponding height in the firmware, remember to modify this each time after you change the height in the firmware) | ||
| + | |||
| + | [[File:3 Printer setting7.png|500px]] | ||
| + | |||
| + | |||
| + | Step7. Write the script 1,2,3,4,5 | ||
| + | |||
| + | We will use this script as shortcuts later to move the print head to the corresponding point. For each point, keep the Z as 2. | ||
| + | |||
| + | For G2 or G2pro: | ||
| + | (0, 0, 2) (0,50, 2) (43.3, -25, 2) (-43.3,-25, 2) | ||
| + | |||
| + | For G2s or G2s pro: | ||
| + | (0, 0, 2) (0,63, 2)(43.3,-2, 2) (-43.3,-2, 2) | ||
| + | |||
| + | So we can set the following script. | ||
| + | |||
| + | {|class="wikitable" | ||
| + | |- | ||
| + | !Code!!G2 or G2pro!!G2s or G2s pro | ||
| + | |- | ||
| + | |<center>Script1:</center>||<center>G0 X0 Y0 Z2</center>||<center>G0 X0 Y0 Z2</center> | ||
| + | |- | ||
| + | |<center>Script2:</center>||<center>G0 X0 Y50 Z2</center>||<center>G0 X0 Y63 Z2</center> | ||
| + | |- | ||
| + | |<center>Script3:</center>||<center>G0 X43.3 Y-25 Z2</center>||<center>G0 X43.3 Y-2 Z2</center> | ||
| + | |- | ||
| + | |<center>Script4:r</center>||<center>G 0 X-43.3 Y-25 Z2</center>||<center>G 0 X-43.3 Y-2 Z2</center> | ||
| + | |} | ||
| + | |||
| + | Apart from the above 4 script, we need to add the fifth code to keep the print head staying in the air and will not creep down the rods. | ||
| + | |||
| + | Script 5: | ||
| + | G0 X0 Y0 Z180 | ||
| + | M84 S0 | ||
| + | |||
| + | When you click the script icon, the print head will move to the corresponding test point as shown in the following picture. | ||
| + | |||
| + | [[File:3 Printer setting8.png|500px]] | ||
| + | |||
| + | Write the script 1,2,3,4,5. Here we take the G2 & G2 pro as example. | ||
| + | Script 1: G0 X0 Y0 Z2 | ||
| + | |||
| + | [[File:3 Printer setting9.png|500px]] | ||
| + | |||
| + | Script 2: G0 X0 Y50 Z2 | ||
| + | |||
| + | [[File:3 Printer setting10.png|500px]] | ||
| + | |||
| + | Script 3: G0 X43.3 Y-25 Z2 | ||
| + | |||
| + | [[File:3 Printer setting11.png|500px]] | ||
| + | |||
| + | |||
| + | |||
| + | Script 4: G0 X-43.3 Y-25 Z2 | ||
| + | |||
| + | [[File:3 Printer setting12.png|500px]] | ||
| + | |||
| + | Script 5: | ||
| + | G0 X0 Y0 Z180 | ||
| + | M84 S0 | ||
| + | Note: here we can add “M84 S0” to stop the motors from creeping down the rods when hanging in the air. | ||
| + | |||
| + | [[File:3 Printer setting13.png|500px]] | ||
| + | |||
| + | Step8. Remember to name the printer as delta or as you like, next time you open the Repetier Host, just choose the name of the printer, you don’t have to set the above parameters again. | ||
| + | |||
| + | [[File:3 Printer setting14.png|500px]] | ||
| + | |||
| + | Step9. Hit "connect" in the upper left-hand corner. You should see the details of the connection in the console window in the bottom section of the screen. If it is | ||
| + | |||
| + | [[File:3 Printer setting15.png|500px]] | ||
| + | |||
| + | [[File:3 Printer setting16.png|500px]] | ||
Revision as of 06:49, 17 October 2015
Please DO NOT rush to start your first printing after assembly, as this is a DIY kit, some parameters of the printer may be different from each other, you need to modify the firmware according the the real situation of your printer. You are advised to read through the whole set-up instructions step by step to get a whole picture of what you will be doing and stick to our instructions before you start with your printer. Do not skip any details.
Contents
How to modify and upload firmware.
In the following set-up process, you will need to modify and upload the firmware by yourself, so, first of all, let’s start with the firmware compiling and uploading process.
1. Download the firmware here:
Firmware for Delta Rostock mini G2 &G2s pro
2. Connect GT2560 to your PC with a USB cable,install FTDI drive. Usually it will install automatically. If not you need to install manually. download the FTDI driver here.
3. If there is nothing wrong with the hardware of board, you can find COM port in device manager. But every computer has different COM watchword, you need check by yourself.
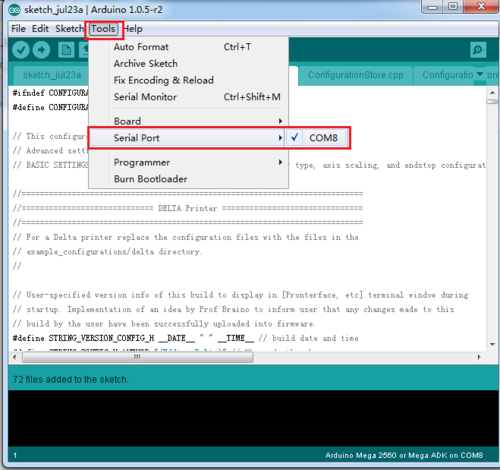
4. Unzip the firmware, drag all the files into Arduino IDE.(I use Arduino1.0.5),choose Board\Arduino Mega or Mega2560,and selects ATmega2560(Mega2560) as default Processor. The order cannot be wrong. Selects the COM port you find in the device manager.
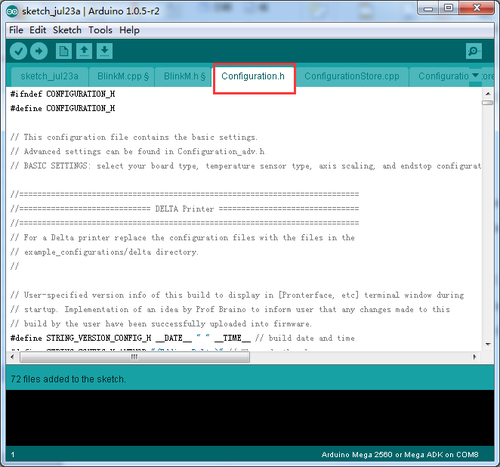
5.Most of the code you need to modify is in Configuration.h . More details on this later.
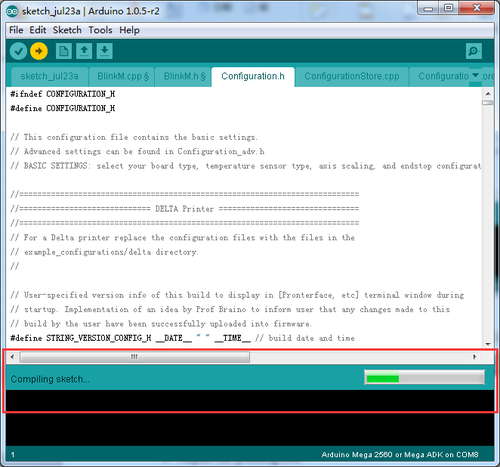
Find the value you need to compile according to your printer. ( we will elaborate which part of setting you need to change later one by one). Upon compiling, you can upload the firmware to your control board. Simply click ![]() and
and ![]() to upload.
to upload.
( Note: You need to disconnect the printer to Repetier Host before uploading).
Compiling
Uploading
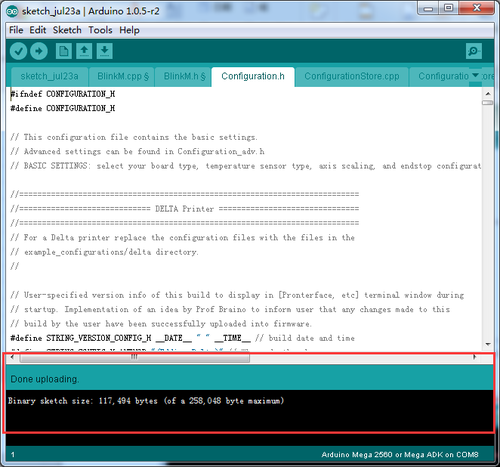
Upload successfully
Printer preparing
Bed leveling
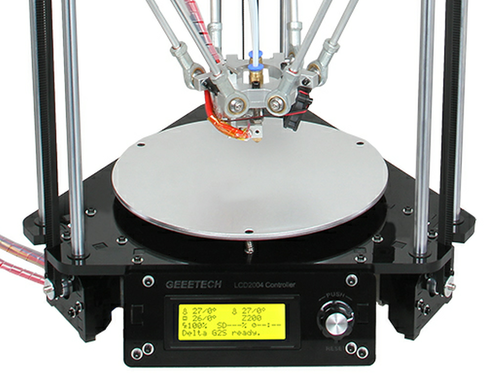
Put a level meter on the bed when adjusting the 3 screws of the bed to check if it is level.
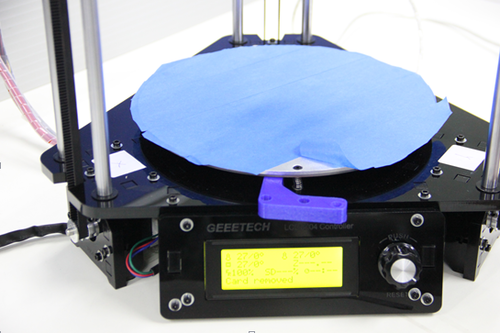
Or you can use the such a cube use a reference height about 10mm to make sure that each top of each bed mounting point is the same after tightening the wing nuts. Simply place a 10mm cube next to the bed (not under!), and tighten the screw till the cube rightly fill gap between the bed and the base plate. Take out the cube and repeat for the other two mounts.
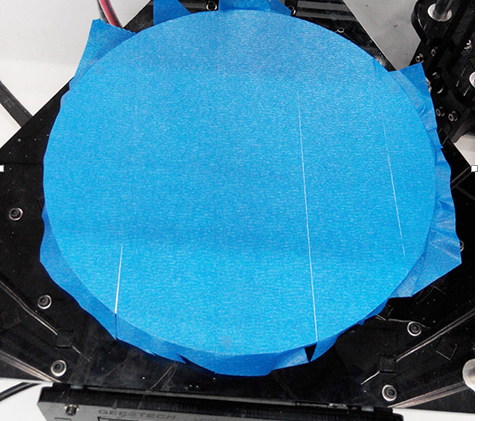
- To protect the bed and the nozzle from crashing, please attach a piece of tape on the bed.
Printer setting
Step1. Connect the USB to your Rostock mini G2 or G2s and power it up. You can see the LED lights and fan come to life, you may be able to hear the motors idling.
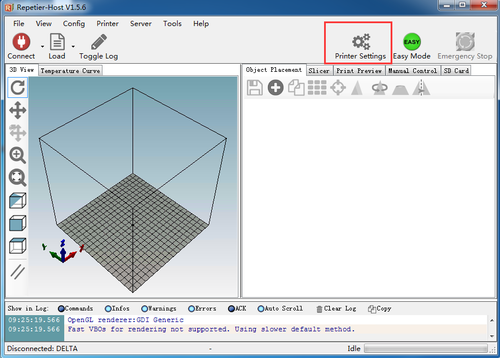
Step 2. Open Repetier Host and ensure that you have a valid port selected for communications. To do this, simply click “Printer Settings” in the upper right-hand corner to bring up the printer settings menu.
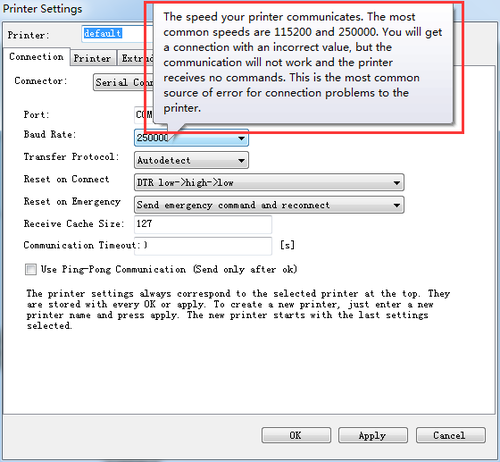
If you don’t know what the parameters mean, just hover your mouse over the item, the explanatory note will prompt up. As shown below:
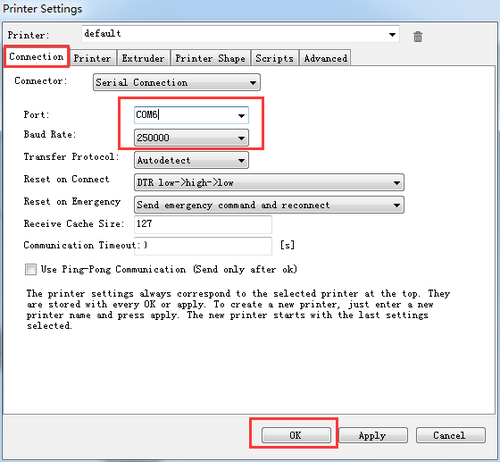
Step 3. Choose the Connection menu to select the COM6 port and the Baud rate 250000. Click OK to continue.
If you can not find the COM port, you can check the device manager to see which port it is).
If you still cannot find the port, please re -install your USB driver here
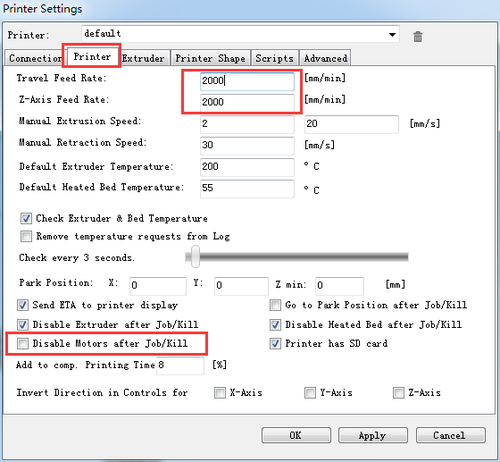
Step4 set the printing speed. And un-check the disable the motors after job/kill.
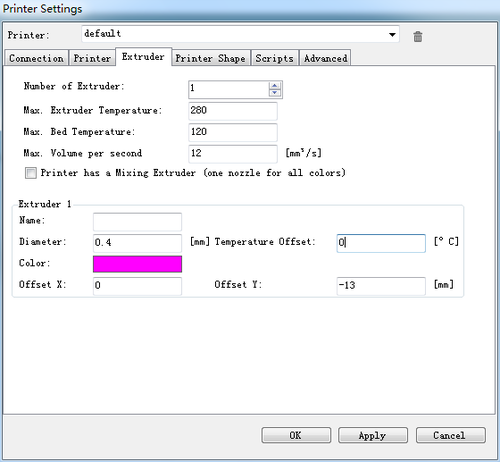
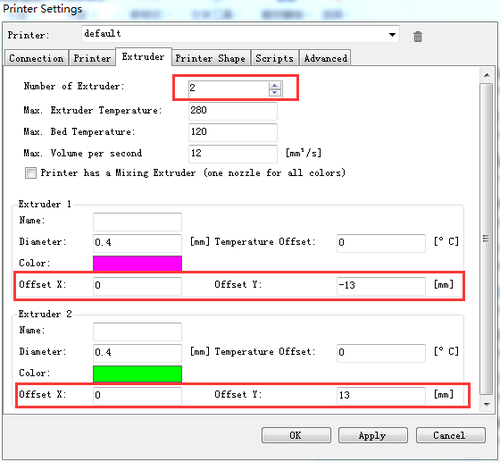
Step5. Set the number and the offset of the extruders (offset only need for duan extruder printer),choose the nozzle size and different colors for each.
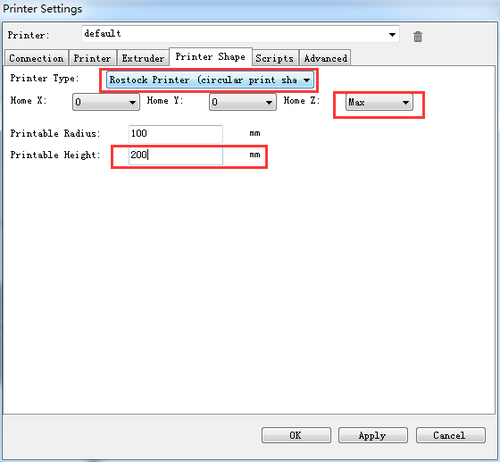
Step6 Choose printer shape. This is very important. Choose printer type as Rostock Printer (circular shape) and set the following parameters
Home X: 0
Home Y: 0
Home Z: Max
Printer Radius: 100mm
Printable height: 200mm ( this is the corresponding height in the firmware, remember to modify this each time after you change the height in the firmware)
Step7. Write the script 1,2,3,4,5
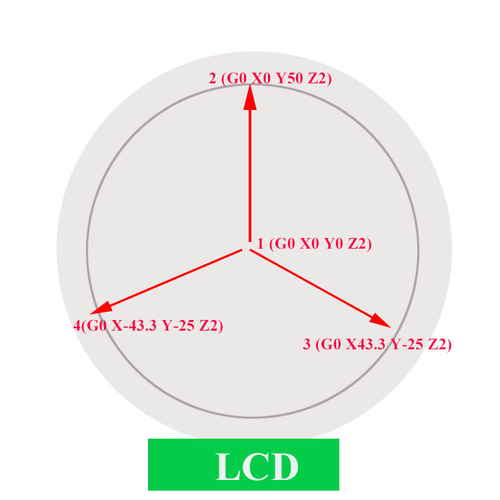
We will use this script as shortcuts later to move the print head to the corresponding point. For each point, keep the Z as 2.
For G2 or G2pro: (0, 0, 2) (0,50, 2) (43.3, -25, 2) (-43.3,-25, 2)
For G2s or G2s pro: (0, 0, 2) (0,63, 2)(43.3,-2, 2) (-43.3,-2, 2)
So we can set the following script.
| Code | G2 or G2pro | G2s or G2s pro |
|---|---|---|
Apart from the above 4 script, we need to add the fifth code to keep the print head staying in the air and will not creep down the rods.
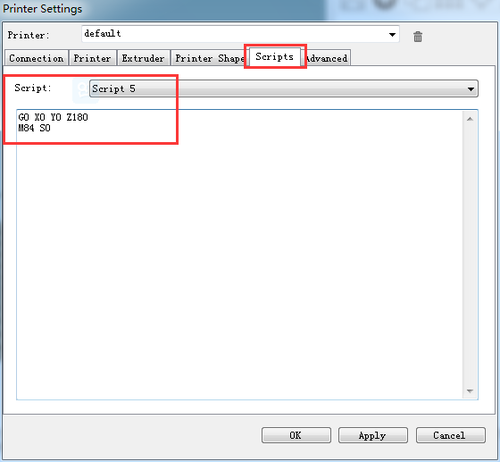
Script 5: G0 X0 Y0 Z180 M84 S0
When you click the script icon, the print head will move to the corresponding test point as shown in the following picture.
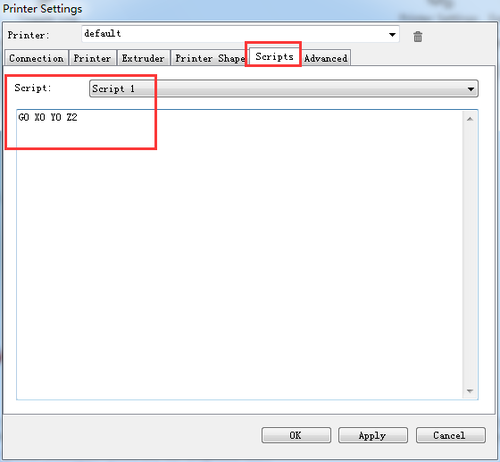
Write the script 1,2,3,4,5. Here we take the G2 & G2 pro as example. Script 1: G0 X0 Y0 Z2
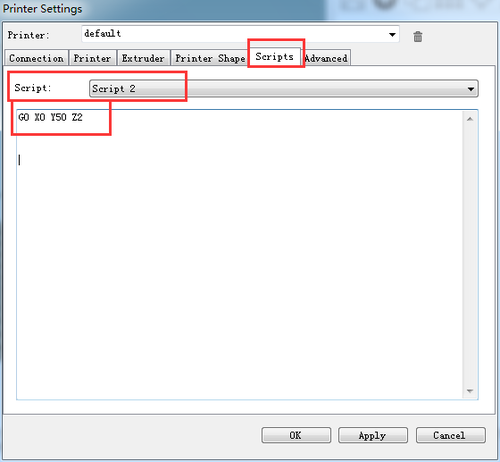
Script 2: G0 X0 Y50 Z2
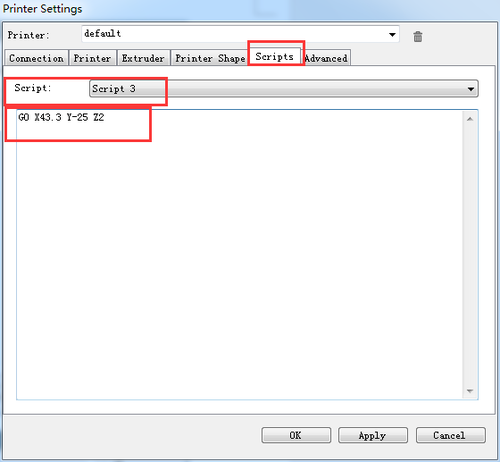
Script 3: G0 X43.3 Y-25 Z2
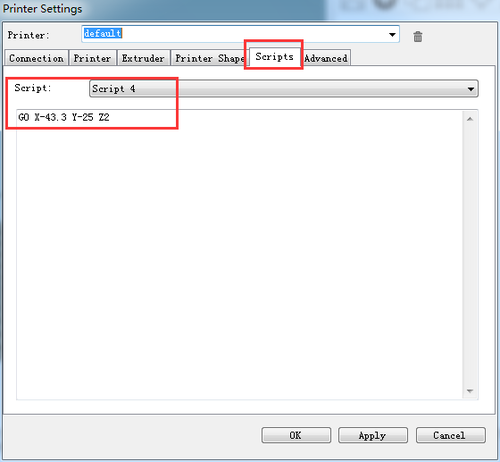
Script 4: G0 X-43.3 Y-25 Z2
Script 5: G0 X0 Y0 Z180 M84 S0 Note: here we can add “M84 S0” to stop the motors from creeping down the rods when hanging in the air.
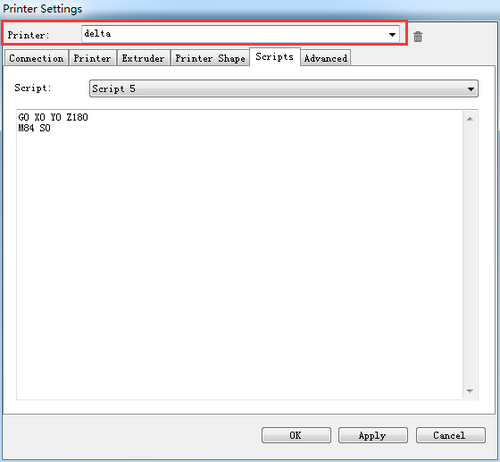
Step8. Remember to name the printer as delta or as you like, next time you open the Repetier Host, just choose the name of the printer, you don’t have to set the above parameters again.
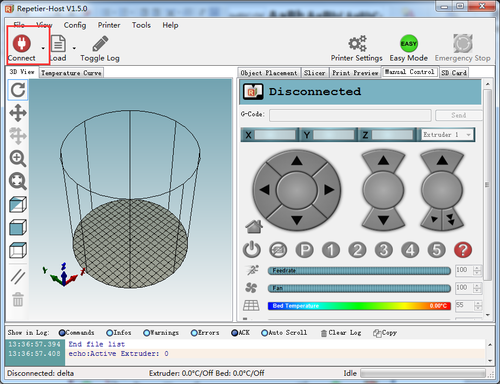
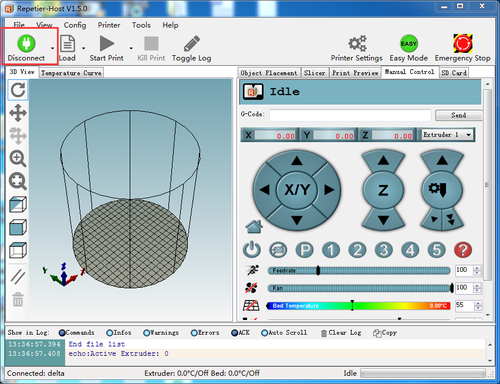
Step9. Hit "connect" in the upper left-hand corner. You should see the details of the connection in the console window in the bottom section of the screen. If it is
