Difference between revisions of "Raspberry Pi Camera Module"
| Line 16: | Line 16: | ||
*Enable camera in raspi-config settings | *Enable camera in raspi-config settings | ||
Reboot. If you are using a fresh image the raspi-config utility should load. If it doesn’t then you can run it manually using : | Reboot. If you are using a fresh image the raspi-config utility should load. If it doesn’t then you can run it manually using : | ||
| − | + | sudo raspi-config | |
Sekect the “Camera” option and press “Enter”. | Sekect the “Camera” option and press “Enter”. | ||
Revision as of 06:49, 6 August 2014
Introduction
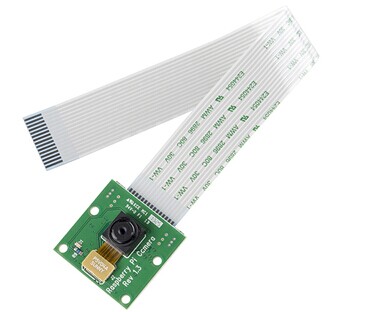
This camera module is capable of 1080p video and still images, the size as around 25 x 20 x 9 (mm). It can be directly connected to your Raspberry Pi by CSI. The CSI is designed especially for the camera. The lens of the module is replaceable so that it is convenient to replace to make sure getting highest quality image for the user. The sensor has a native resolution of 5 megapixel and a fixed focus lens onboard. In terms of still images, the camera is capable of 2592 x 1944 pixels, and supports 1080p30, 720p60 and 640x480p60/90.
Features
- 5MP sensor
- Wider image, capable of 2592x1944 stills, 1080p30 video
- 1080p video supported
- CSI
- Size: 25 x 20 x 9 mm
Connect the camera
- The flex cable inserts into the connector situated between the Ethernet and HDMI ports, with the silver connectors facing the HDMI port. The flex cable connector should be opened by pulling the tabs on the top of the connector upwards then towards the Ethernet port. The flex cable should be inserted firmly into the connector, with care taken not to bend the flex at too acute an angle. The top part of the connector should then be pushed towards the HDMI connector and down, while the flex cable is held in place.
- Update the SD card
In order to use the camera you must be using a recent operating system that knows that the camera exists. The easiest way to do this is to grab the latest Raspbian image from the RaspberryPi.org site and create a fresh SD card.
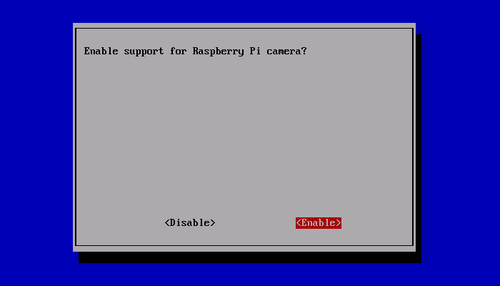
- Enable camera in raspi-config settings
Reboot. If you are using a fresh image the raspi-config utility should load. If it doesn’t then you can run it manually using : sudo raspi-config Sekect the “Camera” option and press “Enter”.
Select “Enable” and press “Enter”.
Select “Yes” and press “Enter”. Your Pi will reboot.
Updating your operating and enabling the camera using raspi-config did two things. It told your Pi that there is a camera attached and it added two command line utilities. raspistill raspivid These allow you to capture still photos and HD video respectively.
You are now ready to start having fun!
Documents
Information(OV5647) [1]
Datasheet(OV5647) Media:Ov5647full.pdf
Quick Start Guide [2]


