Difference between revisions of "Banana Pi"
| Line 93: | Line 93: | ||
'''Linux:''' | '''Linux:''' | ||
| − | i.Run sudo fdisk –l command to check the SD card node. | + | i.Run '''sudo fdisk –l''' command to check the SD card node. |
| − | + | ii.Verify if the hash key of the zip file is the same as shown on the downloads page (optional). | |
| − | + | '''shalsum''' [path]/[imagename] | |
| − | + | This will print out a long hex number which should match the "SHA-1" line for the SD image you have downloaded. | |
| − | + | iii.Run '''umount /dev/sdxx''' to unmount all the partition of the the SD card | |
| − | + | iv.Run '''sudo dd bs=4M if=[path]/[imagename] of=/dev/sdx''' command to write image file to SD card. Wait patiently to successfully complete writing. Please note that block size set to 4M will work most of the time, if not, please try 1M, although 1M will take considerably longer.You can use '''sudo pkill –USR1 –n –x dd''' command to check progress | |
| + | |||
| + | ''''''Step 3: Set up your Banana Pi'''''' | ||
| + | |||
| + | According to the set up diagram below, you can easily set up your Banana Pi. | ||
Revision as of 09:18, 9 April 2014
Description
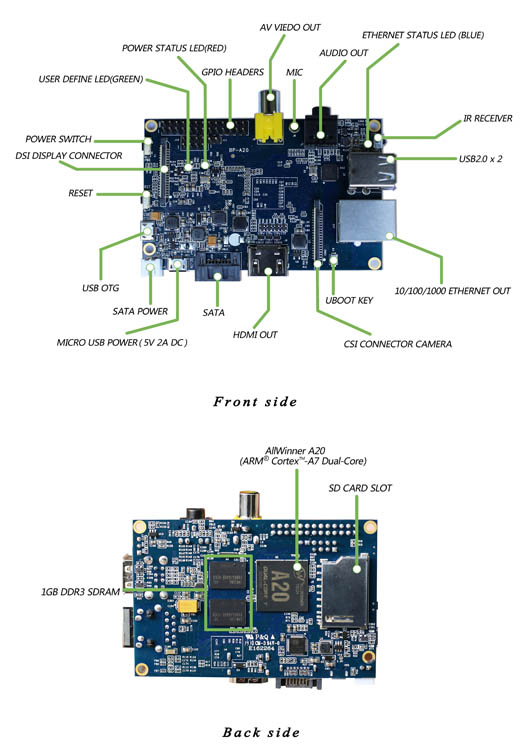

It’s an open-source single-board computer. It can run Android 4.4, Ubuntu, Debian, Rasberry Pi Image, as well as the Cubieboard Image. It uses the AllWinner A20 SoC, and has 1GB DDR3 SDRAM. Banana Pi is for anyone who wants to start creating with technology – not just consuming it. It's a simple, fun, useful tool that you can use to start taking control of the world around you.
Hardware specification
CPU: A20 ARM® Cortex™-A7 Dual-Core
GPU: ARM Mali400MP2 Complies with OpenGL ES 2.0/1.1
Memory (SDRAM): 1GB DDR3 (shared with GPU)
Onboard Storage: SD (Max. 64GB) / MMC card slot UP to 2T on SATA disk
Onboard Network: 10/100/1000 Ethernet RJ45 (optional USB WIFI Dongle)
Camera Input: A CSI input connector allows for the connection of a designed camera module
Sound Input: Mic
Video Outputs: HDMI, CVBS , LVDS/RGB
Audio Output: 3.5 mm Jack and HDMI
Power Source: 5 volt via MicroUSB(DC In Only) and/or MicroUSB (OTG)
USB 2.0 Ports: 2 (direct from Allwinner A20 chip)
Buttons: Reset button: Next to MicroUSB connector
        Power button: Next to Reset button
        UBoot button (optional): Behind HDMI connector
GPIO(2X13) pin:GPIO,UART,I2C bus,SPI bus with two chip selects,
CAN bus,ADC,PWM,+3.3v,+5v,ground.
LED: Power Status LED (Red)
    Ethernet Status LED (Blue)
    User Define LED (Green)
Remote:IR
Supported OS : Android/Android 4.4/Debian/Ubuntu/Raspberry Pi
Product size : 92 mm × 60mm
Quick Start Guide
'Step 1: Get what you need.'
First time to enjoy your Banana Pi, you need at least the accessories in the table below.

'Step 2: Prepare your SD card for the Banana Pi'
In order to enjoy your Banana Pi, you will need to install an Operating System (OS) onto an SD card. Instructions below will teach you how to write an OS image to your SD card under Windows and Linux.
  1. Insert your SD card into your computer. The size of SD should be larger than the OS image size, generally 4GB or greater.
  2. Format the SD card.
    Windows:
       i.  Download the a SD card format tool such as SD Formatter from
           https://www.sdcard.org/downloads/formatter_4/eula_windows/
       ii. Unzip the download file and run the setup.exe to install the tool on your machine.
       iii.In the "Options" menu, set "FORMAT TYPE" option to QUICK, "FORMAT SIZE ADJUSTMENT" option to "ON".
       iv. Check that the SD card you inserted matches the one selected by the Tool.
       v.  Click the “Format” button.
      Linux:
          i.  Run fdisk –l command to check the SD card node.
          ii. Run sudo fdisk /dev/sdx command to delete all partition of SD card. Use d command to delete all partition          of SD card and use    n   command to add one new partition.     Use w command to save change.
          iii.Run sudo mkfs.vfat /dev/sdxx command to format all the partition of SD card as FAT32.
              (x should be replaced according to your SD card node)
   You can also jump this step under Linux, because write image command dd under Linux will format the SD card automatically.
  3. Download the OS image from Download district.
  4.Unzip the download file to get the OS image.
    Windows: Right click on the file and choose “Extract all”.
    Linux: Run unzip [path]/[downloaded filename] command.
       If the filename extension is .tgz, run tar zvxf [path]/[downloaded filename] command.
        Ensure that neither the file name of the image you're using or the path contain any spaces (or other odd characters, for that       matter).
  5. Write the image file to the SD card.
    Windows:
          i. Download a tool that can wirte image to SD card, such as Win32 Diskimager from: http://sourceforge.net/projects/win32diskimager/files/Archive/
          ii. Open the unzipped image file.
          iii.Click Write button. Wait patiently to successfully complete writing.
Linux:
           i.Run sudo fdisk –l command to check the SD card node.
           ii.Verify if the hash key of the zip file is the same as shown on the downloads page (optional).
              shalsum [path]/[imagename]
              This will print out a long hex number which should match the "SHA-1" line for the SD image you have downloaded.
           iii.Run umount /dev/sdxx to unmount all the partition of the the SD card
           iv.Run sudo dd bs=4M if=[path]/[imagename] of=/dev/sdx command to write image file to SD card. Wait patiently to successfully    complete writing. Please note that block size set to 4M will work most of the time, if not, please try 1M, although 1M will take considerably longer.You can use sudo pkill –USR1 –n –x dd command to check progress
'Step 3: Set up your Banana Pi'
According to the set up diagram below, you can easily set up your Banana Pi.