Difference between revisions of "MPR121 TouchPad"
From Geeetech Wiki
(→How to buy) |
|||
| (5 intermediate revisions by the same user not shown) | |||
| Line 1: | Line 1: | ||
==Introduction== | ==Introduction== | ||
| − | [[File:MPR121.jpg]] | + | [[File:MPR121.jpg|400px]] |
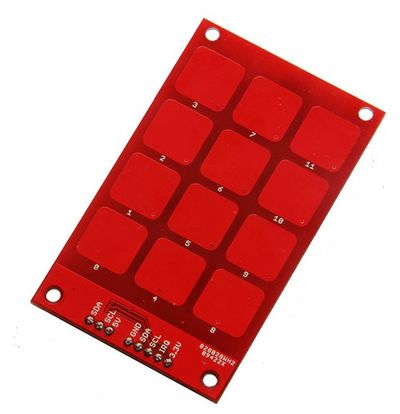
The MPR121 capacitive keypad uses the MPR121 and 12 touch sensitive pads to give you a simple 'keypad' with an I2C output. The board also has four mounting holes allowing it to be used as an input system in place of traditional buttons. The 5V - 3.3V level convertor intergrated | The MPR121 capacitive keypad uses the MPR121 and 12 touch sensitive pads to give you a simple 'keypad' with an I2C output. The board also has four mounting holes allowing it to be used as an input system in place of traditional buttons. The 5V - 3.3V level convertor intergrated | ||
| Line 7: | Line 7: | ||
==Features== | ==Features== | ||
*Low power operation | *Low power operation | ||
| − | * | + | *3.3 V supply operation |
*12 capacitance sensing inputs | *12 capacitance sensing inputs | ||
*Complete touch detection | *Complete touch detection | ||
| Line 14: | Line 14: | ||
*Touch/release threshold and debounce for touch detection | *Touch/release threshold and debounce for touch detection | ||
*3.3V and 5V I2C interface, with Interrupt output | *3.3V and 5V I2C interface, with Interrupt output | ||
| − | + | ||
==Application== | ==Application== | ||
*Switch Replacements | *Switch Replacements | ||
| Line 28: | Line 28: | ||
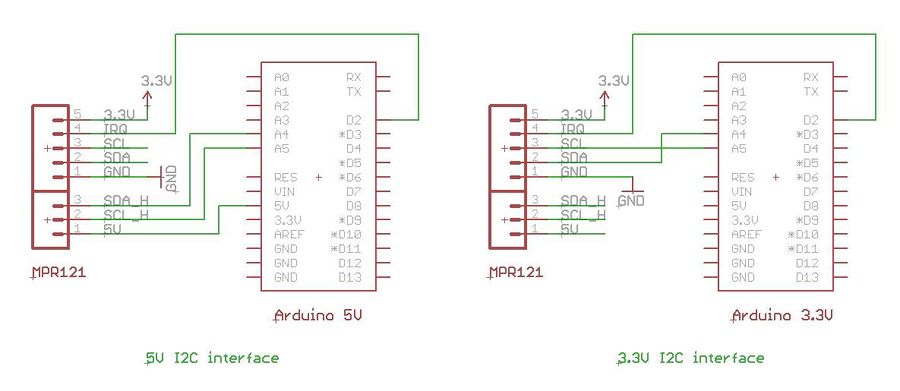
Here is guide illustrate you how to connect MPR121 Touchpad to Arduino. | Here is guide illustrate you how to connect MPR121 Touchpad to Arduino. | ||
| − | [[File:MPR121 wiring.jpg]] | + | [[File:MPR121 wiring.jpg|900px]] |
==Document== | ==Document== | ||
| + | [Arduno example] | ||
| + | |||
| + | [MPR121 datasheet] | ||
| + | |||
| + | [MPR121 Touchpad schematic] | ||
==How to buy== | ==How to buy== | ||
| − | Click here to buy MPR121 Touchpad | + | [Click here to buy MPR121 Touchpad] |
Latest revision as of 06:46, 17 May 2013
Introduction
The MPR121 capacitive keypad uses the MPR121 and 12 touch sensitive pads to give you a simple 'keypad' with an I2C output. The board also has four mounting holes allowing it to be used as an input system in place of traditional buttons. The 5V - 3.3V level convertor intergrated on this keypad provide you the options for 3.3V and 5V I2C interface for your microcontroller.
Features
- Low power operation
- 3.3 V supply operation
- 12 capacitance sensing inputs
- Complete touch detection
- Auto-configuration for each sensing input
- Auto-calibration for each sensing input
- Touch/release threshold and debounce for touch detection
- 3.3V and 5V I2C interface, with Interrupt output
Application
- Switch Replacements
- Touch Buttons
- Touch Keypad
- Touch Slide bar
- Touch Wheel
- Touchpad
- Touch Panel
- Near Proximity Detectio
Usage
Here is guide illustrate you how to connect MPR121 Touchpad to Arduino.
Document
[Arduno example]
[MPR121 datasheet]
[MPR121 Touchpad schematic]
How to buy
[Click here to buy MPR121 Touchpad]

