Difference between revisions of "MMA7361 Triple Axis Accelerometer Breakout"
(→Document) |
|||
| (8 intermediate revisions by the same user not shown) | |||
| Line 19: | Line 19: | ||
==Document== | ==Document== | ||
| − | * [http:// | + | * [http://code.google.com/p/mma7361-library/ MMA7361 library] |
* [http://www.geeetech.com/Documents/MMA7361%20Module%20Schematic%20.pdf MMA7361 Schematic] | * [http://www.geeetech.com/Documents/MMA7361%20Module%20Schematic%20.pdf MMA7361 Schematic] | ||
* [http://www.geeetech.com/Documents/MMA7361L%20Datasheet.pdf MMA7361L Datasheet] | * [http://www.geeetech.com/Documents/MMA7361L%20Datasheet.pdf MMA7361L Datasheet] | ||
==Usage== | ==Usage== | ||
| + | Here is the guide illustrates how to connect an Arduino to the MMA7361 Triple Axis Accelerometer Breakout. The following is a table describing which pins on the Arduino should be connected to the pins on the accelerometer: | ||
| + | |||
| + | |||
[[File:Mma7361 2.jpg|500px]] | [[File:Mma7361 2.jpg|500px]] | ||
| − | [[File:Mma7361 pin.jpg| | + | [[File:Mma7361 pin.jpg|250px]] |
| + | |||
| + | First put on the MMA7361 module on the flat and upload the Arduino example code. Then open the serial monitor, after the calibrating, | ||
| + | MMA 7361 will output the gravity on x, y and z axis. The photo below shows the output data when the accelerometor is lying flat, | ||
| + | the gravity of Z axis is about 100(1 G).Please note keep this module flat when calibrating. | ||
| + | [[File:MMA7361 COM.jpg|350px]] | ||
| − | ==Example code | + | ==Example code== |
#include <AcceleroMMA7361.h> | #include <AcceleroMMA7361.h> | ||
AcceleroMMA7361 accelero; | AcceleroMMA7361 accelero; | ||
| Line 39: | Line 47: | ||
Serial.begin(9600); | Serial.begin(9600); | ||
accelero.begin(13, 12, 11, 10, A0, A1, A2); | accelero.begin(13, 12, 11, 10, A0, A1, A2); | ||
| − | accelero.setARefVoltage( | + | accelero.setARefVoltage(5); //sets the AREF voltage to 3.3V |
accelero.setSensitivity(LOW); //sets the sensitivity to +/-6G | accelero.setSensitivity(LOW); //sets the sensitivity to +/-6G | ||
accelero.calibrate(); | accelero.calibrate(); | ||
| Line 45: | Line 53: | ||
void loop() | void loop() | ||
{ | { | ||
| − | x = accelero. | + | x = accelero.getXAccel(); |
| − | y = accelero. | + | y = accelero.getYAccel(); |
| − | z = accelero. | + | z = accelero.getZAccel(); |
Serial.print("\nx: "); | Serial.print("\nx: "); | ||
Serial.print(x); | Serial.print(x); | ||
| − | Serial.print("\ty: "); | + | Serial.print(" \ty: "); |
Serial.print(y); | Serial.print(y); | ||
| − | Serial.print("\tz: "); | + | Serial.print(" \tz: "); |
Serial.print(z); | Serial.print(z); | ||
| − | delay(500); // | + | Serial.print("\tG*10^-2"); |
| + | delay(500); //make it readable | ||
} | } | ||
| + | |||
==How to buy== | ==How to buy== | ||
Click here to buy [http://www.geeetech.com/mma7361-triple-axis-accelerometer-breakout-p-399.html MMA7361 Triple Axis Accelerometer Breakout] | Click here to buy [http://www.geeetech.com/mma7361-triple-axis-accelerometer-breakout-p-399.html MMA7361 Triple Axis Accelerometer Breakout] | ||
Latest revision as of 00:49, 22 October 2012
Introduction
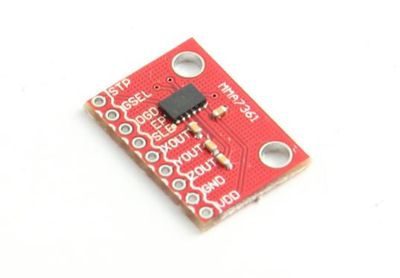
This is a breakout for freescale mma7361l analog three axis accelerometer.The MMA7361L is a low power, low profile capacitive micromachined accelerometer featuring signal conditioning, a 1-pole low pass filter,temperature compensation, self test, 0g-Detect which detects linear freefall,and g-Select which allows for the selection between 2 sensitivities. Zero-g offset and sensitivity are factory set and require no external devices. The MMA7361L includes a Sleep Mode that makes it ideal for handheld battery powered electronics.
Features
- Low Voltage Operation: 2.2 V – 3.6 V
- High Sensitivity (800 mV/g @ 1.5g)
- Selectable Sensitivity (±1.5g, ±6g)
- Fast Turn On Time (0.5 ms Enable Response Time)
- Self Test for Freefall Detect Diagnosis
- 0g-Detect for Freefall Protection
- Signal Conditioning with Low Pass Filter
- Robust Design, High Shocks Survivability
- RoHS Compliant
- Environmentally Preferred Product
- Low Cost
Document
Usage
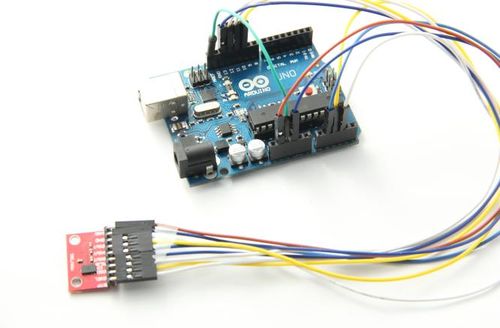
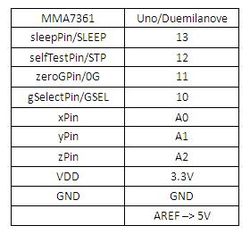
Here is the guide illustrates how to connect an Arduino to the MMA7361 Triple Axis Accelerometer Breakout. The following is a table describing which pins on the Arduino should be connected to the pins on the accelerometer:
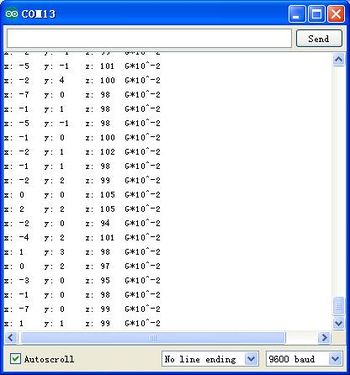
First put on the MMA7361 module on the flat and upload the Arduino example code. Then open the serial monitor, after the calibrating, MMA 7361 will output the gravity on x, y and z axis. The photo below shows the output data when the accelerometor is lying flat, the gravity of Z axis is about 100(1 G).Please note keep this module flat when calibrating.
Example code
#include <AcceleroMMA7361.h>
AcceleroMMA7361 accelero;
int x;
int y;
int z;
void setup()
{
 Serial.begin(9600);
 accelero.begin(13, 12, 11, 10, A0, A1, A2);
 accelero.setARefVoltage(5); //sets the AREF voltage to 3.3V
 accelero.setSensitivity(LOW); //sets the sensitivity to +/-6G
 accelero.calibrate();
}
void loop()
{
 x = accelero.getXAccel();
 y = accelero.getYAccel();
 z = accelero.getZAccel();
 Serial.print("\nx: ");
 Serial.print(x);
 Serial.print(" \ty: ");
 Serial.print(y);
 Serial.print(" \tz: ");
 Serial.print(z);
 Serial.print("\tG*10^-2");
 delay(500); //make it readable
}
How to buy
Click here to buy MMA7361 Triple Axis Accelerometer Breakout


