Difference between revisions of "Arduino ENC28J60 Ethernet Module"
| (One intermediate revision by the same user not shown) | |||
| Line 18: | Line 18: | ||
[[File:ENC28J60 2.jpg|500px]] | [[File:ENC28J60 2.jpg|500px]] | ||
| − | |||
| + | [[File:ENC-table.jpg]] | ||
===Note!!!=== | ===Note!!!=== | ||
| Line 25: | Line 25: | ||
;2.You need to specify the IP address of the Ethernet shield, which is done inside the sketch. byte ip[] = { 10, 0, 0, 177 }; | ;2.You need to specify the IP address of the Ethernet shield, which is done inside the sketch. byte ip[] = { 10, 0, 0, 177 }; | ||
| + | |||
| + | Then enter your Ethernet shield IP address into the URL bar. The Web browser will query inquire the Ethernet shield to return the values from analog input on the Arduino board.As there is nothing plugged into the analog input, their value will change constantly. Press F5 to see the new value. | ||
[[File:ENC28J60 com.jpg|600px]] | [[File:ENC28J60 com.jpg|600px]] | ||
Latest revision as of 02:17, 9 June 2012
Introduction
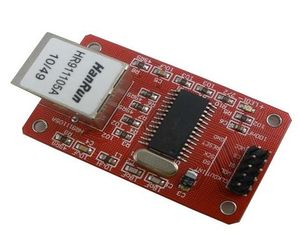
Besides W5100, ENC28J60 is another widely used network chip, the early Arduino network module is accomplished by means of ENC28J60, although later a new Arduino network module come up based on W5100, but the ENC28J60 is also widely used due to its stable and reliable.
Description
- Brand New and High Quality
- With this Ethernet Shield, your Arduino board can be used to connect to internet
- Genuine Microchip's ENC28J60 SPI ethernet controller and HR911102A RJ45 socket
- Open-source TCP/IP protocol stack as an Arduino library.
- Web client application to use Arduino as a distributed network sensor
Usage
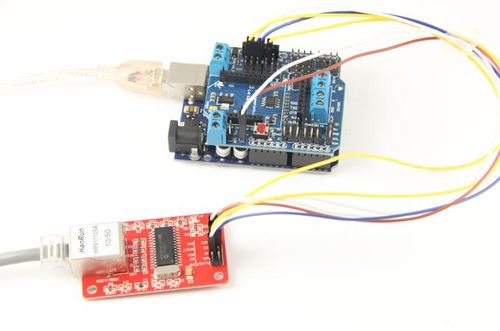
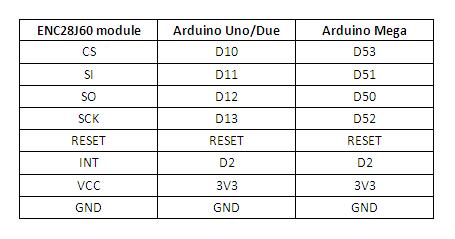
Here is the guide illustrates how to connect an Arduino to the ENC28J60 Ethernet Module. The following is a table describing which pins on the Arduino should be connected to the pins on the ENC28J60 Ethernet Module:
Note!!!
- 1.To get it work, ENC28J60 library need to be used.Due to the function name of ENC28J60 library is same as the original Ethernet library, the original Ethernet library in the library folder must be removed.
- 2.You need to specify the IP address of the Ethernet shield, which is done inside the sketch. byte ip[] = { 10, 0, 0, 177 };
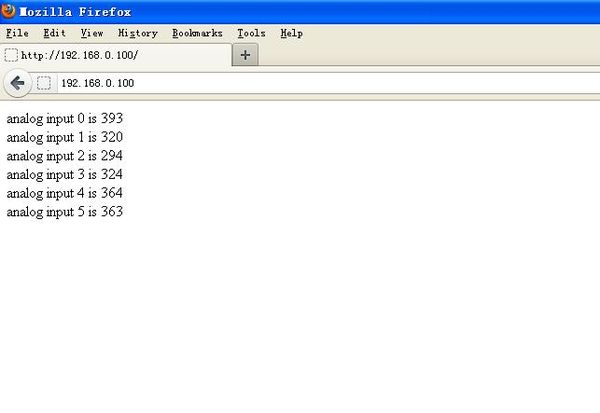
Then enter your Ethernet shield IP address into the URL bar. The Web browser will query inquire the Ethernet shield to return the values from analog input on the Arduino board.As there is nothing plugged into the analog input, their value will change constantly. Press F5 to see the new value.
Example code
Open Arduino IDE Files - Examples - ENC28J60 - WebServer
The IP address in the example code need to be changed for the address assigned to ENC28J60 module.
#include <Ethernet.h>
byte mac[] = { 0xDE, 0xAD, 0xBE, 0xEF, 0xFE, 0xED };
byte ip[] = { 10, 0, 0, 177 };
Server server(80);
void setup()
{
 Ethernet.begin(mac, ip);
 server.begin();
}
void loop()
{
 Client client = server.available();
 if (client) {
   // an http request ends with a blank line
   boolean current_line_is_blank = true;
   while (client.connected()) {
     if (client.available()) {
       char c = client.read();
       // if we've gotten to the end of the line (received a newline
       // character) and the line is blank, the http request has ended,
       // so we can send a reply
       if (c == '\n' && current_line_is_blank) {
         // send a standard http response header
         client.println("HTTP/1.1 200 OK");
         client.println("Content-Type: text/html");
         client.println();

         // output the value of each analog input pin
         for (int i = 0; i < 6; i++) {
           client.print("analog input ");
           client.print(i);
           client.print(" is ");
           client.print(analogRead(i));
           client.println("");
         }
         break;
       }
       if (c == '\n') {
         // we're starting a new line
         current_line_is_blank = true;
       } else if (c != '\r') {
         // we've gotten a character on the current line
         current_line_is_blank = false;
       }
     }
   }
   // give the web browser time to receive the data
   delay(1);
   client.stop();
 }
}
How to buy
Click here to buy Arduino ENC28J60 Ethernet Module


