Difference between revisions of "Arduino RGB Metrix LED Driver shield"
(Created page with "==Introductin== The Colorduino is a RGB LED matrix driver platform basis on ATMega 328P. This design is to make user easily modify or write the firmware of Colorduino by Ar...") |
(→Introductin) |
||
| (2 intermediate revisions by the same user not shown) | |||
| Line 1: | Line 1: | ||
==Introductin== | ==Introductin== | ||
| − | + | [[File:Colorduino 1.jpg]] | |
| − | This design is to make user easily modify or write the firmware of | + | The Colorduino is a RGB LED matrix driver platform basis on ATMega 328P. This design is to make user easily modify or write the firmware of |
| − | Colorduino by Arduino IDE. Colorsduino pairs the M54564 with a single | + | Colorduino by Arduino IDE. Colorsduino pairs the M54564 with a single DM163 constant current driver. By using the DM163, the Colors shield gains three 8+6-bit channels of hardware PWM control of the LED’s freeing up the MCU from having to implement it in software. This gives |
| − | + | the ATmega more CPU bandwidth for performing other tasks. Colorduino is easy to cascade by IIC and Power interface. | |
| − | DM163 constant current driver. By using the DM163, the Colors shield | ||
| − | |||
| − | gains three 8+6-bit channels of hardware PWM control of the LED’s | ||
| − | |||
| − | freeing up the MCU from having to implement it in software. This gives | ||
| − | |||
| − | the ATmega more CPU bandwidth for performing other tasks. Colorduino is | ||
| − | |||
| − | easy to cascade by IIC and Power interface. | ||
==Features== | ==Features== | ||
| − | *8 bits colors support with 6 bits correction for each color in every | + | *8 bits colors support with 6 bits correction for each color in every dots |
| − | |||
| − | dots | ||
*Hardware 16MHz PWM support | *Hardware 16MHz PWM support | ||
*Without any external circuits, play and shine | *Without any external circuits, play and shine | ||
| Line 27: | Line 16: | ||
==Document== | ==Document== | ||
| − | [http://www.geeetech.com/Documents/Colorduino%20library.zip Colorduino | + | [http://www.geeetech.com/Documents/Colorduino%20library.zip Colorduino library] |
| − | |||
| − | library] | ||
==Usage== | ==Usage== | ||
| + | [[File:Colorduino 2.jpg]] | ||
| + | [[File:Colorduino table.jpg]] | ||
| − | Power to the board is either via pin headers or a set of mini screw | + | Power to the board is either via pin headers or a set of mini screw terminals. A slide switch selects between the two. Various Pins are |
| − | + | brought out the edge of the board including RX, TX and DTS, which can be connected to [http://www.geeetech.com/xbee-usb-adapter-module-with-usb-cable-p-418.html FT232 USB adapter] to reprogram the onboard ATmega chip, and SCA and SCL for I2C communication. A green LED on the front of the board indicates power | |
| − | terminals. A slide switch selects between the two. Various Pins are | ||
| − | brought out the edge of the board including RX, TX and DTS, which can be | ||
| − | |||
| − | connected to [http://www.geeetech.com/xbee-usb-adapter-module-with-usb- | ||
| − | |||
| − | cable-p-418.html FT232 USB adapter] to reprogram the onboard ATmega chip, | ||
| − | |||
| − | and SCA and SCL for I2C communication. A green LED on the front of the | ||
| − | |||
| − | board indicates power | ||
| Line 67: | Line 46: | ||
void HSVtoRGB(void *vRGB, void *vHSV) | void HSVtoRGB(void *vRGB, void *vHSV) | ||
{ | { | ||
| − | float r, g, b, h, s, v; //this function works with floats between 0 and | + | float r, g, b, h, s, v; //this function works with floats between 0 and 1 |
| − | |||
| − | 1 | ||
float f, p, q, t; | float f, p, q, t; | ||
int i; | int i; | ||
| Line 86: | Line 63: | ||
else | else | ||
{ | { | ||
| − | h *= 6.0; //to bring hue to a number between 0 and 6, better for the | + | h *= 6.0; //to bring hue to a number between 0 and 6, better for the calculations |
| − | + | i = (int)(floor(h)); //e.g. 2.7 becomes 2 and 3.01 becomes 3 or 4.9999 becomes 4 | |
| − | calculations | ||
| − | i = (int)(floor(h)); //e.g. 2.7 becomes 2 and 3.01 becomes 3 or | ||
| − | |||
| − | 4.9999 becomes 4 | ||
f = h - i;//the fractional part of h | f = h - i;//the fractional part of h | ||
p = (float)(v * (1.0 - s)); | p = (float)(v * (1.0 - s)); | ||
| Line 162: | Line 135: | ||
{ | { | ||
Colorduino.Init(); // initialize the board | Colorduino.Init(); // initialize the board | ||
| − | |||
// compensate for relative intensity differences in R/G/B brightness | // compensate for relative intensity differences in R/G/B brightness | ||
// array of 6-bit base values for RGB (0~63) | // array of 6-bit base values for RGB (0~63) | ||
| Line 168: | Line 140: | ||
// whiteBalVal[1]=green | // whiteBalVal[1]=green | ||
// whiteBalVal[2]=blue | // whiteBalVal[2]=blue | ||
| − | unsigned char whiteBalVal[3] = {36,63,63}; // for LEDSEE 6x6cm round | + | unsigned char whiteBalVal[3] = {36,63,63}; // for LEDSEE 6x6cm round matrix |
| − | |||
| − | matrix | ||
Colorduino.SetWhiteBal(whiteBalVal); | Colorduino.SetWhiteBal(whiteBalVal); | ||
| − | // start with morphing plasma, but allow going to color cycling if | + | // start with morphing plasma, but allow going to color cycling if desired. |
| − | |||
| − | desired. | ||
paletteShift=128000; | paletteShift=128000; | ||
unsigned char bcolor; | unsigned char bcolor; | ||
| Line 200: | Line 168: | ||
==How to buy== | ==How to buy== | ||
| − | Click here to buy [] | + | Click here to buy [http://www.geeetech.com/arduino-rgb-metrix-led-driver-shield-p-467.html [[File:Example.jpg]]Arduino RGB Metrix LED Driver shield] |
Latest revision as of 03:05, 29 May 2012
Introductin
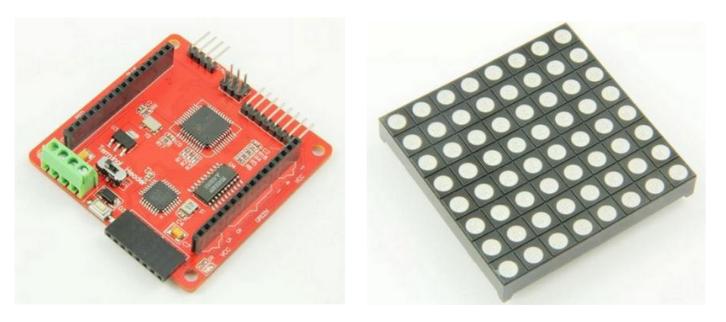
The Colorduino is a RGB LED matrix driver platform basis on ATMega 328P. This design is to make user easily modify or write the firmware of Colorduino by Arduino IDE. Colorsduino pairs the M54564 with a single DM163 constant current driver. By using the DM163, the Colors shield gains three 8+6-bit channels of hardware PWM control of the LED’s freeing up the MCU from having to implement it in software. This gives the ATmega more CPU bandwidth for performing other tasks. Colorduino is easy to cascade by IIC and Power interface.
Features
- 8 bits colors support with 6 bits correction for each color in every dots
- Hardware 16MHz PWM support
- Without any external circuits, play and shine
- Dedicated GPIO and ADC interface
- Hardware UART and IIC communication with easy cascading
- 24 constant current channels of 100mA each
- 8 super source driver channels of 500mA each
Document
Usage
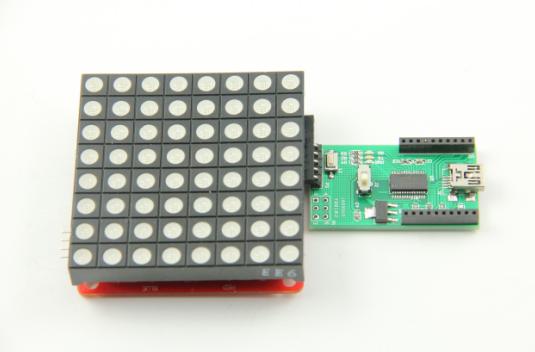
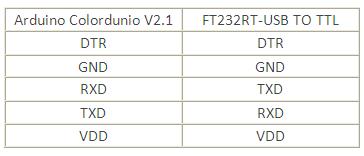
Power to the board is either via pin headers or a set of mini screw terminals. A slide switch selects between the two. Various Pins are brought out the edge of the board including RX, TX and DTS, which can be connected to FT232 USB adapter to reprogram the onboard ATmega chip, and SCA and SCL for I2C communication. A green LED on the front of the board indicates power
Example code
#include <Colorduino.h>
typedef struct
{
 unsigned char r;
 unsigned char g;
 unsigned char b;
} ColorRGB;
//a color with 3 components: h, s and v
typedef struct
{
 unsigned char h;
 unsigned char s;
 unsigned char v;
} ColorHSV;
unsigned char plasma[ColorduinoScreenWidth][ColorduinoScreenHeight];
long paletteShift;
//Converts an HSV color to RGB color
void HSVtoRGB(void *vRGB, void *vHSV)
{
 float r, g, b, h, s, v; //this function works with floats between 0 and 1
 float f, p, q, t;
 int i;
 ColorRGB *colorRGB=(ColorRGB *)vRGB;
 ColorHSV *colorHSV=(ColorHSV *)vHSV;
 h = (float)(colorHSV->h / 256.0);
 s = (float)(colorHSV->s / 256.0);
 v = (float)(colorHSV->v / 256.0);
 //if saturation is 0, the color is a shade of grey
 if(s == 0.0) {
   b = v;
   g = b;
   r = g;
 }
 //if saturation > 0, more complex calculations are needed
 else
 {
   h *= 6.0; //to bring hue to a number between 0 and 6, better for the calculations
   i = (int)(floor(h)); //e.g. 2.7 becomes 2 and 3.01 becomes 3 or 4.9999 becomes 4
   f = h - i;//the fractional part of h
   p = (float)(v * (1.0 - s));
   q = (float)(v * (1.0 - (s * f)));
   t = (float)(v * (1.0 - (s * (1.0 - f))));
   switch(i)
   {
     case 0: r=v; g=t; b=p; break;
     case 1: r=q; g=v; b=p; break;
     case 2: r=p; g=v; b=t; break;
     case 3: r=p; g=q; b=v; break;
     case 4: r=t; g=p; b=v; break;
     case 5: r=v; g=p; b=q; break;
     default: r = g = b = 0; break;
   }
 }
 colorRGB->r = (int)(r * 255.0);
 colorRGB->g = (int)(g * 255.0);
 colorRGB->b = (int)(b * 255.0);
}
float dist(float a, float b, float c, float d)
{
 return sqrt((c-a)*(c-a)+(d-b)*(d-b));
}
void
plasma_morph()
{
 unsigned char x,y;
 float value;
 ColorRGB colorRGB;
 ColorHSV colorHSV;
 for(y = 0; y < ColorduinoScreenHeight; y++)
   for(x = 0; x < ColorduinoScreenWidth; x++) {
     {
      value = sin(dist(x + paletteShift, y, 128.0, 128.0) / 8.0)
         + sin(dist(x, y, 64.0, 64.0) / 8.0)
         + sin(dist(x, y + paletteShift / 7, 192.0, 64) / 7.0)
         + sin(dist(x, y, 192.0, 100.0) / 8.0);
       colorHSV.h=(unsigned char)((value) * 128)&0xff;
       colorHSV.s=255;
       colorHSV.v=255;
       HSVtoRGB(&colorRGB, &colorHSV);
       Colorduino.SetPixel(x, y, colorRGB.r, colorRGB.g, colorRGB.b);
     }
 }
 paletteShift++;
 Colorduino.FlipPage(); // swap screen buffers to show it
}
/********************************************************
Name: ColorFill
Function: Fill the frame with a color
Parameter:R: the value of RED.   Range:RED 0~255
         G: the value of GREEN. Range:RED 0~255
         B: the value of BLUE.  Range:RED 0~255
********************************************************/
void ColorFill(unsigned char R,unsigned char G,unsigned char B)
{
 PixelRGB *p = Colorduino.GetPixel(0,0);
 for (unsigned char y=0;y<ColorduinoScreenWidth;y++) {
   for(unsigned char x=0;x<ColorduinoScreenHeight;x++) {
     p->r = R;
     p->g = G;
     p->b = B;
     p++;
   }
 }
   Colorduino.FlipPage();
}
void setup()
{
 Colorduino.Init(); // initialize the board
 // compensate for relative intensity differences in R/G/B brightness
 // array of 6-bit base values for RGB (0~63)
 // whiteBalVal[0]=red
 // whiteBalVal[1]=green
 // whiteBalVal[2]=blue
 unsigned char whiteBalVal[3] = {36,63,63}; // for LEDSEE 6x6cm round matrix
 Colorduino.SetWhiteBal(whiteBalVal);
 // start with morphing plasma, but allow going to color cycling if desired.
 paletteShift=128000;
 unsigned char bcolor;
 //generate the plasma once
 for(unsigned char y = 0; y < ColorduinoScreenHeight; y++)
   for(unsigned char x = 0; x < ColorduinoScreenWidth; x++)
   {
     //the plasma buffer is a sum of sines
     bcolor = (unsigned char)
     (
           128.0 + (128.0 * sin(x*8.0 / 16.0))
         + 128.0 + (128.0 * sin(y*8.0 / 16.0))
     ) / 2;
     plasma[x][y] = bcolor;
   }
// to adjust white balance you can uncomment this line
// and comment out the plasma_morph() in loop()
// and then experiment with whiteBalVal above
// ColorFill(255,255,255);
}
void loop()
{
 plasma_morph();
}
How to buy
Click here to buy File:Example.jpgArduino RGB Metrix LED Driver shield


